Transkript
Verschiedene Arten von Musik und Übergängen sowie viele andere Elemente werden verwendet, um Sportvideos zu bearbeiten, damit sie intensiver wirken und das Publikum ansprechen, wenn sie das Video ansehen. Sie können Sportvideos mit Hilfe von Wondershare Filmora bearbeiten.
Sie erhalten vier verschiedene Videos, von denen jedes aus einem anderen Blickwinkel aufgenommen wird. Die Personen im Video werden verschiedene Aktivitäten ausführen.
Machen Sie einen Nahaufnahme-Aufnahme beim Training. Machen Sie eine Aufnahme beim Spiel. Nehmen Sie eine weitere Aufnahme mit dem Team auf oder verwenden Sie ein Porträt der einzelnen Spieler. Und schließlich fügen Sie eine weitere Aufnahme des gesamten Teams hinzu.
Verschiedene Blickwinkel helfen Ihnen, die besten Ergebnisse zu erzielen.
Sie benötigen auch einige Audioeffekte. Im Audiomenu haben Sie viele Optionen. Für ein intensives Video können Sie Beat-Musik oder etwas verwenden, das zur Energie im Video passt.
Wählen Sie ein Lied Ihrer Wahl aus und markieren Sie die Beats des Songs. Klicken Sie mit der rechten Maustaste auf den Song und wählen Sie die Option zur Beat-Erkennung, die die Beats erkennt.
Fügen Sie dies in Ihre Timeline ein und sehen Sie sich die Markierungen an, die Sie genau dort führen, wo es einen Beatwechsel gibt.
Entfernen Sie die erste Hälfte, die ruhig ist, und wechseln Sie zum schnellen Teil. Gehen Sie mit den Markierungen vor und passen Sie die Position an, indem Sie darauf klicken und sie auf die andere Seite ziehen.
Vous pouvez changer la position des marqueurs. Lorsque les ondes audio sont élevées, il y aura beaucoup de battements. Nous aurons donc une partie introductive et une partie intégrale. Maintenant, associez les vidéos avec les marqueurs. Allez dans les médias et alignez les vidéos dans l'ordre que vous souhaitez.
Commencez par la vidéo introductive. Maintenant, pour la division, utilisez le ramping de vitesse et les transitions.
Au premier marqueur, cliquez sur le ramping de vitesse, allez dans les paramètres personnalisés, et ajouter un éclairage cadre à cet endroit. Passez ensuite au marqueur suivant et réglez la vitesse. Au milieu, ajoutez une image-clé pour accélérer la vidéo. Ajoutez deux images-clés si vous le souhaitez.
Maintenant, poursuivez avec le ramping de vitesse et alignez tous les marqueurs que vous avez créés.
Juste après la zone qui commence plus rapidement, ramenez-le à la vitesse normale, puis ralentissez-le. Ajoutez une image-clé. Puis passez à un autre marqueur et ralentissez cette zone. Prenez la deuxième image-clé et ramenez-la au même niveau.
Jouez simplement avec le ramping de vitesse jusqu'à ce que vous ayez aligné tous les marqueurs. Cliquez sur OK. Divisez la vidéo d'introduction, puis passez à une autre vidéo, qui est la vidéo de la pièce.
Ensuite, passez à la vidéo de pratique. Et enfin, passez à la dernière vidéo. Faites les mêmes choses que celles faites avec la première. Regardez les marqueurs et utilisez le ramping de vitesse pour accélérer ou ralentir.
Après avoir fini de ralentir toutes vos vidéos, il est temps d'ajouter quelques effets supplémentaires.
Allez dans le menu des effets et tapez "vintage". Vous pouvez utiliser différents filtres de votre choix. Ensuite, ajoutez-le au-dessus de vos vidéos. Maintenant, vous obtiendrez de belles couleurs et cela donne un aspect plus sérieux.
Sain nyt mennä tehovaikutusvalikkoon ja kirjoittaa rakeita, lisätä ne vain tehdäkseen sen näyttämään tyylikkäämmältä. Varmista, että se sopii videoihin. Ja jos se on liikaa, niin kaksoisnapsauta sitä pienentääksesi tehovaikutuksen läpinäkyvyyttä.
Infine, puoi continuare ad aggiungere alcune perdite di luce, che aiuteranno soprattutto nei video senza azione. Se vuoi aggiungere qualche azione, la perdita di luce è perfetta per il giocatore.
Fai clic sul menu degli effetti e inserisci la luce che perde. Lì avrai molte opzioni. Puoi anche aggiungere alcune transizioni per rendere questo effetto più fresco. Vai a fare qualsiasi trasformazione tu voglia. Aggiungi questo direttamente tra due video. E' cosi' che si ottiene l'effetto.
Ora il video sembra più attraente. Segui gli stessi passaggi per creare questo effetto.
Crea video di effetti sportivi
Devi prepararti:
- Computer (Windows o macOS)
- Tuo materiale video.
- Editor video di Filmora
Scarica e installa Filmora
Innanzitutto, è necessario installare l'ultima versione del software sul sistema. Che si tratti di Windows o Mac, Filmora supporta entrambi i principali sistemi operativi.

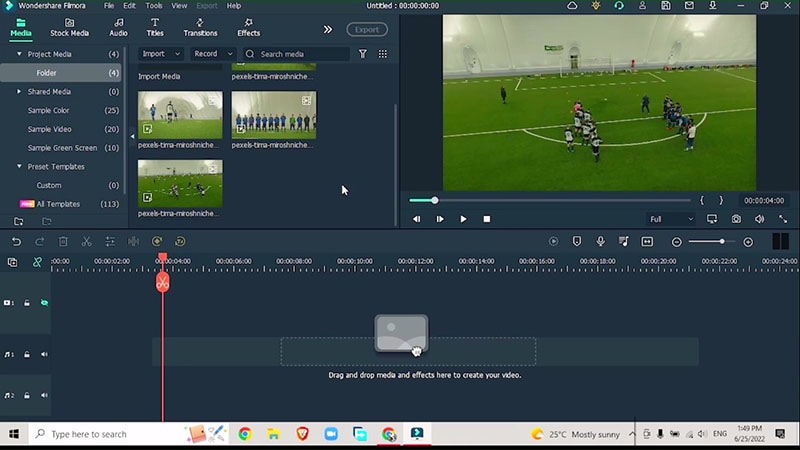
Import the Sports Videos
After installing, launch the Filmora timeline to get started with the sports video editing. Choose your favorite sports team videos and import them onto the Filmora 11 timeline.
Make sure the different videos are recorded from different angles.
Add Audio
You will need background audio for all of our footage so for that, you need to quickly add audio before dragging your videos down to the timeline. Because the sample videos are intense, so choose upbeat audio to match the music with the energy of the players in the sports video.
Go to Audio > Beat Music > Go big or go home (you can add your favorite audio considering the type of sports video you have imported onto your Filmora 11 timeline.
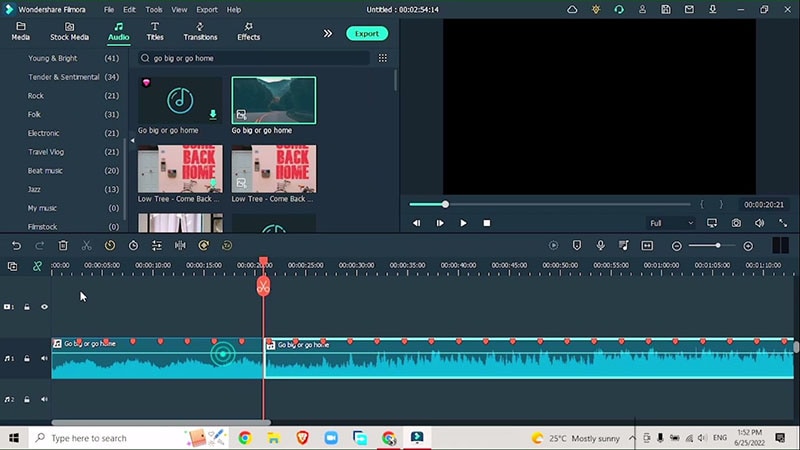
Right-click on the song, and hit beat detection. Drag it down onto your timeline. You will see red markers which show the beat detection points indicating a change in the beat.
Mark the introduction and beat drop parts in your audio so merge it with the imported video.
Adjust the Speed
Go to Media > Align the video. Drag the team introduction video down first, and adjust the speed ramping to merge the audio. Click on time > speed > speed ramping. Go to customize, and add a keyframe. Drag the keyframe to adjust the speed. You can increase the speed according to the audio beat.
Match all the markers and adjust the speed by increasing or decreasing the slider.
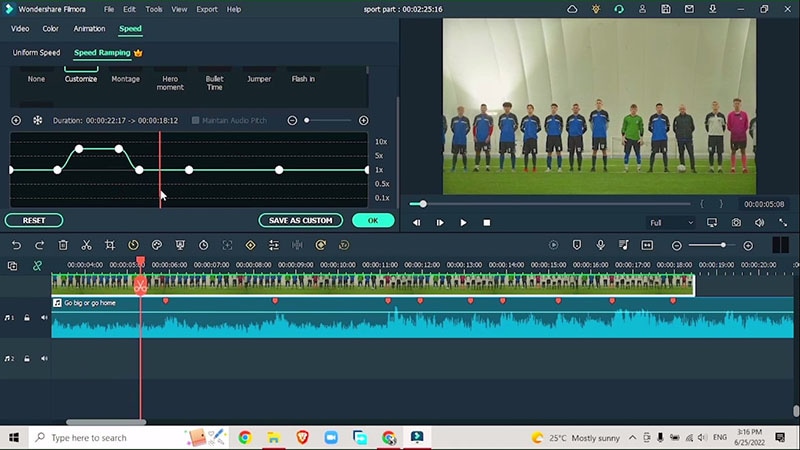
After the introduction video, drag down the other videos which include videos of the players playing. Adjust the speed similarly as demonstrated above. Drag the sliders in the speed ramping section to either slow down or fast the videos.
Add Additional Effects
After adjusting the speed ramping of all your imported footage, it’s time to add some additional effects to tie the sections together.
Go to Effects > Vintage > Vintage X process (you can choose any vintage effect of your choice). Add the effect on the top track to add some interesting colors.
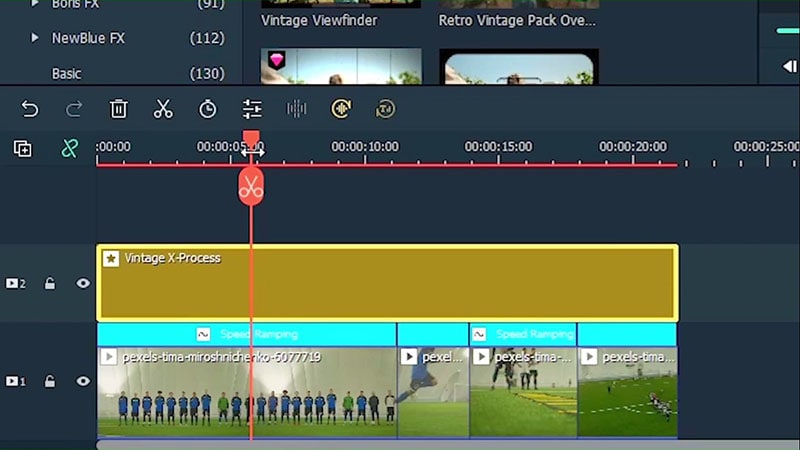
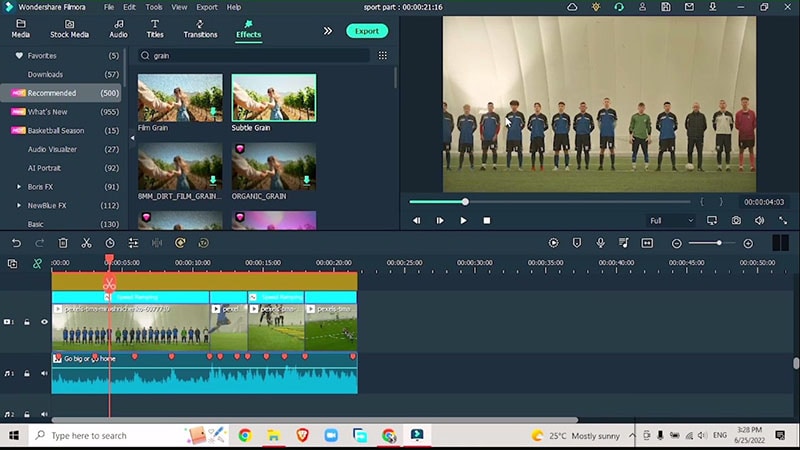
Similarly, go to the Effects menu, search for grain effects and add a subtle grain effect to make the video look more natural. Place it on the top track above the vintage effect. Increase the length of the effect to match the video.
You can also adjust the intensity of the grain effect by double-clicking on the effect and lowering the slider towards the left.
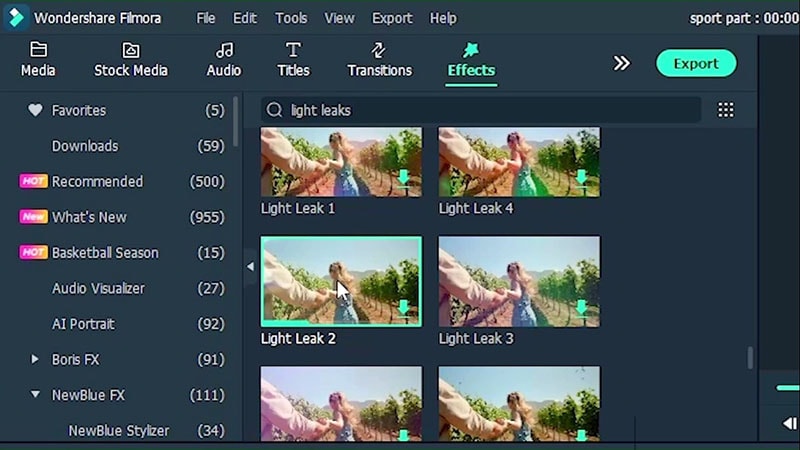
Add Light Leaks
In the videos, where there is no action, it is suggested to add an interesting effect like a light leak which increases audience engagement in your videos. The light leaks also add some sort of creative digital movement to your videos.
Go to effects > Light Leaks > Light Leak 1 (or choose any light leak effect which you prefer according to your video).
Finish with Transitions
To make your videos look fancier, add transitions to tie the sections of your videos together. Go to the transition menu > Glitch > Glitch Intro effect (or you can add any glitch effect of your choice).
Don’t forget to add the glitch transition in between the sections of your video. Adjust the duration of the transition and you’re good to go.

The different sections of your sports videos are tied up together by professional editors by using multiple cool effects, transitions, and background audio effects. By adding these overlays, music, and transition, you can transform your sports video into professional highlights just exactly as are shown on the TV.

Speak Your Mind