Transcript
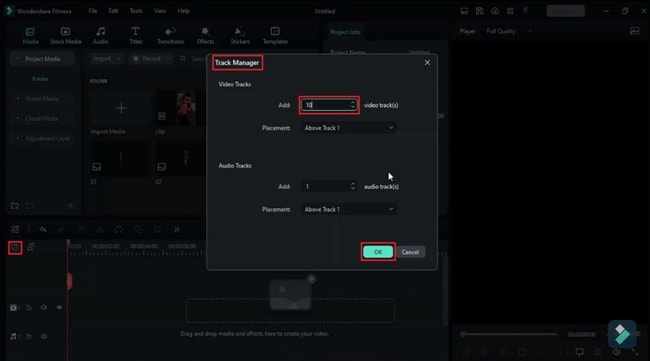
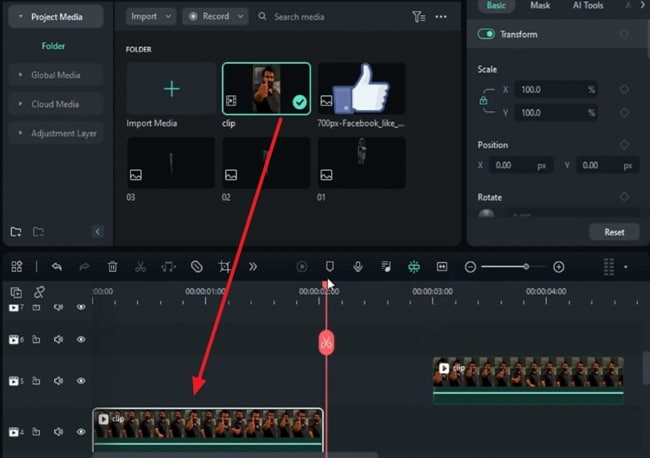
In this video, we will create this magic finger trick in Wondershare Filmora. First, shoot a video showing a thumbs up. Then, you need a few mechanical parts, which you will get from any free PNG website. Add 10 more tracks on "Track Manager." Drop your main clip at track 4. Identify the start of the effect and split the clip. Then, split the clip at the end of the effect and shift the second split part to track 2.
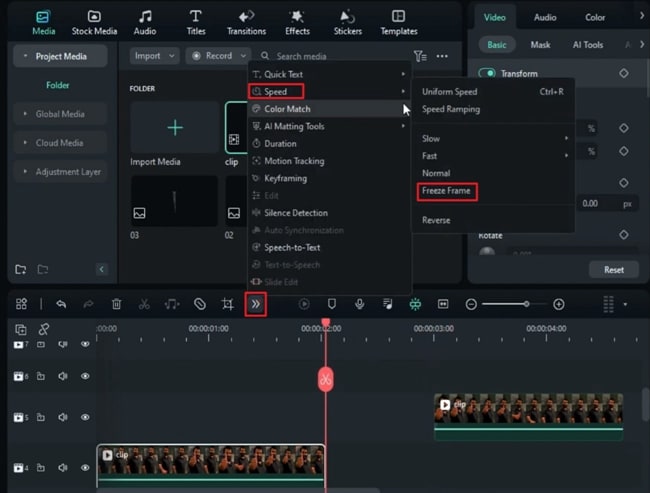
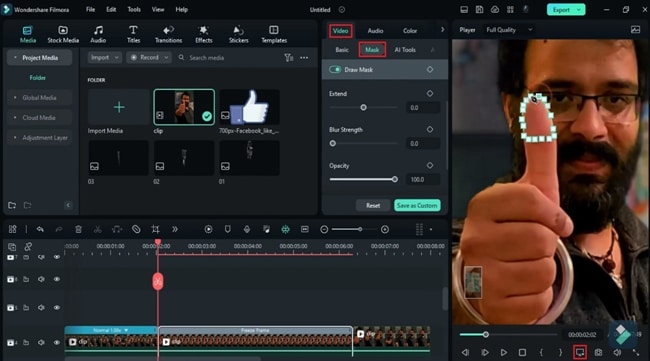
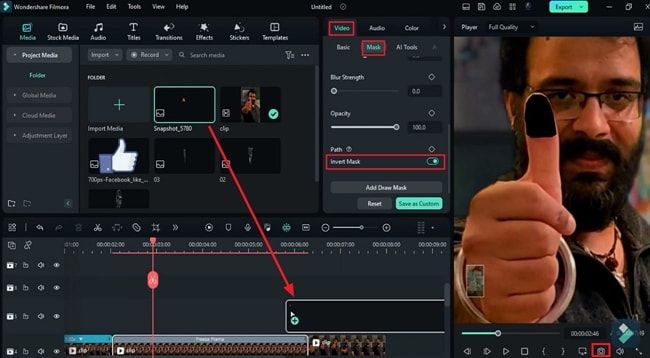
Add a "Freeze Frame" at the end of the first split part. Keep the freeze frame for 6 seconds and the 15th frame. Then, place the second split part right after the freeze frame. Split the clip at the start of the freeze frame. Then go to the "Mask," select the pen tool, zoom in to 75%, and create a mask around the thumb's upper part. Take a snapshot of it and "Invert" the mask.
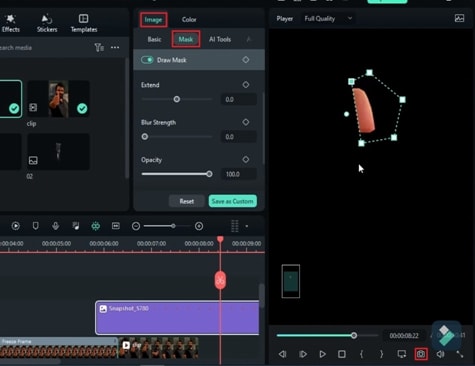
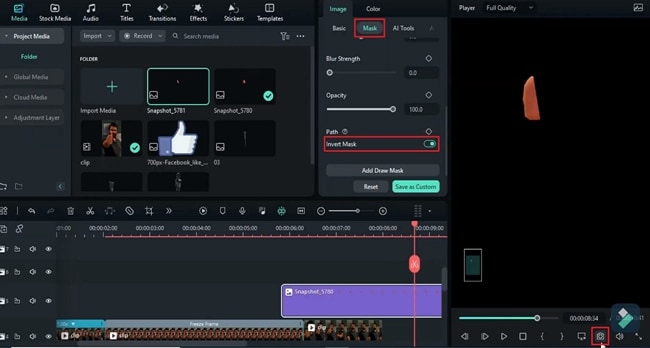
Now, drop the thumb snapshot on track 5 at blank space. Go to the "Mask," and select the pen tool to mask the half area of the thumb. Take a snapshot, "Invert Mask," take a snapshot again. "Delete" the thumb snapshot from the timeline. Drop both half-thumb snapshots on tracks 8 and 9.
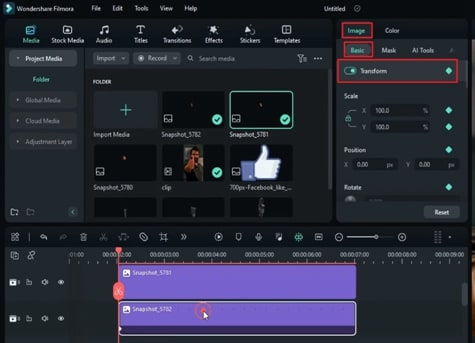
Turn on the "Transform" keyframe at the start of both snapshots. Then, go 10 frames forward, change "X" to -30 for track 8 snapshot, and set "X" to 30 for track 9 snapshot. Then, add a blank keyframe on both snapshots at 6 seconds. Go 10 frames forward and change "X" to zero on both snapshots. Shrink the snapshot to the last keyframe.
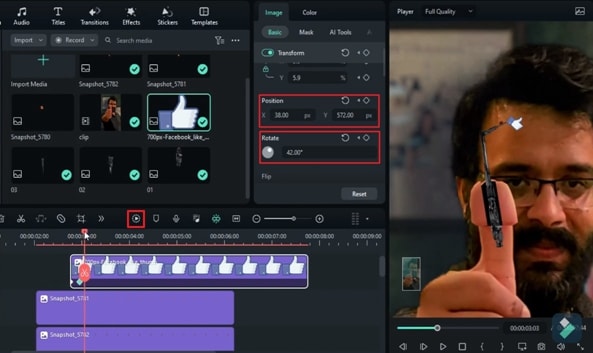
Adjust the main clip freeze frame according to the snapshots. Stop at the frame when the thumb is half open. Drop the first mechanical part PNG on track 3. Turn on the "Transform" keyframes. Adjust its "Position." Then, change "Scale" to 13.2. Now "Rotate" it and adjust "Position" again; take it behind the thumb.
Dopo 8 fotogrammi, utilizzare "X" e "Y" per posizionare la parte semi-meccanica nella parte nera. Rimuovere la parte meccanica completa in 5 fotogrammi. Dopo 5 fotogrammi, abbassare la parte meccanica. Quindi, il clip meccanico viene diviso tra il secondo e il terzo fotogramma chiave. Passaggio al binario 5; Questo produrrà un effetto pop-up.
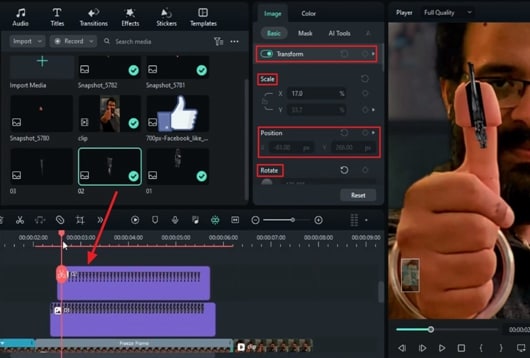
Posizionare la seconda parte meccanica tra il terzo e il quarto fotogramma chiave della traccia 3. Regola la sua "posizione". Gira 171 giri. Riduci il "rapporto" e nascondilo dietro il primo componente meccanico. Apri i fotogrammi chiave Trasforma, sblocca Zoom, avanza 12 fotogrammi e aggiungi "Y" e "Posizione" per renderli visibili.
Quindi, il rapporto "Y" è ridotto a 18,4 e il rapporto "X" è ridotto a 14,6. Aumenta la scala "Y" di più per renderla più alta. Mantieni la "Y" a 38.6 e regola la sua "posizione".
Then split the second mechanical part after three frames. Shift it to the same "Position" on track 6. Place the first part at 5 seconds and the 49th frame, and reduce clip duration. Then, add blank keyframes 13 frames backward.
Next, go 5 frames forward and change "Y" to "Position" to bring the first part in the middle of the thumb. Split it here and place the split part on track 3. Slide the mechanical part between the thumb at the end.
Then decrease the duration of the second part. Turn on "Transform" keyframes 10 frames backward. Then, after 5 frames, change the "Y" "Scale" to 13.5. Adjust its "Position" and split it here. Shift the split part to track 3 and make it disappear from the screen at the endpoint.
Drop the third part at 2 seconds and 38 frames. Do "Scale" and adjust its "Position" over the second mechanical part. Turn on "Transform" keyframes, and go 10 frames forward. "Rotate" it by –115 and adjust its "Position" on the tip of a second mechanical part. It will create an opening effect.
Turn on “Transform” keyframes at 5 seconds and 28th frame. Then, go 10 frames forward to create a closing effect by placing it at its starting point. Then locate the first keyframe and drop this PNG on track 9. Reduce its "Scale" to 2 and adjust its "Position" on the tip of the third mechanical part.
Reduce "Scale" to zero, then go to the second keyframe of the mechanical part and increase the PNG scale to 5.9. Adjust its "Position" on the edge. Go 15 frames forward, change "Rotation" to -22, and adjust its "Position" on edge
Apri Trasforma fotogrammi chiave in avanti da 20 a 25 fotogrammi. Quindi, crea un effetto goccia d'acqua e regola la "posizione". Quindi, dopo 10 fotogrammi, cambia "rotazione" in 105 e regola la sua "posizione". Usa lo stesso processo per creare un effetto swing. Basta ricordare di rimanere come PNG sul bordo e cambiare ogni 10 fotogrammi dopo ruotare a 105, quindi a 78. È possibile aggiungere modifiche utilizzando valori diversi per creare effetti swing reali. Infine, inverti l'effetto di apertura per creare un effetto di chiusura. Ora, vediamo le finali.
Guida all'aggiunta di trucchi per le dita magiche con Filmora
What you need to prepare:
- A computer (Windows or macOS)
- Your video materials.
- Filmora video editor
Import the Video and Add Tracks
Begin the process by shooting a video including the object on which you want to apply the revealing effect. Import this video into the media panel after starting the new project. You need to add 10 more tracks to the timeline to create this effect.
Per fare ciò, vai alla barra degli strumenti della sequenza temporale e fai clic sull'icona "Gestisci tracce" nell'angolo in alto a sinistra. Sullo schermo appare una piccola finestra in cui è possibile aggiungere un numero qualsiasi di tracce e selezionare OK per applicare le impostazioni.
Riconoscimento dei punti degli effetti dell'applicazione
Seleziona il video clip e posizionalo sulla traccia della sequenza temporale. Spostando la testina di riproduzione, determinare il punto iniziale e finale dell'effetto da applicare. Puoi dividere la clip in due punti. Quando dividi il video, seleziona la seconda sezione divisa e trascinala su un'altra traccia.
Aggiungi un fermo immagine nella prima parte
Seleziona la prima parte della clip e vai alla barra degli strumenti della sequenza temporale. Fare clic sull'icona "Altro" e selezionare "Velocità" dall'elenco a discesa. Ora, aggiungi "stop motion" dal menu esteso alla fine di questo frammento. Tenere premuto per alcuni secondi e posizionare la seconda parte divisa davanti al frame di congelamento sulla stessa traccia.
Dividi il quadro congelato per creare una maschera
Allo stesso modo, la prima clip dello stop-motion viene applicata all'inizio dello stop-motion. Fare doppio clic sulla clip di congelamento e andare al pannello delle impostazioni a destra. Nella scheda Video, vai alla sezione Maschera e seleziona l'opzione Disegna maschera per disegnare manualmente la maschera attorno all'oggetto.
Ingrandisci da "Impostazioni display" nella parte inferiore del pannello di anteprima per trovare i dettagli per applicare la maschera in modo più accurato.
Scatta un'istantanea della maschera
Dopo aver disegnato la maschera, cerca l'icona della fotocamera nella parte inferiore del pannello di anteprima per scattare un'istantanea della maschera. Fare clic su "OK" dalla finestra pop-up per salvare questa istantanea nel pannello multimediale. Passare alle impostazioni della maschera e scorrere verso il basso per abilitare l'opzione Inverti maschera. Trascina questa istantanea e posizionala su una traccia della sequenza temporale senza un livello video.
Dividi l'oggetto maschera in due metà
Inoltre, seleziona un'istantanea sulla sequenza temporale, vai alle impostazioni della maschera nella scheda Immagine e Disegna una maschera attorno a metà area dell'oggetto. Ottieni una "istantanea" della maschera e salvala nel supporto facendo clic su "OK".
Ora puoi "invertire" la maschera che hai creato per ottenere l'altra metà dell'oggetto. Ancora una volta, salvalo scattando una "istantanea" di questa maschera invertita. È possibile selezionare l'icona Elimina per rimuovere l'istantanea originale dell'oggetto dalla sequenza temporale precedentemente eliminata.
Posiziona gli oggetti divisi nella sequenza temporale
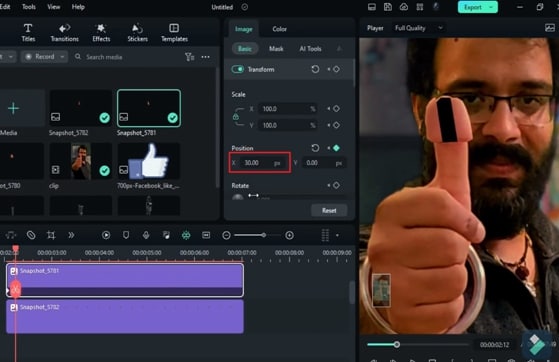
Select both the snapshots of the half objects and drop them onto the timeline on different tracks as video layers. To start applying the effect on both snaps, go to the “Image” settings and enter the "Basic" section. Enable the "Transform" button and add keyframes at the beginning of both these snaps.
Create the Opening and Closing Effect
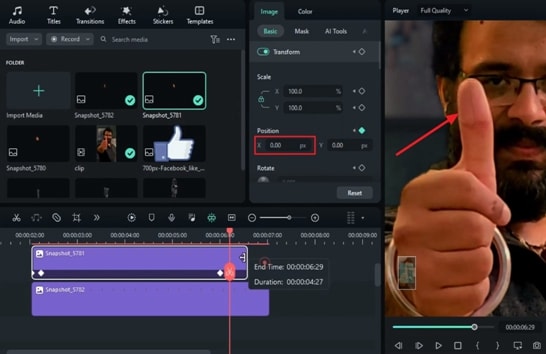
After placing the playhead at the required frames towards the right, select both the tracks containing the half objects one by one and change their “Position" on "X" to make them move apart. Similarly, you can add a blank keyframe by moving the playhead at the required frames.
Now, bring those split parts of the object closer to each other by applying a keyframe at that point and adjusting the “Position” to zero. You can trim the excess parts of the snapshot. Furthermore, adjust the freeze frame duration according to the snapshots' duration.
Adding the Revealing Object Layer
Select the freeze frame clip and move the playhead to the point where your subject is half-split. Import the object's media in PNG format to apply the revealing effect on this object. Place this object at another track below the above video layers.
Double-click this track, and from the settings, enable the "Transform" keyframe under the "Basic" tab of the "Image." Here, you can add a keyframe and adjust the "Scale," "Position," and "Rotation" of this object accordingly.
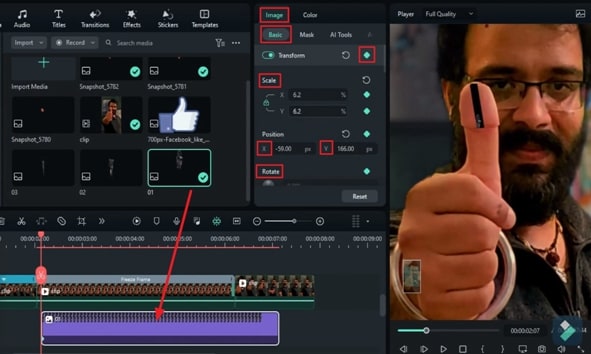
Create the Revealing Effect
Make sure to adjust the "Position" on "X" and "Y" so that the hidden effect is created. Further, move the playhead a few frames forward. Add multiple keyframes by readjusting the "Scale," "Position," and "Rotation." You can gradually reveal the object by making the split parts move apart.
To create the pop-out effect, select the revealing object on the timeline. Split this clip after the initial keyframes and drop the second half part on the track above the freeze frame track. You can repeat the same process to apply the revealing effect for multiple objects. Make sure to place the layers of the objects a few frames ahead of the previous ones.
Furthermore, you can add “Transform” keyframes at the end of these layers and adjust the “Position” to create the hiding effect on your object.
Swing Effect on the Objects
If you want to attach another object and create an opening effect. Drop this object on the top track as a new video layer. Adjust its "Position," "Scale," and "Rotation" at the start and end points of this video layer to create the opening and closing effects.
Add keyframes to lock the settings on those specific points. Here, you can add more objects and create the swing effect by adding multiple keyframes and readjusting the size, "Position," and "Rotation" into the video layer. Do the same process in reverse to create the closing effect. Hit the "Render Preview" on the timeline toolbar to see the final results.
Wondershare Filmora has made the video editing process quick and easy. You can create multiple magic effects in your videos by using its built-in tools. This guide has taught you to apply the hiding, revealing, and splitting effects on multiple video layers. Following this step-by-step guide, you can easily create these magical effects for your projects.


Speak Your Mind