Transcript
Dans cette vidéo, nous créerons un effet DJ Bouncing super cool dans Wondershare Filmora. Avant de commencer le montage, vous devez télécharger ces éléments de contour néon sur pixabay.com. Déposez le clip 1 sur la piste 1 et gardez-le pendant 3 secondes et 10 images. Activez la clé "Opacité" au début, changez-la à 0 %, puis à 1 seconde et 20 images, passez à "Opacité" à 100 %.
Déposez le clip 2 sur la piste 1 ; gardez-le pendant 8 secondes et 10 images. Ensuite, divisez-le à 4 secondes et la 17e image. Dupliquez-le sur la piste 5, utilisez "Smart Cutout" pour sélectionner le DJ, lancez et enregistrez. Masquez la piste et revenez à la piste 1, "Motion Tracking," sur ce clip divisé. Placez-le sur l'appareil DJ et suivez-le, puis déposez le PNG de l'ensemble DJ sur la piste 6, et sous le suivi de mouvement, liez-le à la piste 1.
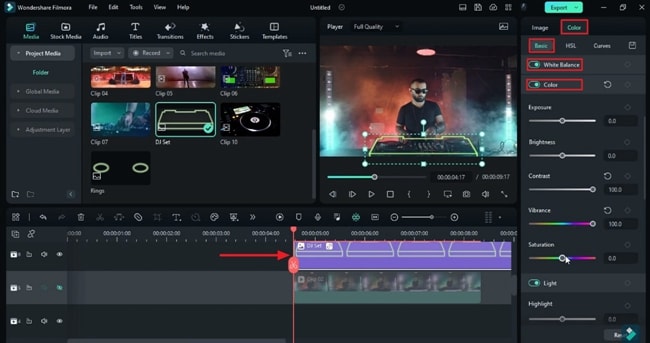
Déverrouillez ensuite la "Échelle" pour l'ensemble DJ, ajustez sa position sur l'ensemble DJ, puis passez à la couleur, changez "Contraste", "Vibrance" et "Saturation" à 100.
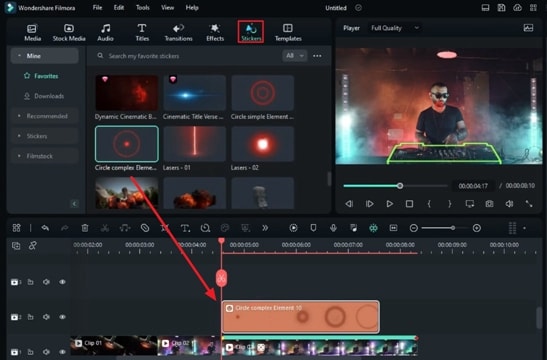
Ajustez la "Durée", puis passez aux "Stickers" et déposez l'élément Circle 10 sur la piste 2. Passez à la vitesse et réglez la "Durée" sur 12 images. Réglez l'"Échelle" à 130 au début et l'"Échelle" à 180 à la fin. Dupliquez sur la même piste, puis déposez l'élément Circle 12 sur la piste 3 et répétez les mêmes étapes.
Passez à la "Couleur" et changez "Exposition", "Luminosité" et "Contraste" à 100. "Vibrance" et "Saturation" à -100, et "Accentuation" à 100. Dupliquez ensuite, puis déposez l'élément Circle sur la piste 4. Suivez les mêmes étapes.
Ensuite, déposez les anneaux sur la piste 7, déverrouillez la "Échelle", gardez-le pendant 12 images, changez "X" à 49,7 et "Y" à 37,5 au début, et ajustez sa "Position". Après trois images, déplacez vers le haut à droite et changez "X" à 50 et "Y" à 40. À la fin, réglez "X" à 70 et "Y" à 60, dupliquez sur la même piste. Ensuite, supprimez la première image clé, déplacez la deuxième image clé au début et dupliquez à nouveau.
Applica l'effetto Chaos 2 sulla traccia 8 e mantieni 12 fotogrammi. Disattiva "RGB Separation" e scarta Chaos 1 dopo Chaos 2. Mantieni 12 fotogrammi e disattiva "RGB Separation". Copia entrambi gli effetti e incolla ulteriormente fino alla fine. Quindi posizionare la terza clip sulla traccia 1 e tenerla per 11 secondi, fotogramma 27. Dividi a 9 secondi e 27 fotogrammi. Seleziona la prima parte divisa e usa Taglia intelligente per mascherare queste schermate. Quindi vedrai solo lo schermo.
Applica l'effetto Chaos 2 sulla traccia 8 e mantieni 12 fotogrammi. Disattiva "RGB Separation" e scarta Chaos 1 dopo Chaos 2. Mantieni 12 fotogrammi e disattiva "RGB Separation". Copia entrambi gli effetti e incolla ulteriormente fino alla fine. Quindi posizionare la terza clip sulla traccia 1 e tenerla per 11 secondi, fotogramma 27. Dividi a 9 secondi e 27 fotogrammi. Seleziona la prima parte divisa e usa Taglia intelligente per mascherare queste schermate. Quindi vedrai solo lo schermo.
Vai alle opzioni "Taglia intelligente" e "Invertire". Quindi copiare la traccia due, impostare l'inizio in nove secondi e l'ottavo fotogramma. Quindi vai a Maschera e usa la maschera Lineare per nascondere lo schermo a destra. Quindi, imposta la "scala" a 370 all'inizio e impostala su 100 a 9 secondi e 11 frame. Copialo sulla traccia tre e imposta l'ora di inizio a 9 secondi e 24 fotogrammi. Vai a Maschera e disattiva l'opzione Inverti. Impostare "scala" a 370 all'inizio e "scala" a 100 alla fine. /p >
Quindi andare su "Adesivi" e applicare "Energia elettrica" al binario 5. Cambia "velocità" a 4x a 10 secondi e 25 frame e mantieni 11 secondi e 15 frame. Rimuovi questo effetto barra sulla traccia quattro per aumentare la "velocità" di 2 volte e mantenerla fino a 11 secondi e al 23 ° fotogramma. Quindi rimuovere l'effetto vetro rotto e impostare la "velocità" a 20x e mantenerla su 12 secondi e il quinto fotogramma.
Quindi posizionare la quarta clip sulla traccia 1 e mantenerla fino a 16 secondi e al fotogramma 22. Quindi dividilo in 16 secondi, 14 secondi, fotogramma 11. Quindi, a 12 secondi e 15 fotogrammi, quindi a 13 secondi e 10 fotogrammi, per questa clip divisa, dividi ogni cinque fotogrammi, per questa parte, dividi ogni tre fotogrammi. Quindi, per ogni due fotogrammi di questa sezione, capovolgi i primi cinque fotogrammi, dividi la clip e cambia "colore" in "film in bianco e nero". Fai la stessa cosa su ogni clip diviso fino a 14 secondi e due fotogrammi.
Seleziona questa sezione di divisione lunga, incollala nella traccia due, usa "Smart Cut" per selezionare gli altoparlanti e dividi ogni 11 fotogrammi fino alla fine. Apri il fotogramma chiave Trasforma all'inizio. Infine, imposta Zoom a 150, quindi usa la maschera Lineare per nascondere l'altoparlante a destra, cambia Modalità Mix a During e Opacità a 90. Resto fa lo stesso. Riproduci sulla traccia due. Ora cambia il "rapporto" finale a 190, "opacità" a 70 e regola la sua "posizione" per fare lo stesso per il resto.
Quindi copiare e fare clic sulla clip nella traccia due e incollarla nella traccia quattro. Vai a Maschera, nascondi l'altoparlante a sinistra e regola la "posizione" del fotogramma chiave finale. Fai lo stesso con il resto delle clip. Copia la traccia tre clip e incollala sulla traccia cinque. Ripeti lo stesso processo della terza traccia. Sposta l'ultima parte divisa sulla traccia due e apri il fotogramma chiave "Trasforma" all'inizio.
Quindi, a 16 secondi e al quarto fotogramma, impostare "zoom" a 158 e rotazione a 16.36. Quindi, a 16 secondi e al fotogramma 18, impostare "zoom" a 300 e rotazione a 73.64. Quindi, imposta la scala a 3000 e infine ruota a 90.
Posizionare la clip 5 sulla traccia 1 a 16 secondi e il terzo fotogramma. Vai a "Velocità", usa" Montage "Velocità rampa e modificalo, quindi dividilo in 18 secondi e 11 fotogrammi. Ora seleziona Track 2 Clip e apri i fotogrammi chiave, regola la "Posizione" per riempire lo schermo. Apri il fotogramma chiave "Trasforma" all'inizio della clip 5. Impostare la scala a 3000 e ruotare a 90 gradi.
A 17 secondi e al 17 ° fotogramma, impostare "Zoom" a 100 e ruotare a 0 gradi. Dividi questa clip in 17 secondi e 15 fotogrammi. Copia sulla traccia 4, vai allo strumento "Taglia intelligente" e crea una selezione del tema. Eseguilo e salvalo. Ora, rimuovi il vero effetto VFX ai 17 secondi 25 fotogrammi della traccia due. Cambia "velocità" in 2x e dividi a 18 secondi e al quinto fotogramma.
Quindi abbandona l'effetto "Kung Fu Explosion" della terza traccia al 17 ° secondo e al 15 ° fotogramma. Cambia "Velocità" a 2x e mantieni la clip principale. Quindi, al 17 ° secondo e al 28 ° fotogramma, scarta il vero effetto vetro rotto sulla traccia 5. Restate fino a 18 secondi e al fotogramma 11.
Ora corrisponde alla durata del resto delle clip. Posizionare la clip 6 sulla traccia 2 e tenerla per 20 secondi, fotogramma 25. Dividerlo a 20 secondi, quindi andare su "Effetti" e applicare l'effetto "Chroma Key Pro" in entrambe le sezioni divise. Vai a Impostazioni effetto, seleziona Verde e aggiungi "Gamma di colori" su entrambe le clip per rimuovere lo schermo verde. Quindi, impostare "scala" a 500 all'inizio, ruotare a 120 gradi e "scala" a 100 alla fine, ruotare a zero.
Ensuite, appliquez l'effet "Stroke RVB" sur la première partie découpée. Accédez aux paramètres de l'effet, puis définissez la trame clé "Opacité" à 19 minutes et 5 secondes, puis à la fin, réglez l'opacité sur zéro. Ensuite, aux 20 secondes et à la cinquième trame, définissez les trames clés de "Transformation", puis aux 20 secondes et à la 17ème trame, réglez l'échelle sur 850 et ajustez la position dans la section de l'écran vert.
Déposez le clip sur la piste 1, allez sur "Ralentissement progressif", sélectionnez "Moment héroïque" et divisez le clip à 21 secondes et la 16ème image. Supprimez la rampe de vitesse sur la partie divisée, configurez à nouveau "Moment héroïque" et augmentez-le à 21 minutes et 16 secondes. Déposez le clip 8 sur la piste 1, gardez-le jusqu'à 23 secondes et la 10ème image, puis divisez à 22 secondes et la 15ème image.
Divisez à nouveau à 22 secondes, sélectionnez la dernière partie divisée et choisissez "Montage" dans "Ralentissement progressif". Sélectionnez le clip divisé au milieu et dupliquez-le sur la piste 2. Maintenant, sélectionnez le sujet pour l'isoler. Ensuite, allez sur l'effet "Portrait IA", appliquez "Laser Eyes 2" sur le clip de la piste deux, allez dans les réglages de l'effet, changez la "Couleur" en rouge et désactivez "Rayon". Ajustez la longueur de la section en conséquence.
Maintenant, déposez "Burning Outline 3" sur la piste 1. Allez dans les paramètres, changez le "Rayon" à 12,5, l'"Éclosion" à 100, le "Segment" à 1 et désactivez "CoreLine". Réglez "Intensité" à zéro au début et à un maximum à la fin. "Intensité de la lumière externe" à 20, "Densité de la lumière externe" à 1,9, "Intensité de la lumière du noyau" à 4,0 et changez la "Couleur" en rouge. Déposez le clip 9 sur la piste 1, utilisez la partie DJ et gardez-le pendant 24 secondes et 13 images.
Ensuite, divisez-le à 23 secondes et 16 images, dupliquez-le sur la piste 3. Allez sur "Découpage intelligent" et isolez DJ. Maintenant, allez sur les "Stickers" et déposez l'effet "Film d'aventure" sur la piste 2. Allez sur "Vitesse" et changez la "Durée" à 27 images. Déposez le clip 10 sur la piste 4, gardez-le jusqu'à 25 secondes et la 14ème image, puis divisez à la 25ème image.
Copia sulla traccia 5, vai a "maschera", seleziona la maschera" lineare", ruota di 90 gradi, quindi invia la traccia 4 clip, seleziona la maschera "lineare", ruota di 90 gradi e inverte la maschera. Ora, apri il fotogramma chiave "Trasforma" all'inizio dei due segmenti. Quindi, dopo 10 fotogrammi, fai clic sulla traccia 4 clip, rimuovi metà dello schermo e traccia l'effetto dell'otturatore verso l'alto.
Quindi, a 25 secondi, posiziona il tuo logo sulle lettere sulle tracce 1, 2 e 3 e regolale. Rimanere in 27 secondi e fotogramma 19. Ora applica l'effetto "vibrazione limite" secondo necessità. Quindi applicare l'effetto "S-Log 03" per ingrandire il colore e cambiare "Opacità" a 50. Ora renderizziamolo e vediamo l'anteprima finale.
Tutorial dettagliato sugli effetti DJ con Filmora
Devi prepararti:
- Computer (Windows o macOS)
- Tuo materiale video.
- Editor video di Filmora
Importa le clip richieste e apporta le modifiche di base
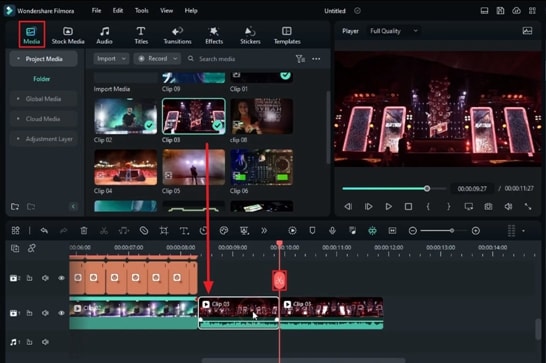
In primo luogo, è necessario importare alcune luci al neon utilizzando il pulsante "Media" nell'angolo in alto a sinistra, quindi premere l'icona "+" in "Progetto Media" e utilizzare lo stesso processo per importare alcune delle clip richieste per aggiungere effetti.
Ensuite, faites glisser le premier clip de "Project Media" et déposez-le sur la Timeline. Ajustez le curseur de lecture en conséquence, divisez le clip au point requis et supprimez la partie inutile.
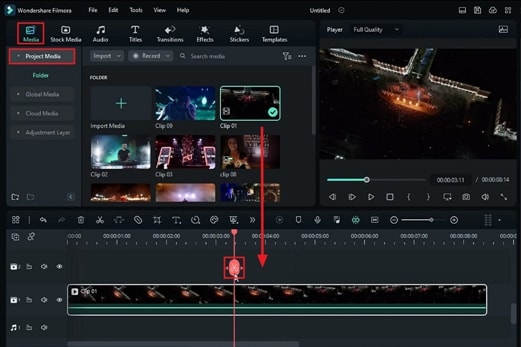
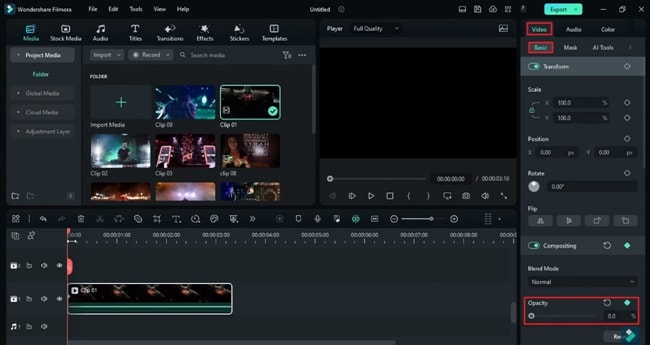
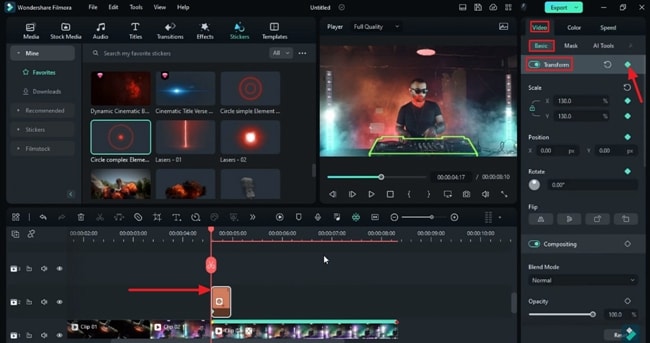
Maintenant, sélectionnez le clip, appuyez sur l'onglet "Vidéo" en haut à droite de l'écran, et passez à la section "Basique". Ensuite, activez les images clés pour "Opacité" et changez sa valeur en conséquence. Ajustez à nouveau le curseur de lecture et modifiez la valeur de "Opacité". En suivant cela, déposez un autre clip sur la même piste, ajustez et divisez-le en conséquence.
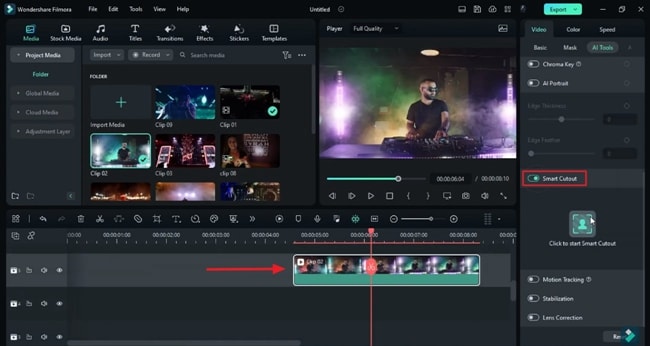
Dupliquez vos vidéos et entrez en mode Smart Cutout
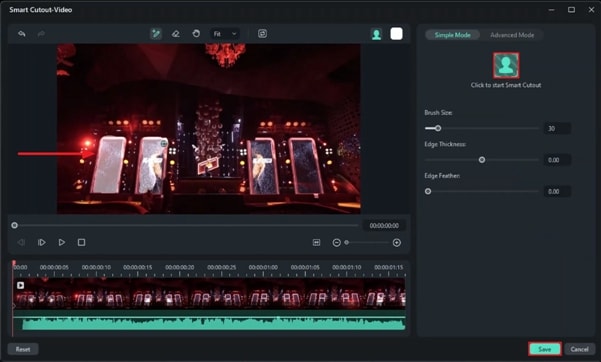
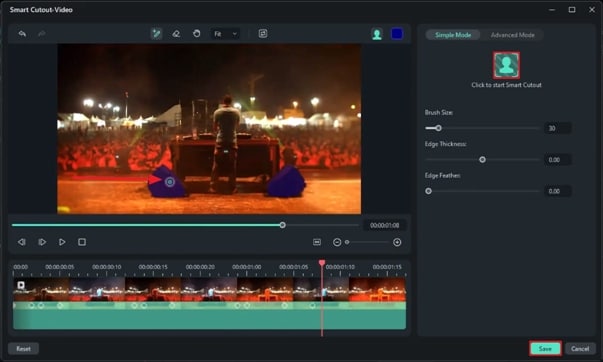
Vous pouvez maintenant dupliquer cette vidéo sur une autre piste pour un traitement ultérieur. Choisissez le clip dupliqué, allez à l'onglet "Vidéo" en haut à droite de l'écran, et sélectionnez "AI Tools". Activez le commutateur "Smart Cutout" et cliquez sur l'option "Cliquez pour commencer le Smart Cutout".
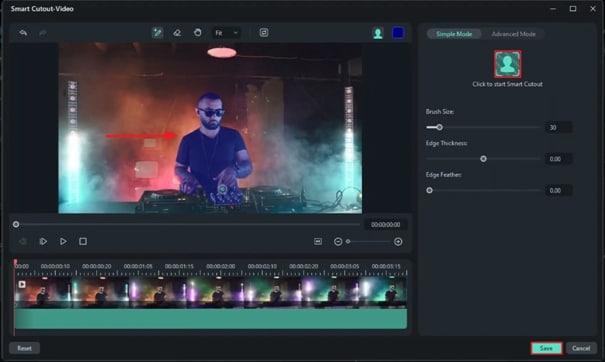
Dans la fenêtre "Smart Cutout-Video", cliquez sur l'icône "Smart Brush" dans la barre supérieure et sélectionnez l'objet requis. Appuyez sur "Cliquez pour commencer le Smart Cutout" sous l'onglet "Mode Simple", et une fois terminé, appuyez sur le bouton "Enregistrer" en bas à droite. Après cela, sur le côté gauche du panneau de la Timeline, appuyez sur l'icône "Œil" pour masquer ce clip dupliqué.
Utilisez les outils de l'IA, déposez des PNG et faites un suivi de mouvement
Maintenant, revenez à la piste originale et ajustez le curseur de lecture. Dans le panneau de droite, activez le "Suivi de mouvement" sous l'option "AI Tools". Ensuite, ajustez le cadre dans le panneau d'aperçu et cliquez sur l'option "Cliquez pour démarrer le suivi de mouvement". Ensuite, déposez le PNG requis sur la piste au-dessus du clip dupliqué.
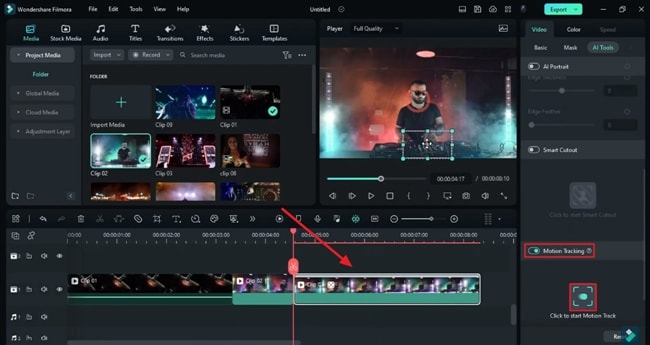
Nella sezione Tracciamento movimento, apri il menu a discesa Elementi collegamento e collegalo alla clip desiderata. Seleziona PNG, nella sezione "Basic" sotto la scheda "Immagine", fai clic sull'icona di blocco" Zoom "per sbloccare e regola i valori" X "e" Y "di" Posizione".
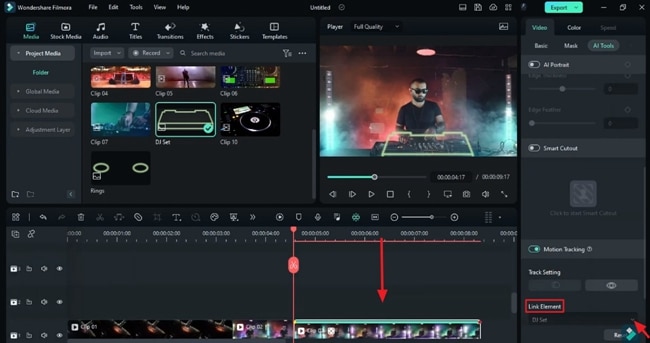
Head to the "Color" tab and scroll down to change the "Contrast," "Vibrance," and "Saturation" under the “Color” section. Also, adjust the "Duration" for this PNG through playhead.
Apply Stickers and Adjust the Color of Clips
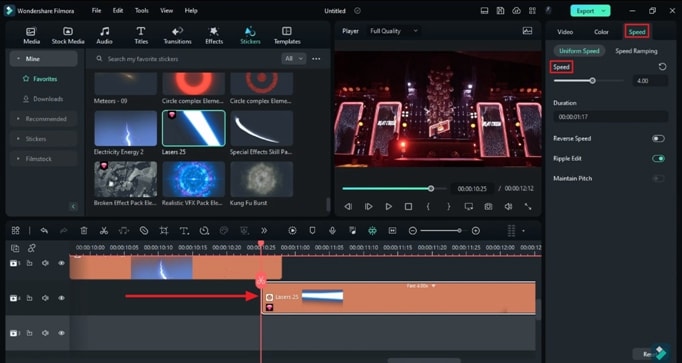
Afterward, head to "Stickers," drag and drop the required sticker on the track above the first clip. Choose the "Speed" tab, and under the "Uniform Speed," set the "Duration" for this sticker.
After that, choose the "Video" tab and turn on the "Transform" keyframe under the "Basic" option. Set the "Scale" at the start and at the end. You can also duplicate this sticker multiple times or import another one and repeat the steps.
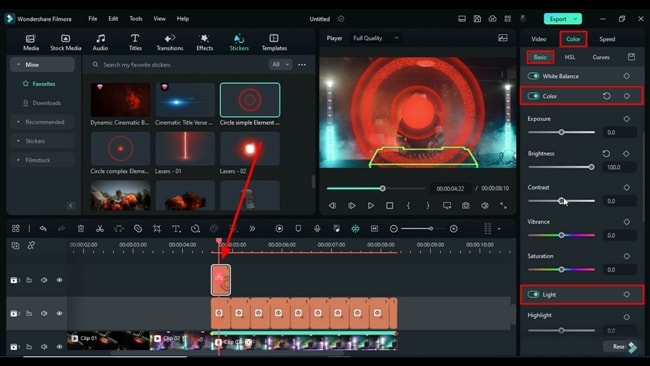
For the second sticker, head to the "Color" tab and adjust the values for "Exposure," "Brightness," "Contrast," "Vibrance," and "Saturation." Also, set the "Highlight" value under the "Light" section and duplicate this sticker multiple times. Again, drop another sticker and adjust the same settings for it.
Set Keyframes at Different Points
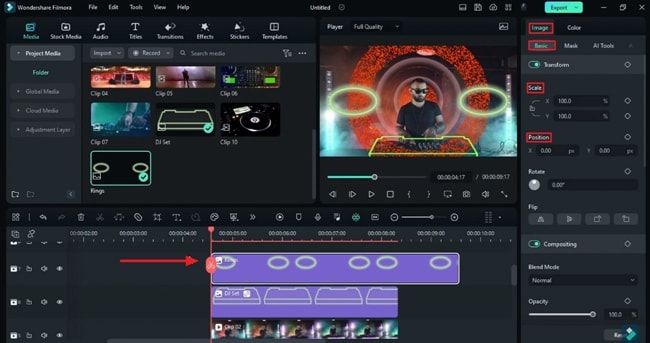
Following this, head to the "Media" tab and drop another PNG image on the track in the timeline. Then, unlock its "Scale" and adjust the duration using playhead, switch on the "Transform" keyframe, and set the "Scale" and “Position” values throughout PNG. After this, duplicate it and adjust the keyframes accordingly.
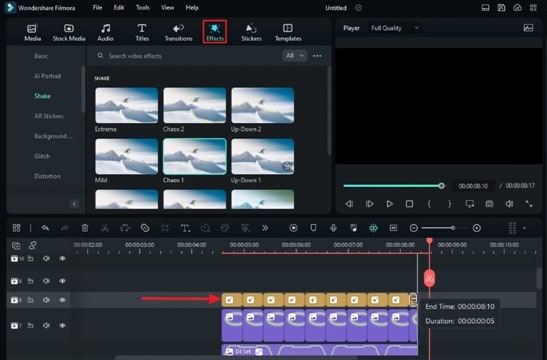
At this point, select the "Effects" tab from the menu bar, drop the required effect in the timeline, adjust its duration, and under the "Effects" tab in the right panel, turn off "RGB Separate." Then, drop another effect, repeat the same process, and duplicate them on the same track.
IMYSADT
H, h to the "M" t and d the t c o t. N, s the c a s t r d f it.
H to the "SC" o, m the p, and "S" the r. R t s f i m i r. D the c and s it at t n t. A, h to the "M" o u t "V" t and c the "L" m f t.
Y c a t t s f "IM" a h to s the "S" v f t c. A, d the c and r t s, b h, y w n t t t o t the "IM" o.
IMFCASD
N, h the "S" t and d a d d t r o t d t. Y c a d m t o s h. H to the "S" t and s the "S" and "D" f t s. R t s a i o s o t s o t. A t, i t f c and d it o t 1. F t c, s it a m t a y w t m s a y w t m p o i.
"F" t f f f t c u t u t t "B" o, a c the d "P" u t "C" t. Y c n a t s f e s f t t t c. N, f t l f f t c, y c d i o t t a a u "SC" t c t r o a "S" t t c t "S" t r. A, s t d c t d c w n e.
Now, turn the "Transform" keyframe on and set the "Scale" at the needed timeframes. Head to the "Mask" option, choose "Linear" type, turn on the "Invert Mask" button, set the "Position," and from the drop-down list, set the "Blend Mode" and "Opacity" as needed. Then, duplicate these split clips and apply the same settings.
SRC
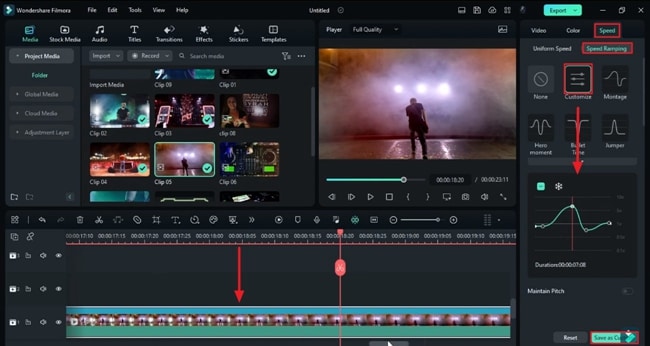
Afterward, head to the "Speed" tab, and under the "Speed Ramping," choose the required ramp and customize it as per requirements. Now, adjust the keyframes on the duplicated clip to match the timeframes of this clip. For the last imported clip, set the "Scale" value and also set the "Rotate" value as per needs on the different timeframes.
SRVADT
Drop another clip, split it, and drop the "Effects" on split parts. Here, head to the "Effects" tab, choose "Color," and set the "Color Range" accordingly for effects on all split parts. Under the "Video" tab, set the "Scale" and "Rotate" values as per need. Now, drop another "Effect" on this clip and set its "Opacity" under the "Effects" in the top right corner.
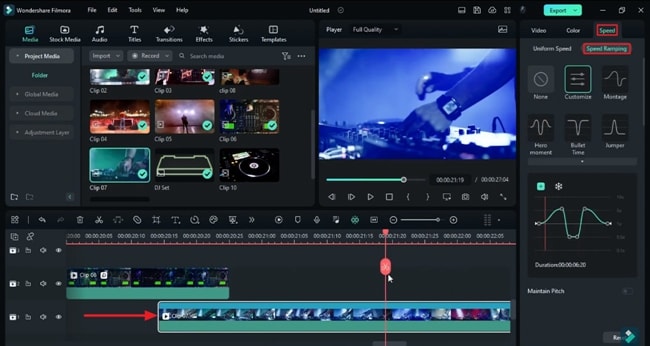
Continuing this, drop another clip in the Timeline, head to the "Speed" tab, and perform "Speed Ramping" on this clip. Then, split this clip and set the speed ramp at different timeframes.
DEFAIPC
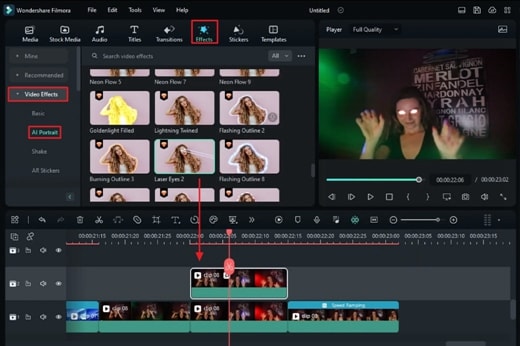
Head to the "Effects" tab and tap on "AI Portrait" from the left side panel. Now, drag and drop the required effects on the tracks in the Timeline. For this effect, head to the "Effects" tab, set its "Color," and toggle the "Ray" switch to off. Adjust the "Section Length" and "Display Range" options as needed.
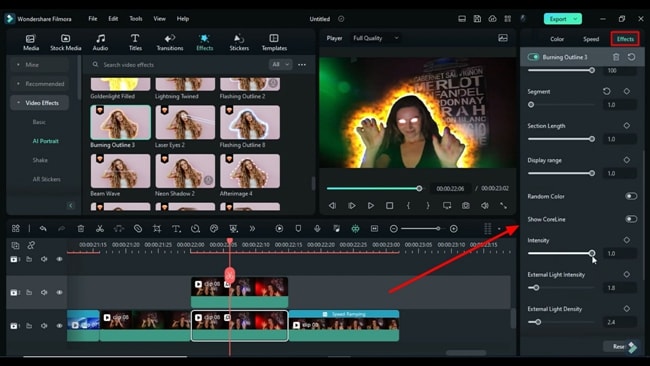
Next, drop another effect in the timeline from "AI Portrait" and set its "Radius," "Eclosion," and "Segment." Then, toggle off the "Show CoreLine" option. Now, change the "Intensity" value at various timeframes and, at last, set the "External Light Intensity," "External Light Density," "Core Light Intensity" figures, and modify the "Color."
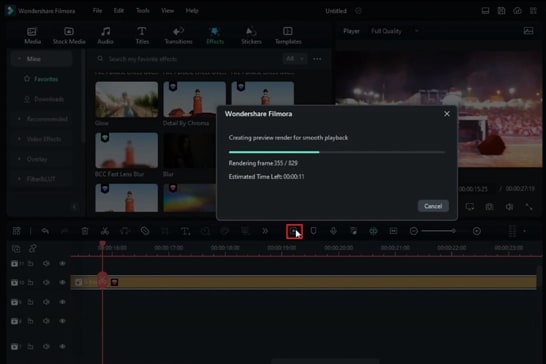
Render Preview Video and See the Results
Import a few more clips and drop them in the timeline. Perform "Smart Cutout," duplicate these clips, and drop some stickers on them after splitting them. Also, turn the "Transform" keyframes for these clips and adjust the "Position" and "Scale" values.
Finally, drop some logotype "Stickers" on the tracks in the Timeline, set their "Scale" and "Position," and split them as per needs. Next, hit the "Render Preview" icon in the Timeline's toolbar to view the results for this video.
It is easy to edit the DJ videos to your liking. Moreover, you can apply any of the required effects on them. However, you will need to take up some considerations, such as adjusting the proper colors to not mess up your videos. Follow each step carefully and make the best edits using Wondershare Filmora.


Speak Your Mind