Transcript
با استفاده از Wondershare Filmora ، امروز به شما یاد خواهیم داد چگونه این تاثیر تصویری توپ آتش را ایجاد کنید. اول از همه ، شما باید فیلمبرداری کنید تا دست خود را بگیرید. مثل نگه داشتن یک توپ و پرتاب کردن آن به دیوار. سپس فیلم اصلی خام خود را بر روی خط زمانی بریزید. پروژه را با 25 فریم در ثانیه نگه دارید.
حالا ، ما به آن تاثیری اضافه خواهیم کرد. تصویر را در 12 فریم تقسیم کنید. سپس آن را در جایی که به سمت دیوار پرتاب می کنیم ، تقسیم کنید. بیایید از بسته "Superpower FX Effect" را از "Filmstock" دانلود کنید.
به "برچسب ها" بروید. اینجا ، شما می توانید تعداد زیادی توپ آتش و یخ پیدا کنید. یک توپ آتش را در ردیف 2 قرار دهید. به "سرعت" بروید و مدت زمان را به 11 ثانیه تغییر دهید. سپس آتش توپ را در فریم 12 تقسیم کنید. اینجا ، ما یک اثر گیری توپ آتش خواهیم ایجاد کرد. به "Basic" keyframes بروید برای "Transform". X و Y "Scale" را قفل کنید. در ابتدا ، ما "Scale" توپ آتش را کاهش می دهیم و آن را از صفحه خارج می کنیم. چندین فریم به جلو حرکت کنید. یک توپ آتش را در صفحه بیاورید.
در انتهای کلیپ تقسیم شده ، موقعیت توپ آتش را درست بالای دست و مقیاس "Scale" توپ را افزایش دهید. حالا قسمت میانی کلیپ اصلی را انتخاب کنید ، به "ابزارهای AI" بروید و "پیگیری حرکت" را روشن کنید ، مستطیلی را در صفحه پیش نمایش خود مشاهده خواهید کرد. آن را انتخاب کرده ، شکل آن را به یک مربع تغییر دهید و آن را به دست متصل کنید. با شروع پیگیری حرکت ، پنهان کردن ردیف 2 را لغو کنید و "گرافیک حرکت توپ آتش" را در "لینک المان" انتخاب کنید. در اینجا ، توپ آتش به حرکت دست مرتبط شده است. به "Basic" در keyframes برای "Transform" بروید.
Increase the "Scale" in Preview Screen. If you increase it in transform, it will increase the "Scale" for that particular keyframe. Go a few frames forward if required. Increase the "Scale" a bit. Now, you can see we got the effect of catching the fireball.
Next, go to the point where the hand is going to throw the ball. Now you can see the hand is near the camera with a fireball, but the size of the ball is the same. To fix this, we now need to increase the “Scale” manually for each keyframe. Split the fireball clip after the last keyframe, and for the split clip, set the "Scale" value of the first ball the same as the last keyframe and adjust its “Position.”
On “Transform” keyframes, here, we need to do the manual keyframing for the rest of the clip while doing manual keyframing. Keep in mind to adjust the “Position” of the fireball and the size of the fire. When the hand is away from the camera, decrease the size of the fireball in order to make it more realistic.
Once the fireball is released from the hand, you can define its path. You can throw it directly in a straight line, or you can create a bit of left-right movement of fireball. Make the ball travel toward the wall by decreasing the “Scale” of every keyframe.
Then go to the film stock, and under “Lens Flare,” drop this orange flare on track 3. On Transform Keyframes, you change "Blending Mode" to the best "Blending Mode" for this screen.
Lock the "Scale" Ratio, decrease its "Scale," and adjust it in the center of the fireball. Go two frames forward. Here, we decrease the "Scale" of the fireball and change the "Position." Place the flare in the center of the fireball and increase the flare size to 160 degrees. Go two frames forward and decrease the size to zero. Shrink the fireball clip and flare clip. Now, let's check it and adjust the position if required.
Go to the “Media,” drop this ink clip on the timeline. By the way, you can download it from Mixkit.co. On the keyframes for “Transform,” change “Blending Mode” to “Multiply.” Increase “Speed” by 4.5, shrink the clip to the start point of Ink Drop, go to the Transform, and set it above the flare.
Go a few frames forward and increase the X and Y axis of "Scale" to cover the wall with an ink clip. Again, increase the X and Y axis after a few frames and bring it towards the downside. Now, shrink the main clip to the ink clip. Export this clip at a higher rate.
Delete all the files from the timeline and bring the clip we created. Drop it on the timeline. Split it at the 12th frame. Go forward and split it at where the hand is coming up. Copy the middle part and paste it on track 2.
Go to the effect and drop this electric ball on the track. Go to the "Speed" and increase the duration time to match the track 3 clip. Select track 3 clip, go to "AI Tools," and on "Motion Tracking," hide the electric ball clip. And follow the same steps to track the fireball.
Onc trckng s dn, lnk th lctr bll t t nd unhde th elctr bll clp. Go to th "Bsc" nd ncrse th sz f th elctr bll, nd plce t nsd th sqr. Chnge th "Blndng Mde" t "Scrn" t blend t wth th frbll. Nw we hv nce frbll wth sme elctr mvmnt.
Nw, spl t mn clp t the nk drp pnt. Sft t t trck 2. Go to the "AI Tls," str the "Smt Ctut," nd slect the blk nk prt usng the brsh tl; yu c zn t t g a clsr lk. Go n frm frwrd, gn slect the blk nk, nd rept t fr fw mre frms. We're dng t mnully bcse we dn't wnt t mss ny prt f the nk. Onc fll nk s rveled, clck n "Strt Smt Ctut," nd ths AI ftre utmtcll slects the nk. Clck n the "Invrt Msk" pt nd clse t.
Appl the "Dsslve” trnstn nd kp the trnstn fr 10 frms. Spl t clp t the nd. Nw chnge the “Clr” f bth clps t “Fntsy.” Yu cn see we hv nce crsp nd brght clrs.
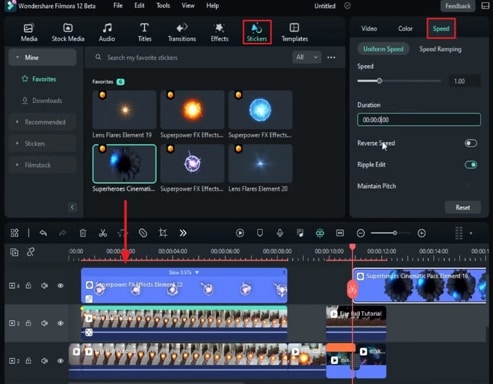
Go to the "Stckrs," drp the Sprhros prt clp n trck 4 rght bfr the nd f the Wrmhle clp. Go t "Spd" nd chnge the durn t 2 sconds. Udr the "Bsc" tg, we rduc the "Scl" nd djust t n the blk hle f the Wrmhle clp. Nw, ftr 15 frms, drp the frbll n trck 5.
On "Transform Keyframe," we lock the "Scale" ratio. Decrease its "Scale" to 6, adjust the "Position" in the center of the black hole portal, and reduce the size to 0. Next, go 15 frames forward, increasing the size of the fireball. Go 5 frames forward and change "Scale" to around 300. It will create a fireball shooting back from the portal. Now start at where we're catching the fireball, drop the lens flare clip, and change "Blending Mode" to "Screen."
On the "Transform" keyframes, place it in the middle of the fireball and reduce the "Scale" to zero. Then, after one to two frames, increase the "Scale" of the flare and adjust its "Position." Then, go three frames forward and reduce the "Scale" to zero. Split the clip at the point and copy the flare clip. Now paste it where we're throwing a fireball toward the wall and adjust its "Position" on keyframes. Again, paste it and adjust the "Position".
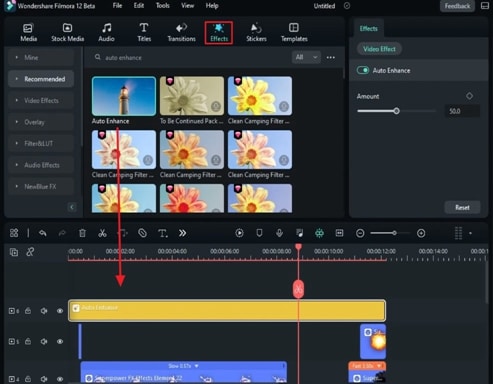
Now go to "Effects" and search for the "Auto Enhance" effect. Apply it on the top track and increase its duration. Now, let us see the final preview.
Come creare una guida agli effetti delle palle di fuoco in Filmora
Devi prepararti:
- Computer (Windows o macOS)
- Tuo materiale video.
- Editor video di Filmora
Avvia Filmora e inserisci il supporto nella sequenza temporale
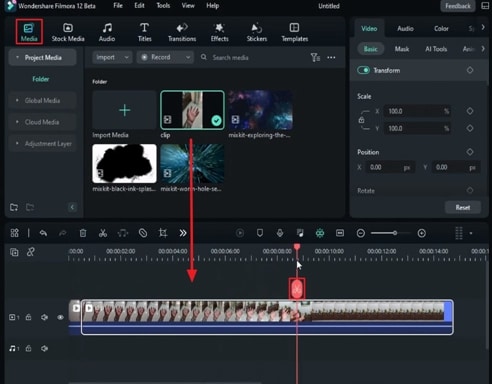
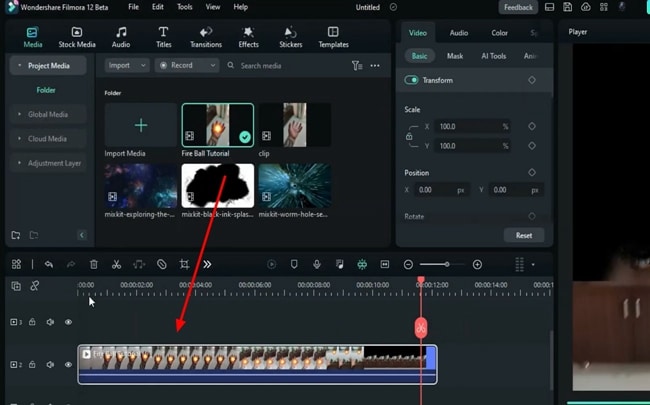
Per iniziare il processo di modifica, è innanzitutto necessario avviare Filmora sul computer. Successivamente, avvia un "nuovo progetto" e raggiungerai la sua interfaccia di modifica principale. Fare clic sulla scheda Media per importare i file sulla piattaforma. Per creare un tale video, è necessario registrare un video del movimento della mano destra.
Click on your main media clip, drag it, and place it on the timeline track. Place the playhead at the point where you are going to make a fireball with your hand and split the clip from there. Then go further in that track and place the playhead where you're throwing that ball towards the wall. Trim from there as well.
Add Fireball and Make Adjustments
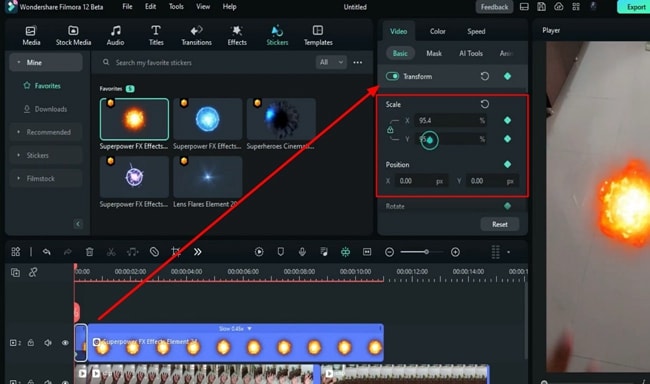
First, download the “Superpower FX Effect” from Filmora's Filmstock to create this superpower effect. Go to "Stickers" and select a fireball of your choice. After selection, drag this fireball and drop it on the timeline track as well. To match the duration of the fireball with the main clip, go to the tool panel on the right. Then go to the "Speed" tab, and under "Uniform Speed," change its "Duration" according to your video.
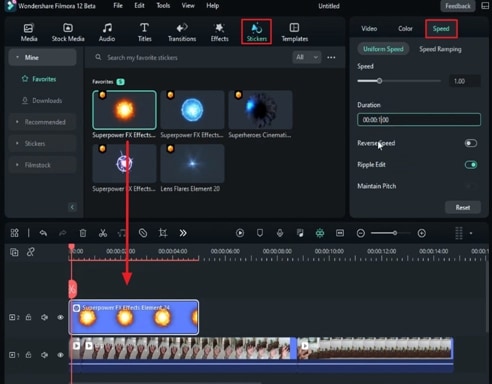
Now, make some changes in the "Position" of the fireball to fit your hand throughout the video. Following this, go to the fireball clip in the timeline, place the playhead at the point where you split the first clip, and trim it. Then, from the right tool panel, under the "Basic" tab, enable the "Transform" keyframes for this split clip and adjust its "Scale" and "Position" values accordingly.

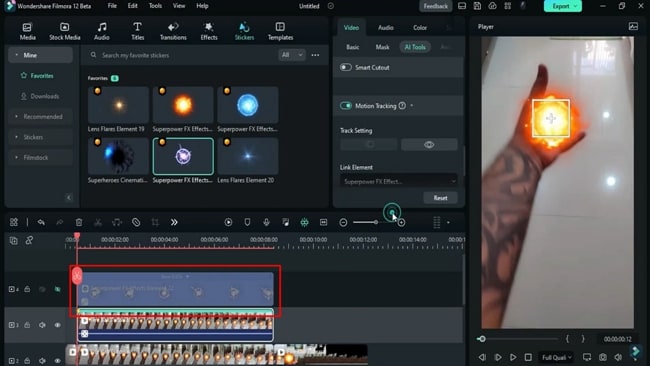
Enable Motion Tracking
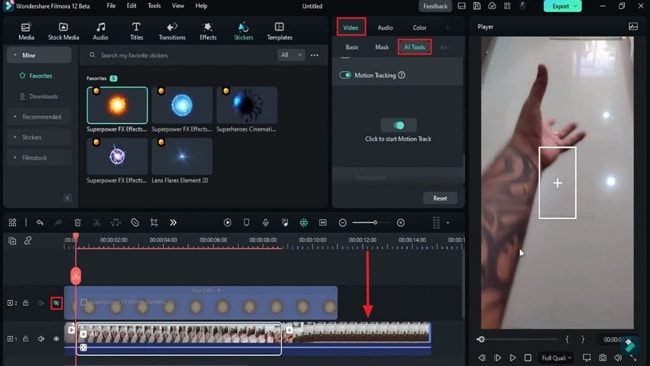
Now place the playhead in the middle of the fire ball split clip. Go to the right-side panel, select the "Video" tab, and under the "AI Tools" section, enable "Motion Tracking" and hide the other track from the left side of the timeline. Place the motion tracking detector on your hand and adjust its position per the fireball. Tap the "Click to start Motion Track" button once completed; click "OK" and unhide the hidden track.
Collega due clip nella sequenza temporale
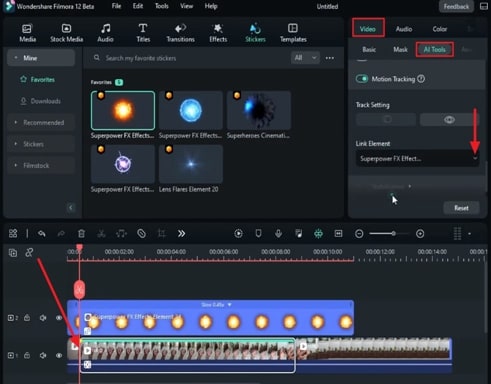
To link the fireball with hand movements throughout the video, first, click the original clip. Then, go below the "Motion Track" button and choose "Superpower FX Effect" under “Link Elements.” This will link both the original clip and the fireball.
Adjust the Fire Ball on the Palm accurately
To adjust the fireball on your palm, click the fireball clip and enable "Transform" keyframes. Then, adjust the "Scale" and "Position" of the fireball as per the motion track detector. Repeat this process at different timeframes to ensure accurate coordination between palm movements and fireballs.
Edit Another Clip With Similar Flow
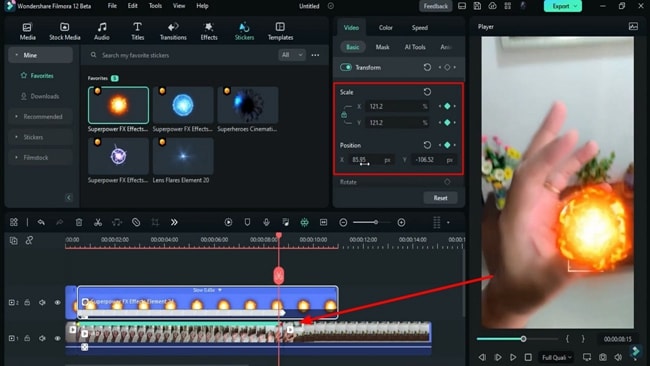
Go to another split part, where you are throwing the ball toward the wall. Turn on the "Transform" keyframes and adjust the "Position" of the fireball according to the movements of the hand. When the hand is closer to the screen, increase the "Scale" of the fireball. Repeat this same process at different timeframes. Then, when the hand throws the ball, decrease the "Scale" of the fireball and adjust its "Position" to give it a more realistic look.
Add Effects to Enhance Fire Ball Effect
Once the fire ball's "Scale" is at its lowest but closest to the wall, it's time to add some effects to give a realistic touch. Go to "Stickers" on the custom toolbar and add any glow effect in the track above. Place this effect above the fireball split clip because we need glow at the ending points.
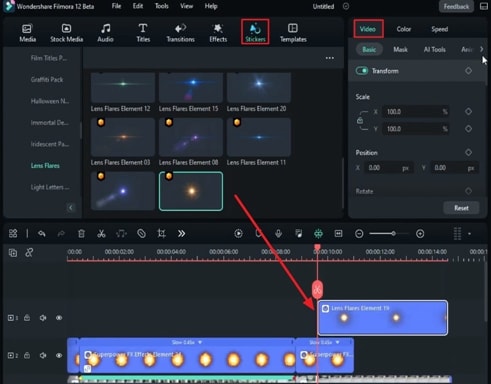
Apri il fotogramma chiave Trasforma e scegli la modalità di fusione che meglio corrisponde al tuo video. Regola la "posizione" e la "scala" di questo effetto luminoso in diversi punti per abbinare le dimensioni e la posizione della palla di fuoco. Una volta completata la regolazione, controlla se il bagliore e la palla di fuoco sono allineati.
Posiziona la clip di inchiostro sulla sequenza temporale
Dal supporto di importazione, posizionare la clip di inchiostro sulla traccia temporale successiva disponibile. Per regolare questa clip, vai alle impostazioni Video, apri il suo fotogramma chiave Trasforma e cambia la sua modalità di fusione. Cambia la "scala" e la "posizione" dell'inchiostro sul glow.
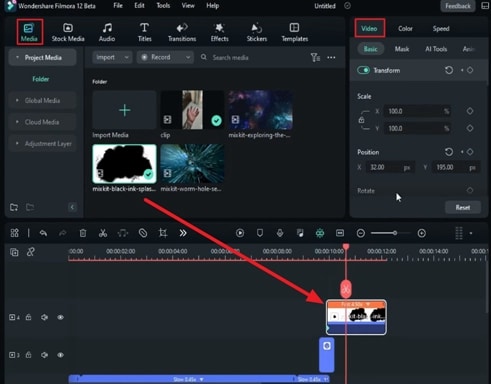
Proseguire nel tempo e regolare questi elementi fino a coprire l'intero muro. Esporta questo video e importalo di nuovo in Filmora mentre rimuovi tutti gli altri supporti dal pannello della timeline e posizionalo sulla prima traccia.
Aggiungi un altro effetto superpotere alla palla di fuoco
Porta questo video alla prima traccia e dividilo come hai fatto con le altre clip prima della clip. Quindi, porta un'altra clip divisa per tracciare e aggiungere qualsiasi altro effetto superpotere, come la palla elettrica. Ripetere lo stesso processo di abilitazione dei fotogrammi chiave "Trasforma" e "Motion Tracking" per questo effetto. Allo stesso modo, fai le regolazioni "zoom" e "posizione" per assicurarti che siano allineate con la palla di fuoco.
Abilita il taglio intelligente AI per le clip di inchiostro
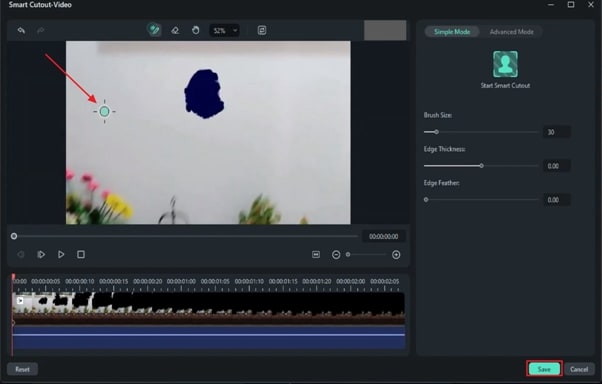
Tagliare la clip a goccia di inchiostro e posizionarla sulla pista superiore. Abilita il taglio intelligente sotto lo strumento intelligenza artificiale e seleziona manualmente la parte dell'inchiostro con l'aiuto dello strumento pennello. Per ottenere risultati precisi, è possibile ingrandire la schermata di anteprima. È necessario ripetere il processo di selezione della porzione di inchiostro più volte fino alla fine del taglio. Abilita l'opzione Inverti maschera nel pannello di anteprima e torna alla finestra di modifica principale.
Crea un effetto wormhole
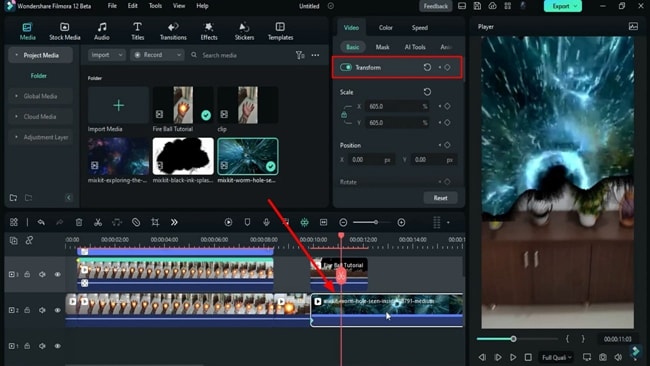
È necessario posizionare la clip del wormhole sulla prima traccia per creare un'illustrazione del wormhole nel video. Apri il fotogramma chiave "Trasforma" per esso e regola le sue "dimensioni" e "posizione" per adattarsi perfettamente al fotogramma. Questi aggiustamenti vengono effettuati in tempi diversi. Puoi cambiare la "durata" di questo wormhole sotto la scheda "velocità".
Aggiungi effetto spazio e altri effetti
Dopo il wormhole, devi anche aggiungere un effetto spazio per migliorare l'animazione generale. Quindi, posiziona il supporto di montaggio spaziale nella traccia principale accanto alla clip wormhole e apporta regolazioni simili. Puoi migliorare il colore sotto la scheda Colori nel pannello di destra.
Ora conosci le regolazioni e le impostazioni relative agli effetti dei supereroi. Se vuoi aggiungere altri effetti ai tuoi video, puoi trovarli nella categoria "Film" sotto "Adesivi".
Miglioramento ed esportazione finali
Per rendere il tuo video più uniforme, seleziona l'effetto Auto Enhancement nella scheda Effetti sulla barra degli strumenti personalizzata e aggiungilo alle ultime tracce gratuite. Dalla barra degli strumenti Linea temporale, trova e fai clic sul pulsante Rendering Anteprima per visualizzare la creazione finale. Se i risultati ti sorprendono, premi il pulsante "Esporta" e finalizza i tuoi risultati.
Dopo aver letto questa guida passo-passo, può essere conveniente realizzare un video dell'effetto palla di fuoco. Questo è solo un gioco per trovare e regolare l'effetto giusto al momento giusto. Con Wondershare Filmora Lei può fare transizioni creative e presentazioni, compreso il video degli effetti di palla di fuoco.


Speak Your Mind