Garanzia di Download Sicuro, zero malware
¿Estás pensando en hacer tus podcasts pero te preocupa cómo grabarlos? Relájate, no necesitas un estudio profesional para esto. Hay muchos software, pero la grabación de podcasts con zoom es relativamente más sencilla. Un podcast es una colección de archivos de audio que puedes descargar o escuchar en línea usando internet. Este artículo te ayudará a aprender a grabar podcasts usando zoom.
En este artículo
Fórmula de 7 pasos: ¿Cómo grabar un podcast en zoom?
Grabar un podcast en zoom es bastante simple y fácil. No necesitas ser un experto en grabación; puedes hacerlo en casa usando tu computadora portátil. En este artículo, te guiaré paso a paso sobre cómo grabar un podcast usando zoom.
Paso 1Scarica e installa
Primo passo è scaricare e installare zoom sul tuo dispositivo. Successivamente, visitandoScala il sito. Accedi a questo account con il software che hai installato e goditi lo zoom gratuito. Free Edition Le permette di registrare per 40 minuti. Per chiamate più lunghe, si prega di acquistare la versione a pagamento.
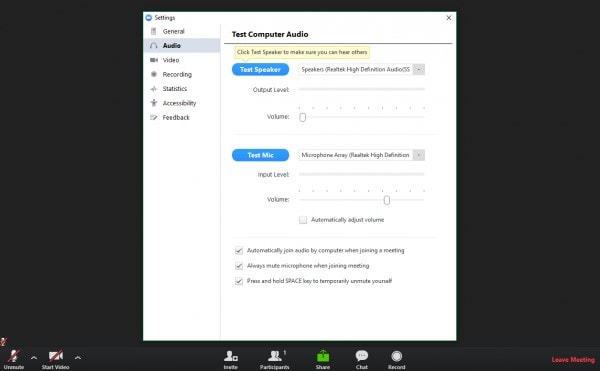
Fase 2Impostazione microfono e cuffie
Zoom può utilizzare il microfono incorporato del dispositivo, ma è consigliato l'uso di un microfono esterno di alta qualità. Migliora notevolmente la qualità del tuo podcast. Molti microfoni esterni costano meno di $50, il che è davvero importante.
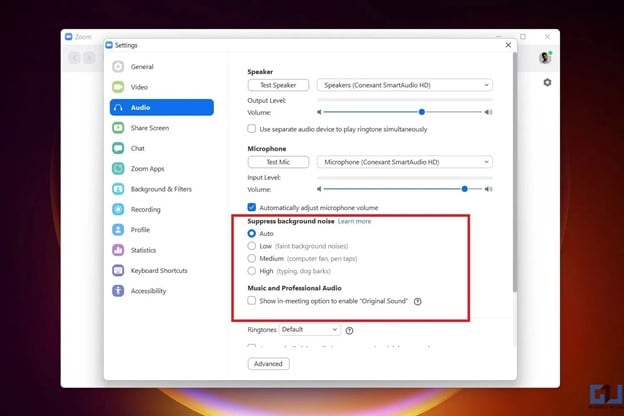
Fase 3Elimina qualsiasi rumore di fondo
A nessuno interessa ascoltare cosa succede dietro le quinte mentre ascolti il tuo podcast. Quindi assicurati che il tuo ambiente sia il più silenzioso possibile prima di premere il pulsante "Registra". È possibile seguire i passaggi seguenti per ridurre il rumore di fondo.
- Turn off the fan, air conditioner, or any other noisy appliances. (ES)
- Remove noisy kids, roommates, or pets. (ES)
- Hang a 'Do Not Disturb' sign on your front door. (ES)
- Shut your door and windows to avoid noise from outside sources, such as sirens, traffic horns, etc. (ES)
- Avoid the rustling sound of paper or moving things around your desk. (ES)
- Install noise-canceling software to filter out any background noise. (ES)
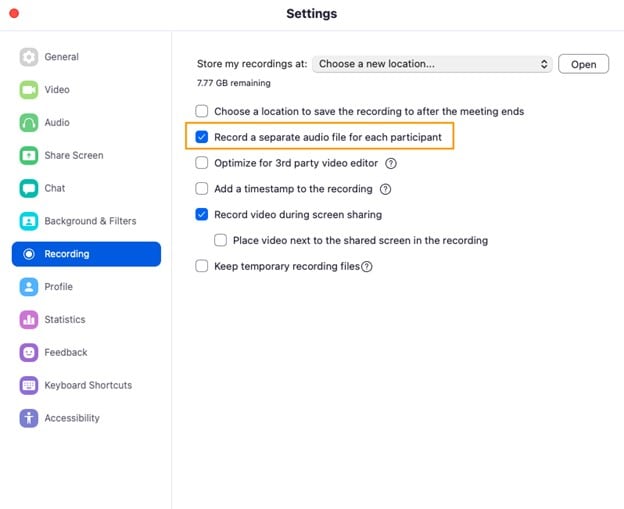
Step4 (ES)Set Up Separate Audio Tracks for Each Speaker (ES)
Wouldn't it be easier to edit your podcast if you recorded audio tracks for each speaker separately? Zoom has this feature of recording separate audio tracks. (ES)
To enable this, go to your zoom 'Settings' and click on the 'Recording' setting. Then select "Record a separate audio file for each participant," and you are ready to go. (ES)
Fase 5Prima di iniziare, si prega di informare gli ospiti sulla funzione di zoom.
Se stai andando online e il tuo ospite è nuovo di zoom, è meglio presentarlo brevemente alle funzionalità di zoom. Guida i tuoi ospiti su come utilizzare zoom per partecipare alla chiamata. Sarebbe meglio se gli dicessi anche la durata e il tema del tuo podcast.
Si consiglia di testare il microfono e le cuffie dell'ospite prima di iniziare il podcast in diretta. I vostri ospiti non hanno bisogno di scaricare e installare zoom sul loro dispositivo, ma possono partecipare cliccando sul link e inserendo la chiamata dal browser.
Fase 6Registra una chiamata usando Zoom
Registrare podcast con zoom è molto semplice. Ecco i passaggi che devi seguire:
- Fare clic sul pulsante Nuova riunione per iniziare la chiamata.
- Ora clicca sul pulsante "Invita".
- Selezionare Copia invito e copiare l'ID e la password della riunione
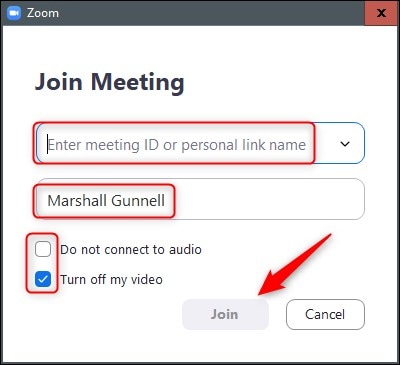
- Share the ID and passcode with your guest.
- Ask your guest to join the call by clicking on the link.
- After your guest joins the call, press 'Manage Participants' at the bottom of the screen.
- You will see a list of all the participants. Please make sure everyone's microphone is working and their voices are clear.
- Click on the participant name you want to make a co-host and press the make co-host button.
- Click the 'Record' button and turn on 'Original Sound' to start recording the podcast.
- When the podcast is complete, click on the 'End' button and then click on 'End Meeting for All.'
Step7Edit the Audio File Using Editing Tools
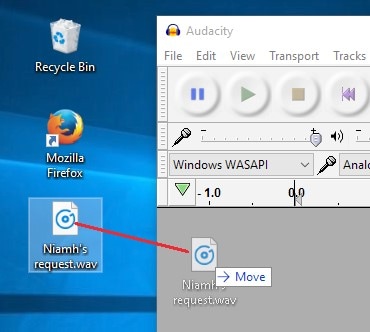
At the end of the recording session, you will get two different file types. An MP4 audio file that you can edit using audio editors and an MP4 video file that you can edit and post on youtube or any other social media platform.
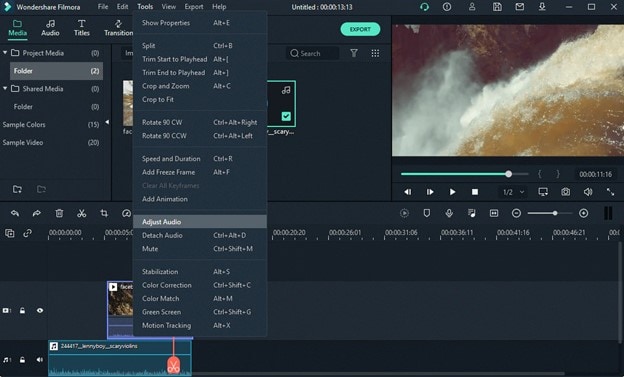
If you have recorded separate audio tracks for each speaker, you will get separate MP4 audio files for each speaker with that person's name. You can edit the audio tracks with professional podcast editing software, like Audacity editor or Filmora.
We have discussed how to use zoom for recording podcasts, and now we will look at the benefits of using zoom to record podcasts.
The Benefits of Using Zoom To Record Your Podcasts
- You can host any podcast on zoom- a solo one where you are the speaker, hosting a speaker, or co-hosting with another podcaster.
- Co-host with anyone you want with a particular social distancing meanwhile.
- Share the screen with the attendees in just a few clicks.
- Built-in feature splits audio and video and makes editing much more accessible.
- Can accommodate multiple participants when there are more speakers
- The audience may feel more involved in the discussion.
Limitaciones de usar zoom para podcasts
Having discussed the method to record podcasts with zoom and the benefits of using zoom, we will now discuss the limitations of zoom for podcast recording. Of course, every software has its limits, and so does zoom, and these limitations are discussed below.
● Audio and Video Quality
Zoom's priority is virtual conferencing, which compromises audio and video quality to optimize the speed and smoothness of calling. Besides, the recording audio and video quality depend upon your internet speed. If your internet is slow, you will experience lag and interruptions in your recorded podcasts.
● Compressed Audio and Video
Zoom compresses your audio and video files by removing portions of audio tracks making the file smaller. Audio compression makes your video chat smooth, but the resulting recorded file is of low quality for professional use.
● Time limit
With the free plan, you can make calls for a maximum of 40 minutes. To record longer podcasts, you must spend money on the paid version.
Consejos para mejorar tu podcast con zoom
- Ensure you and your guest have a strong and stable internet connection.
- Give your guest a brief tutorial on zoom before going live.
- Use a high-quality podcast microphone for better audio quality.
- Make sure your environment is quiet, and there is no background noise.
- Utilice el grabador de video incorporado en su dispositivo para grabar un podcast de respaldo. Será útil si su internet se retrasa y en caso de que pierda la grabación de zoom de alguna manera.
Debido a sus limitaciones, zoom no puede ser utilizado como una herramienta de grabación de podcast profesional. Por lo tanto, necesitamos una alternativa a zoom para grabar podcasts con fines profesionales, y aquí es donde entra en juego Wondershare Filmora.
La mejor alternativa a zoom - Grabación con Wondershare Filmora sin pérdida de calidad
Wondershare Filmora puede grabar la pantalla y la cámara web al mismo tiempo, y también puede capturar el audio del sistema y del micrófono al mismo tiempo. Como resultado, es uno de los software de grabación de video más poderosos que puede grabar cualquier actividad en la pantalla de su PC.
Con Wonderhsare Filmora, puede grabar fácilmente podcasts, gameplays, conferencias y muchos otros videos sin pérdida de calidad y exportar los videos a YouTube y Vimeo.
Características
A continuación se presentan algunas características de edición de audio de Filmora.
- Más de 2000 recursos de audio que incluyen música, efectos de audio y mucho más.
- Convierta sus archivos escritos en narraciones utilizando la función de Texto a voz. Es lo mejor para los podcasters que no quieren usar su voz.
- Admite la conversión de texto a voz que permite una conversión fluida de la narración a texto.
- Audio Ducking to quickly eliminate background noise and unwanted sound recorded while creating podcasts.
- Create eye-catchy podcast videos by adding adorable animations using an advanced keyframing tool.
Recording From Webcam and Editing Podcast With Filmora
Recording from a Webcam and editing podcasts have been made much easier and simpler by Filmora. It is an easy-to-use software and comes with amazing editing features.
Steps to Record From Webcam
Now we will discuss step by step how you can record from a webcam using Wondershare Filmora.
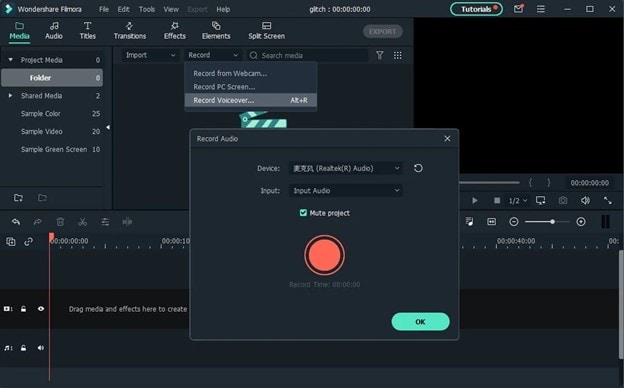
Paso 1 Download and Install Filmora
The first step is to download and install Filmora on your desktop. To download Wondershare Filmora, go to their official website and start downloading from there. After downloading, install Filmora on your device.
Fase 2 Launch Filmora:
After installing, left-click on the Filmora icon twice to launch it. The Wondershare Filmore user interface will open on the screen.

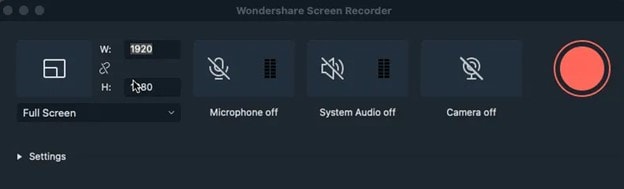
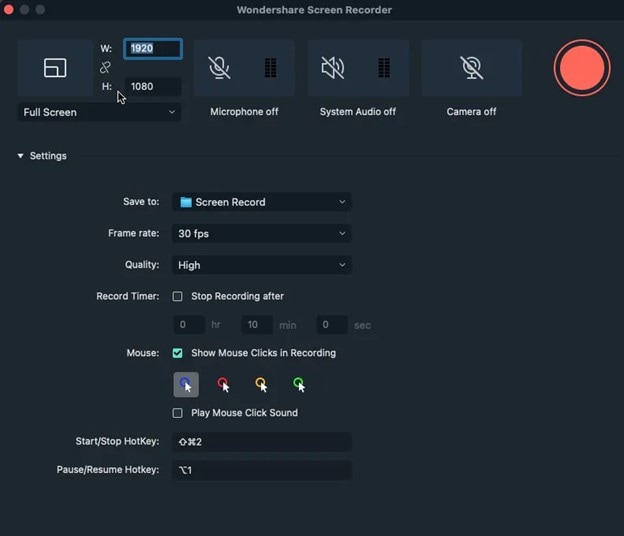
Fase 3 Screen Recorder's Settings Panel:
Open the Filmora recorder settings and make the following adjustments.
1. Dimension Settings
You can set the dimensions you want to record your desktop screen. This way, you will get fine recorded footage according to your needs.
2. Setting up Microphone
If you want to record audio with the desktop screen, click on the microphone icon to turn on the audio recording. Keep the microphone off if you want to record your device screen only.
3. Speaker Audio and Webcam
If you wish to record both device's audio and screen, keep the Speaker Audio Recorder in its default ON position.
Similarly, for the Webcam option, click on the icon to allow screen recording or keep it disabled if you don't want to record the screen.
4. Regolazione dei parametri
Imposta la frequenza dei fotogrammi, la qualità e i timer di registrazione dello schermo prima di iniziare. Inoltre, selezionare la cartella di destinazione in cui è stato registrato il file.
Passaggi per modificare un podcast usando Filmora
Una volta registrato il podcast, il passo successivo è modificarlo prima di pubblicarlo su youtube o su qualsiasi altra piattaforma di social media. Allo stesso modo, con le sue eccellenti capacità di editing, Filmora è il software preferito per questo scopo.
I suoi effetti e le sue transizioni possono avere un impatto reale, e qui vi mostrerò passo dopo passo come modificare podcast con Filmora.
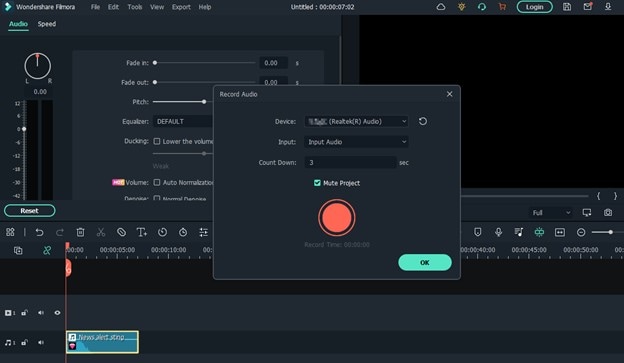
Paso 1Importa traccia audio
Primo passo per modificare un podcast è importare tracce audio in Filmora. È quindi possibile trascinare e rilasciare la traccia audio per importarla in Filmora.
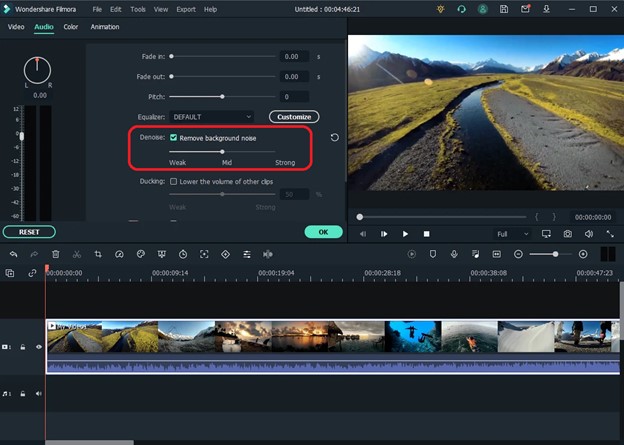
Fase 2Ascolta di nuovo e rimuovi il rumore di fondo:
Non dimenticare di riascoltare la traccia che hai aggiunto prima di procedere. Questo riascolto ti aiuterà a decidere quale parte vuoi conservare e rimuoverne un'altra. Usa diversi strumenti di riduzione del rumore per eliminare qualsiasi sibilo di sfondo.
Fase 3Mantieni l'audio sempre coerente
The next step after removing background noise is to make the volume consistent throughout the podcast. Select -2.0 level for peak amplitude and amplify the low amplitude areas.
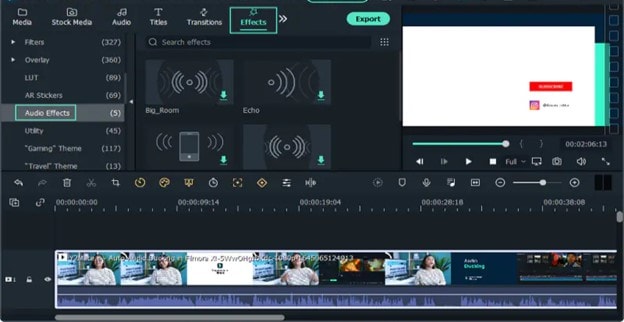
Step4 (ES) Add Effects and Transitions:
The next step is to do sound designing and mix the podcast. Add different effects and transitions. Always try to add such effects that increase the audience's interest and keep the audience engaged. Finally, compress and equalize the audio to adjust it accordingly in different sections of the podcast.
Fase 5 Preview, Export, and Post on Social Media:
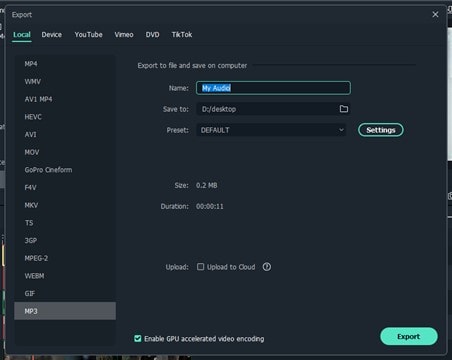
Once you complete your podcast editing, preview it to check if everything is in its place. If you want to make any other changes, this is the time. After you are satisfied, click the 'Export Button' to export your podcast. After exporting, you can post it on youtube or any other social media platform.
If you still have questions about the podcast audio editing process, you can look at the complete video tutorial below.
How to EDIT AUDIO in Filmora 11
Preguntas frecuentes sobre la grabación de podcasts con zoom
1. Can you record a podcast virtually?
Yes, a podcast can be recorded virtually using suitable software and equipment, such as a microphone and headphones. A noise-free environment is also crucial for recording a podcast.
Zoom is the most cost-effective, straightforward, and reliable software to record your podcast. You can use the built-in feature of zoom to record your conference calls and use them for podcasting purposes.
2. Are Zoom recorders good for podcasts?
Zoom makes it very simple for you to record podcasts, whether it is a solo podcast or a group discussion. Its features, such as a built-in recorder and separate audio tracks for each speaker, make it great for podcasting. But you can't use it for professional purposes because it compresses the audio files and reduces their quality.
3. How do I host a podcast on Zoom?
After installing zoom on your device, sign in to zoom. Create a meeting ID and passcode and invite people to your podcast by sending them the meeting ID and passcode. People can also join your meeting directly by clicking the link you provide. After people join your meeting, you can host a podcast. If you want to publish your podcast, you can start recording it from settings, edit it, and post it.
Final Words
In this article, we learned that recording and editing podcasts using suitable software is pretty straightforward. Zoom is ideal for hosting and recording podcasts for beginners.
Zoom alternatives such as Wondershare Filmora can be used to record podcasts for more professional use. In addition, Filmora can record a podcast in much better quality. Another advantage of preferring Filmora over zoom is its editing capability.
Edit your recorded podcast using Filmora's unique transitions and effects and post it on youtube, Vimeo, or any other social media platform.
If you find this information helpful, share it with your podcaster friends and if you have any queries, leave a comment below.