Slow-motion videos are in trend on social media platforms. You can shoot the footage in slow-motion mode or slow it down while editing the video. Similarly, if you are making a funny video, there are surely going to be parts where the video speeds up. Sped-up video clips have always been part of comic relief and entertainment for the audience. You will need a feature-rich video editor to customize the speed of your video.
DaVinci Resolve has established itself as a complete video editor. You can edit your video, correct the color, add visual effects and edit audio parts. You can undoubtedly change video speed in DaVinci Resolve. However, DaVinci Resolve's user interface is slightly complex for beginners. We will instruct on how you can speed up a video using DaVinci Resolve. We will also suggest you an easier alternative if you are not in favor of DaVinci Resolve.
In this article
Part I. What are the Scenarios When You Need to Speed Up Video?
There are several scenarios when speeding up a video becomes a necessity. Here are the most probable ones that you can relate to.
BBNP - TCBSSIALVTTNAMWHDBYVAYVLVMEYSPUTSTAWQ
FV - TSAITVLVFWMYSTU. TF,IFYMFVTEYV,SCSOYVWFAT
SV - SDVAEPOSMP
PUATACTNFVCSADAFVDROTRSMP
T - TVAATWYCSTVITAMPLBTE. THYCFTKYCFMOSOVD
Part II. Speed Up Video using DaVinci Resolve
DRISAPEWYCCVSEIWYCCSSISOTOP
You can also use the advanced Speed Ramp option to customize the video speed unevenly. Besides, there are retime curves to adjust the video speed at your convenience. Let us go through the detailed guide on how to speed up the video in DaVinci Resolve 17.
Method 1. Change Clip Speed Option
The simplest way is through the Change Clip Speed option. You can explicitly mention the speed percentage as needed. To speed it up, mention speed percentage above 100. If you want to slow it down, the speed percentage will be below 100. Here are the steps you need to execute.
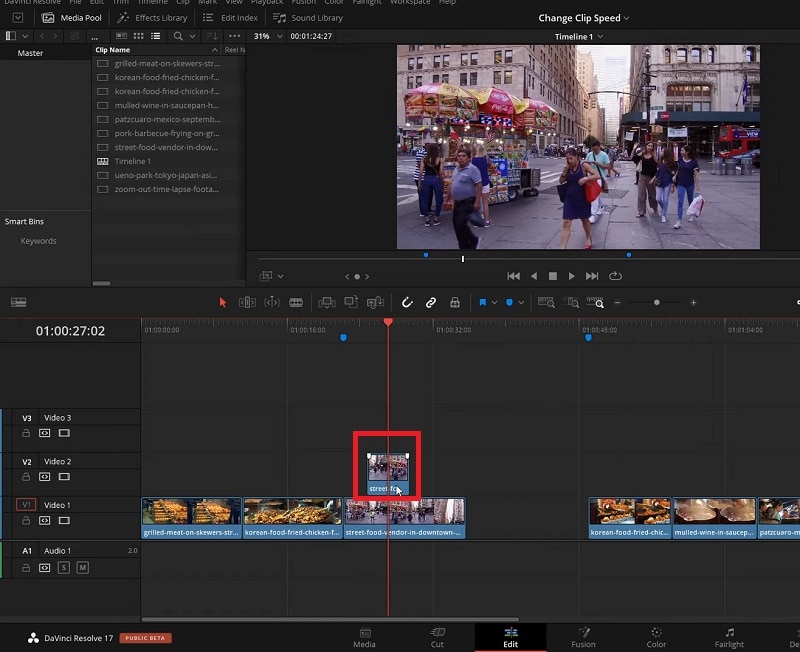
Step1 After you have placed the video clip onto the timeline, select the clip and right-click on it.
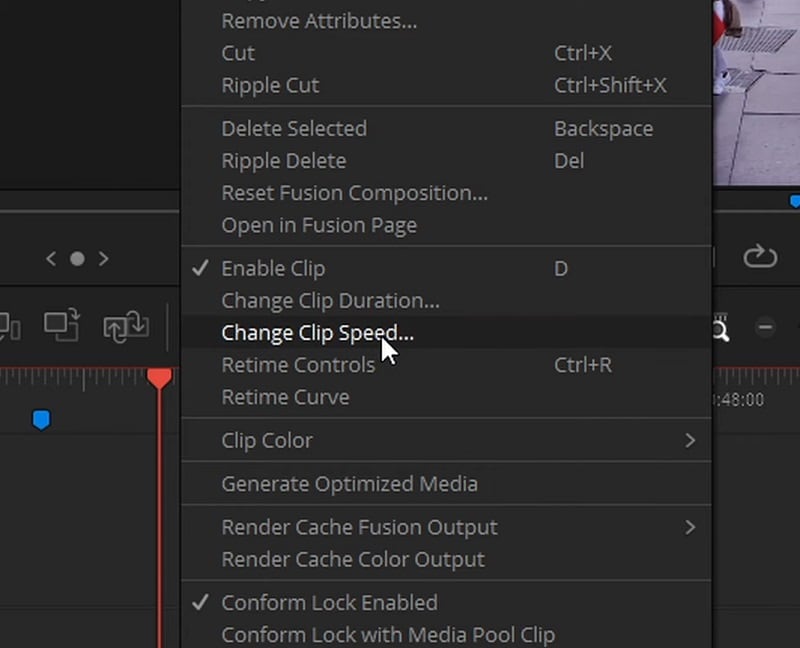
Step2 Tap "Change Clip Speed…" option.
Step3 Once the Change Clip Speed dialog box opens, modify the speed from 100% to something higher if you want to speed it up.
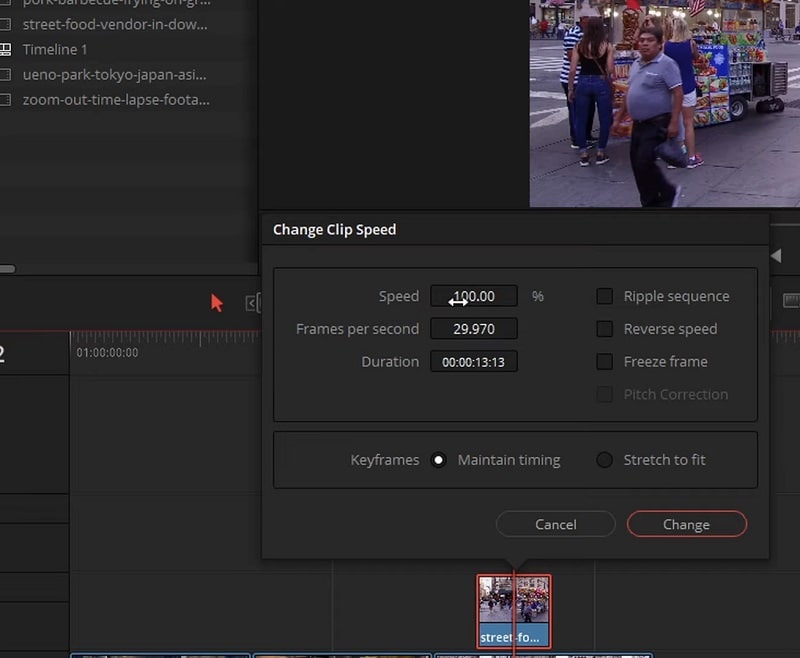
Step4 Cliquez sur le bouton Change lorsque vous êtes satisfait du résultat.
Méthode 2. Option de speed ramping
Le speed ramping est un processus qui vous permet de faire varier la vitesse de votre vidéo de manière inégale. Cela signifie que vous pouvez accélérer certaines parties tout en ralentissant d'autres. Cela est réalisé grâce aux commandes de retiming qui vous permettent de modifier les clips vidéo par sections à l'aide de points de vitesse. Voici les étapes pour illustrer le processus.
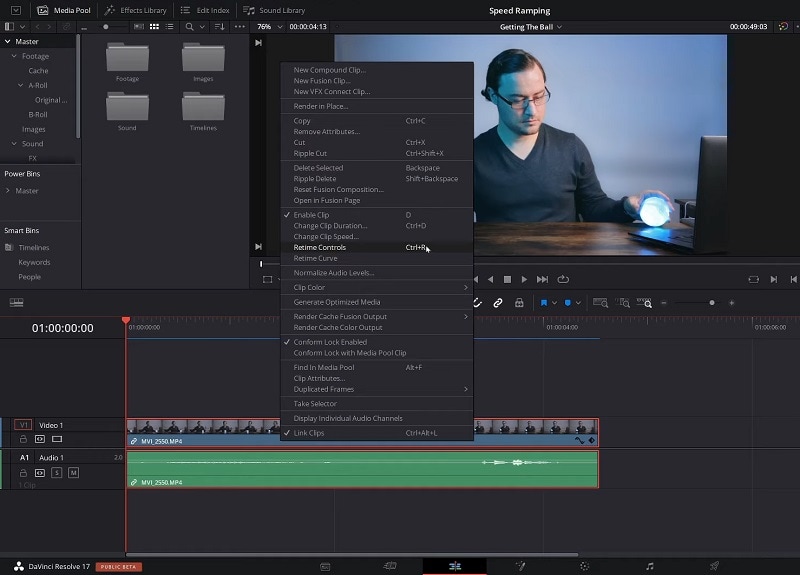
Step1 Cliquez avec le bouton droit sur le clip vidéo de votre timeline. Dans le menu, sélectionnez l'option Retime Controls.
Step2 Déplacez la tête de lecture à l'endroit où vous souhaitez modifier la vitesse. Cliquez sur la flèche à côté de 100% et sélectionnez l'option Add Speed Point. De même, déplacez la tête de lecture vers un autre point et ajoutez un nouveau point de vitesse.
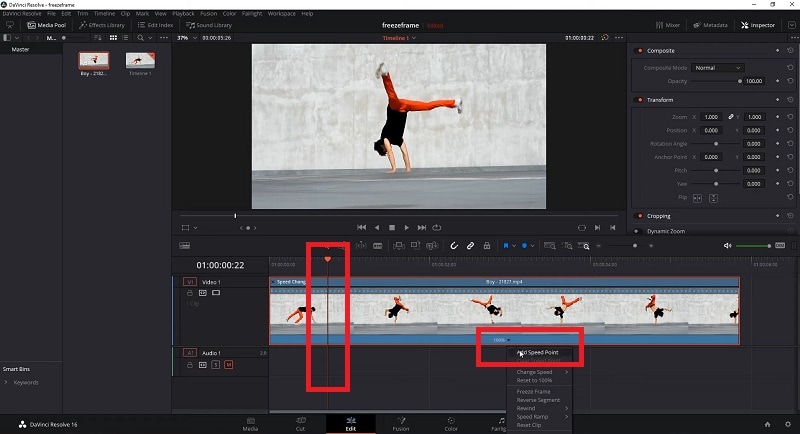
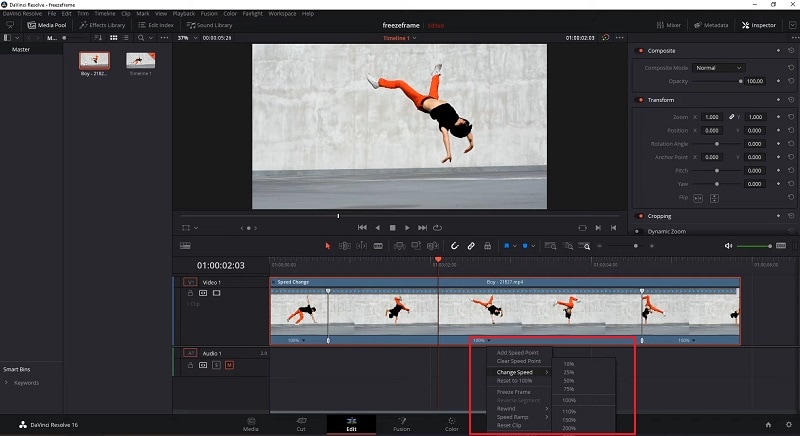
Step3 Cliquez sur la flèche à côté de 100% pour changer la vitesse entre deux points de vitesse. Allez à l'option Change Speed et sélectionnez parmi les préréglages. En fonction de votre sélection de vitesse prédéfinie, la vitesse de la vidéo entre les points de vitesse changera.
Part III. Pros and Cons
Chaque éditeur vidéo a ses avantages et ses inconvénients. Donc, si vous envisagez de modifier la vitesse de la vidéo avec DaVinci Resolve, vérifiez ses avantages et ses inconvénients.
I difetti sono troppo gravi per essere ignorati. Anche la curva di apprendimento è ripida. Molte persone sono alla ricerca di un'alternativa più semplice a Leonardo da Vinci per risolvere la transizione della rampa di velocità.
Part IV. A Simpler Alternative to DaVinci Resolve to Change Video Speed
Wondershare FilmoraPerfetto per te se stai cercando un'alternativa più semplice alla soluzione Leonardo da Vinci. Filmora è dotato di una semplice interfaccia utente. Come editor video, puoi ottenere quasi le stesse funzionalità di DaVinci Resolve. Concentrandosi sul cambiamento della velocità del video, Filmora ha opzioni simili a quelle di DaVinci Resolve, ma sono più facili da usare.
Chiunque può cambiare immediatamente la velocità dell'intero video o parte di esso. Gli utenti esperti possono scegliere di unificare la velocità e semplificare la pendenza della velocità. È possibile modificare la velocità del video clip secondo necessità. Quando la velocità cambia, non c'è jitter. In breve, Filmora è personalizzato per soddisfare tutte le tue esigenze per accelerare il tuo video in passaggi più semplici.
Come modificare la velocità del video in Filmora?
Ci sono fondamentalmente tre modi per cambiare la velocità del video in Filmora. Puoi scegliere le modifiche istantanee tra le impostazioni predefinite. È possibile personalizzare la velocità del video o utilizzare i gradienti di velocità per ottenere cambiamenti di velocità video di alto livello. Ora vi mostreremo come modificare la velocità del video in Wondershare Filmora.
OsservazioniQuesto videoScopri tutti i modi per cambiare la velocità del tuo video in Filmora.
Metodo uno. Seleziona tra le preimpostazioni della velocità
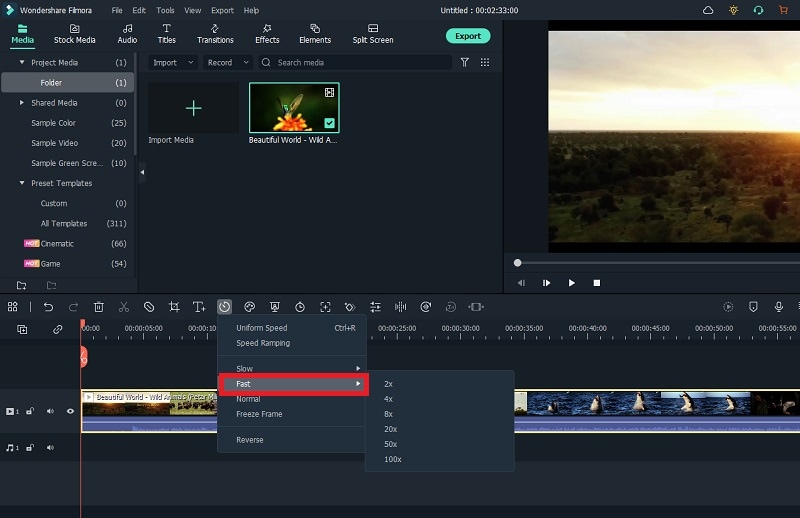
You can instantly select from Speed Presets if you want to change your video speed in fewer steps. There are fast speed presets as well as slow speed presets available. Follow these steps to choose a speed preset.
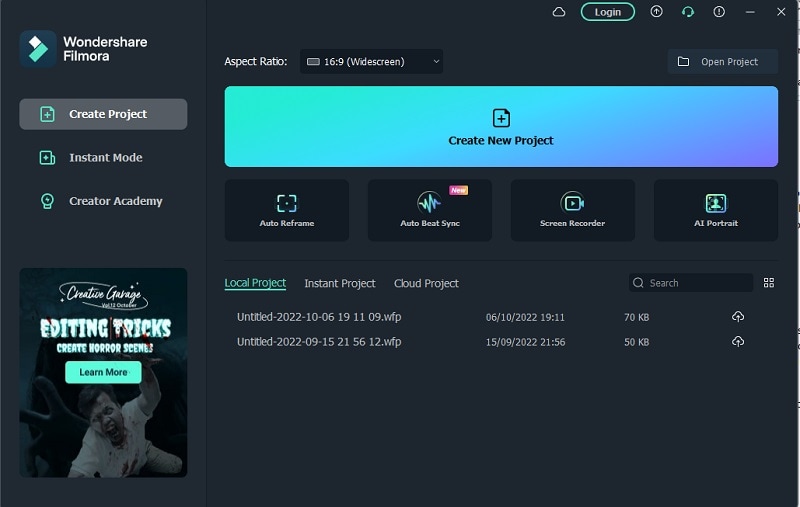
Step1 Install Filmora on your computer (Windows or macOS). Open Filmora and select Create New Project.
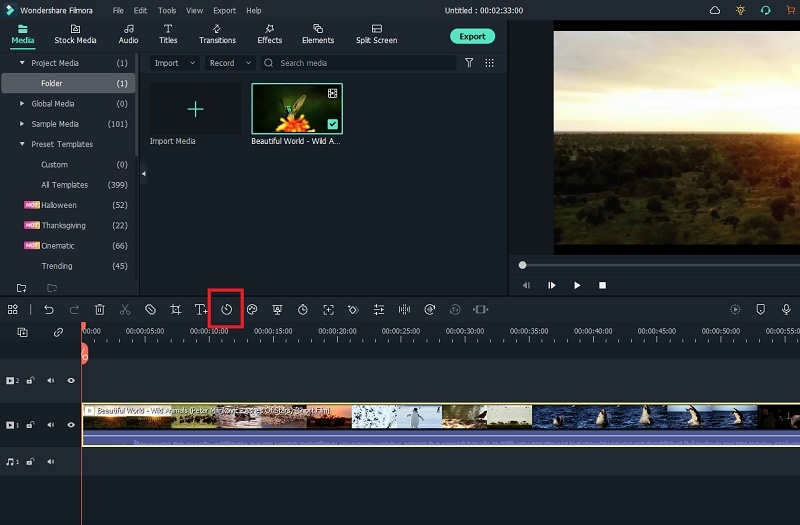
Step2 Drag the video file from your computer to Filmora's timeline. Choose video and tap Speed icon that you can find at the top of the timeline.
Step3 From the menu, go to the Fast or the Slow option and select a speed preset. Finally, you can export the file to save it to your computer.
Method 2. Alter Uniform Speed
If you want to customize the video speed as per your need, the Uniform Speed option is for you. You can select from 0.01X to 100X speed. The selected speed will be applicable to the entire video clip uniformly. Here are the steps to set uniform speed.
Step1 Once you have the video on the timeline, click on the Speed icon.
Step2 Choose the Uniform Speed option, which will open the Uniform Speed tab.
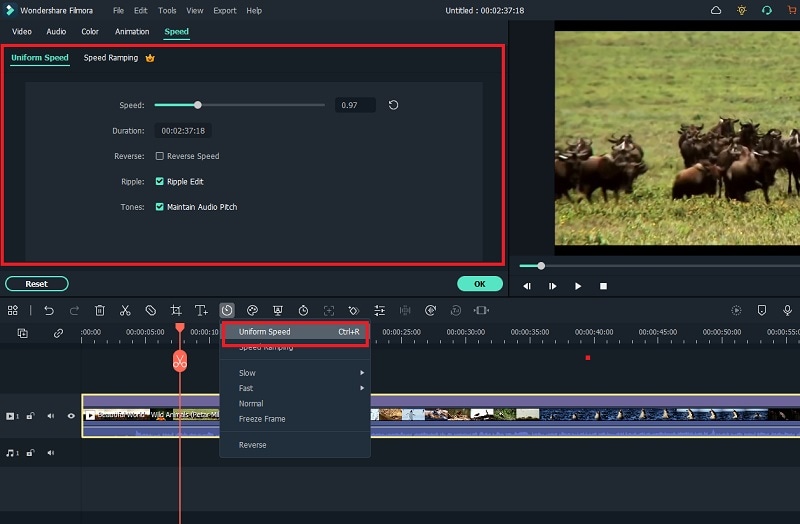
Step3 Adjust the speed slider to change the video speed as you need.
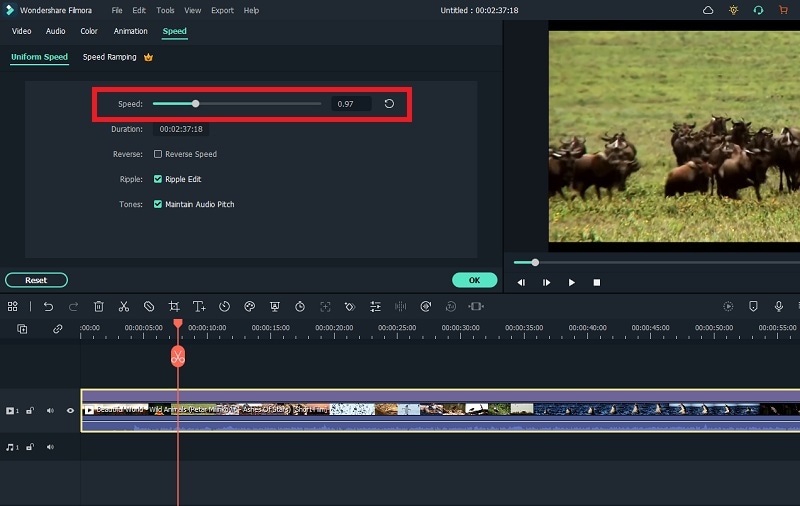
Step4 After setting the speed, click on the Ok button. Then you can export the video in any file format.
Metoda 3. Koristite ubrzanje i usporavanje
Ubrzanje i usporavanje vam omogućuje grafikon za prilagođavanje brzine videa. Možete ubrzati i usporavati različite dijelove videa prema vlastitom nahođenju. Brzina videa varira prema vrhovima i dolinama grafa. Evo koraka za izvođenje ove metode.
Step1Postavite video datoteku na vremensku liniju i idite na ikonu Ubrzanja.
Step2Odaberite opciju Ubrzanje i usporavanje. To će otvoriti karticu Ubrzanja i usporavanja.
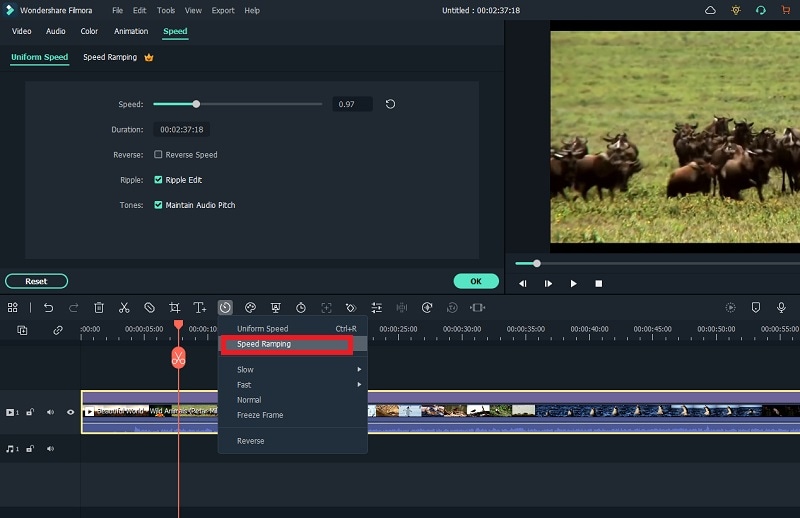
Step3Možete odabrati bilo koji unaprijed postavljeni izbor ili odabrati opciju Prilagodi. Kad odaberete opciju Prilagodi, možete urediti grafikon prema potrebama.
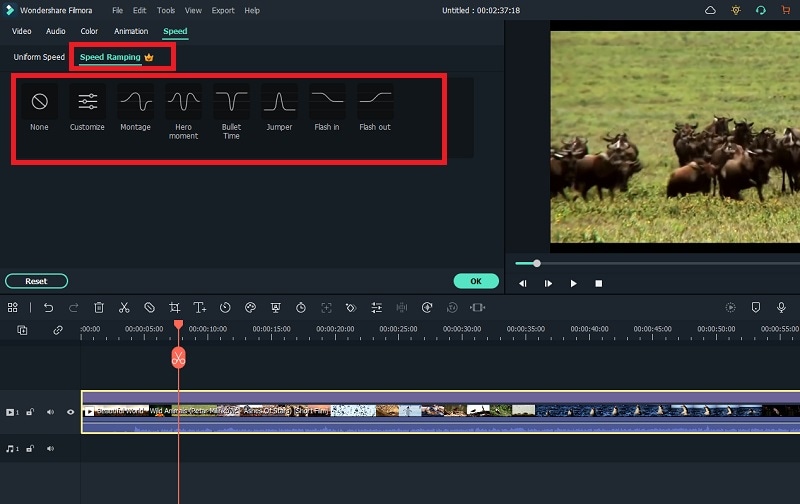
Step4Kliknite na gumb U redu, a zatim na gumb Izvoz, kako biste sačuvali video.
Part V. Comparison Between DaVinci Resolve and Filmora
| Parametri | DaVinci Resolve | Filmora |
| Promjena opcija brzine videa | Too Many | Appropriate |
| Video Speed Presets | Limited | Ample |
| Ease of Speed Change | Slightly Complicated | Very Easy |
| Export Options | Limited | Ample |
| Application Stability | Non molto stabile | Alta stabilità |
| La valutazione media | 3/5 | 4.5/5 |
| Prezzi | Alto | Ragionevole. |
| Ideale per | Editor video avanzato | Editing video per principianti e avanzati |
Conclusione
We have answered how you can use the speed ramp DaVinci Resolve 17 to speed up your video. We have also illustrated the steps to change speed settings in DaVinci Resolve. But many users look for an easier video editor to avoid DaVinci Resolve's complicacy. Wondershare Filmora is that intuitive video editor where you can change video speed as you need. You can instantly choose from presets and customize the video speed throughout.
 Garanzia di Download Sicuro, zero malware


