When there are certain boring but necessary parts in your video, you need to speed them up. Similarly, you may need to reduce the duration of the entire video. Speeding up the video is your only option when you do not want to cut any part. You must have also observed that certain videos look funny when you speed them up. To speed up videos, you will need a video editor that does not degrade the video quality.
Final Cut Pro is a popular choice to speed up video without distorting the pitch. Many think that the video quality can degrade when they change the speed of the video clip. This concern can be taken care of when you alter the video speed with Final Cut Pro. Instead of changing the speed of the entire video, you can change the speed of specific parts. We will illustrate how to speed up the video using Final Cut Pro and suggest a better choice than FCP.
In this article
Part I. Speed Up Video using Final Cut Pro
Final Cut Pro by Apple is one of Mac users' most popular video editors. Many video creators purchase MacBooks for editing their videos in Final Cut Pro. The video editor is suitable for beginners as well as professionals. FCP, as a video editor, is super fast in rendering and processing video while exporting. Here are the steps for the Final Cut Pro speed-up clip.
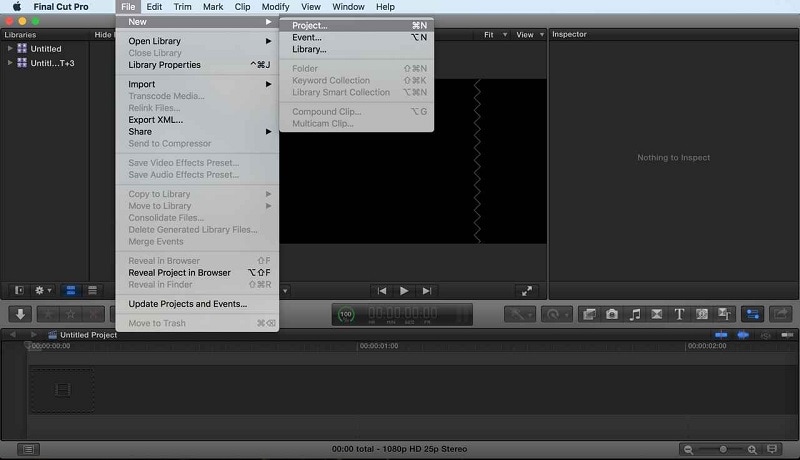
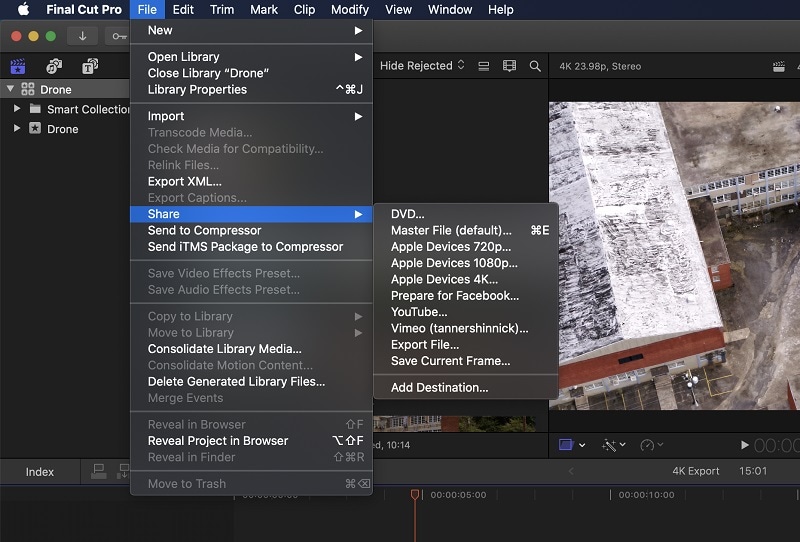
Step1 Open FCP. Navigate to File>New> and tap Project to start a new project.
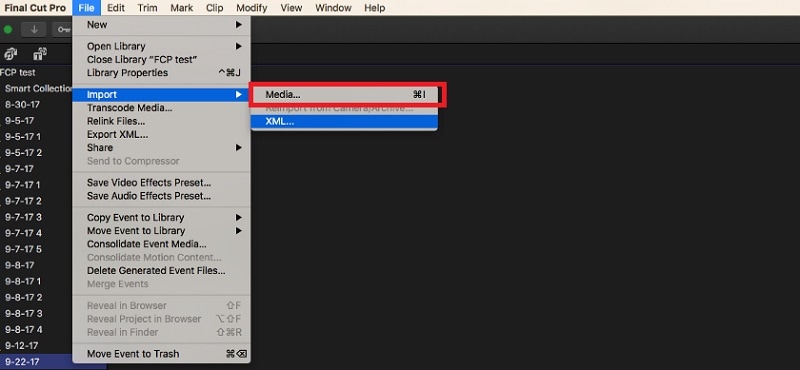
Step2 Go to File>Import> Media and fetch your video clip. After that, drag/drop the video clip into the timeline.
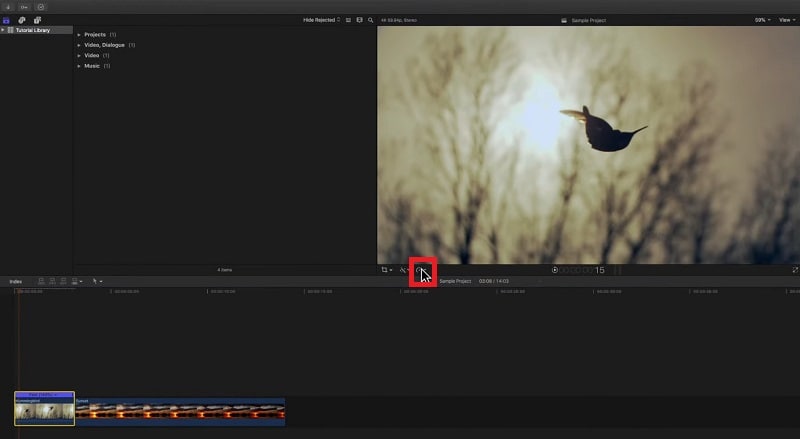
Step3 Choose the video clip from the timeline. Click on the Speedometer(Retime) icon at the top of the timeline.
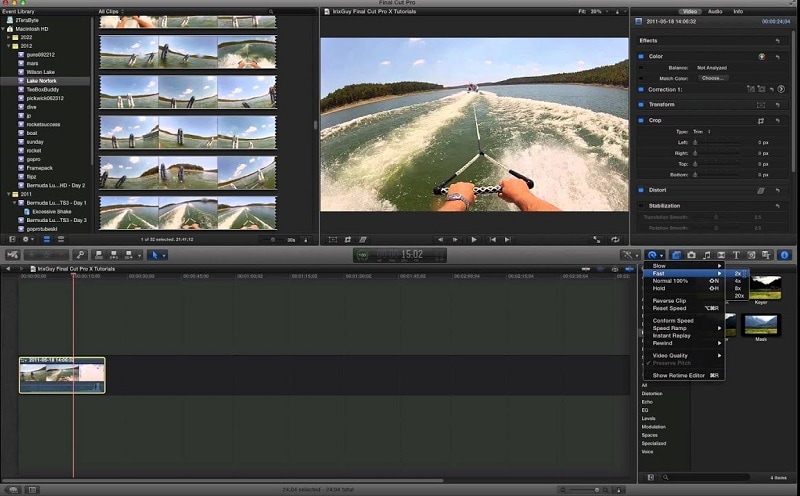
Step4 Tap the Speedometer icon, to get the drop-drop menu. For the Final Cut Pro speed-up video, go to Fast and select the speed. You get to choose from 2X to 20X.
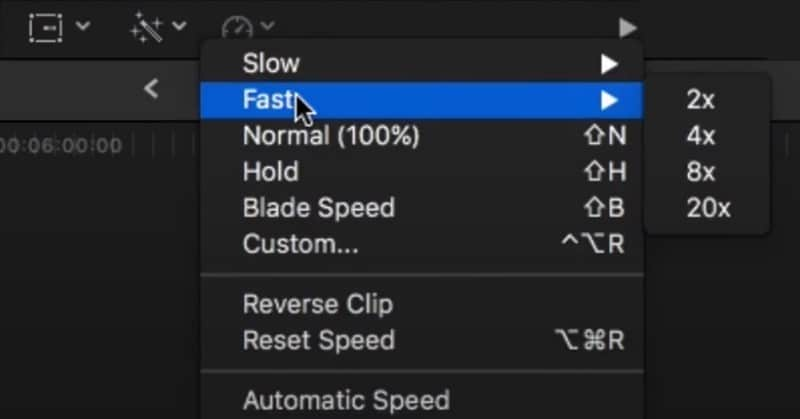
If you want to customize the speed-up rate, you can click on the Custom option. Enter any desired percentage speed.
Step5 Now, play the video.
Part II. Tips for Speeding Up Video in Final Cut Pro
You have to keep a few points in mind when you speed up videos in Final Cut Pro. This ensures that the video does not get distorted while speeding up a section. Here are some tips to follow to speed up the video in FCP.
ATPSC -
By default, FCP preserves the pitch of the audio even when you change the speed of the video. However, you may want to change the pitch per the video's speed. This is because you might want to make the audio sound funny. You need to turn off the Preserve Pitch option from Retime menu. Once you do that, the pitch of the sped-up clip adjusts itself as per the change in speed.
SUVBAFR -
You can shoot at a low frame rate for the scene you want to speed up. The frame rate should be lower than the overall video project's frame rate.
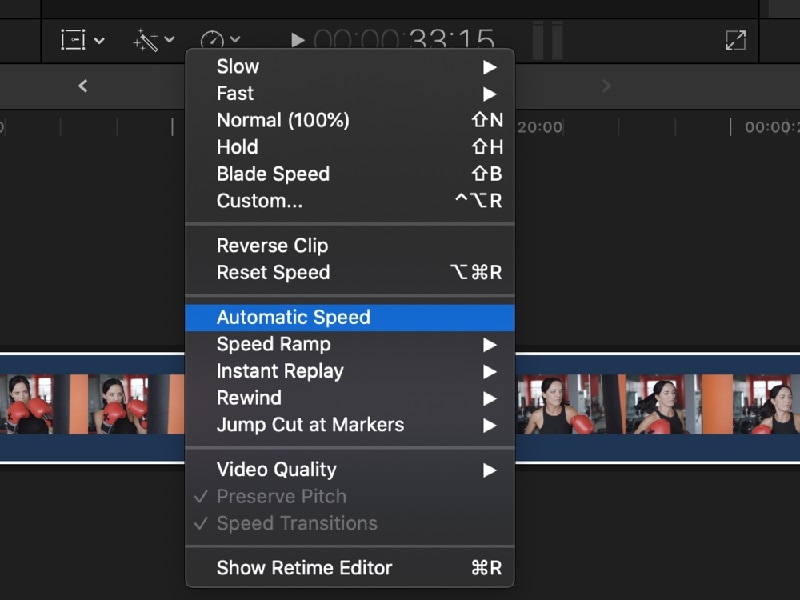
You can add the scene to your video project on the timeline. Then you need to choose Automatic Speed from Retime menu. This will increase the frame rate from the scene to the video project frame rate. Once the frame rate increases, the video will speed up automatically.
SOtSUAV -
Sometimes, the overall video may look old when you speed up a particular portion. That is why there are two options available on FCP. The first option is frame blending which is more suitable for the slow-motion clip.
The second option is the optical flow that smoothens out the sped-up clip. It adds in-between frames by analyzing the directional movement of pixels. You can find the option from Video Quality present in the Retime menu.
Part III. The Right Final Cut Pro Alternative for Changing Speed - Filmora
FCP has a steep learning curve. Unless you have some experience in video editing, you will find the user interface slightly complicated. Besides, FCP is only available for Mac users since it is an Apple product.
वीडियो की गति बदलने के लिए कई लोग एक फाइनल कट प्रो के विकल्प की तलाश करते हैं। फाइनल कट प्रो की तुलना में, वंडरशेयर फिल्मोरा वीडियो की गति बदलने के लिए सबसे अच्छा विकल्प है।
Wondershare Filmora est un éditeur vidéo professionnel disponible pour les utilisateurs Windows et Mac. L'éditeur vidéo convient aux débutants ainsi qu'aux créateurs de vidéos expérimentés. La popularité de Filmora est due à son interface utilisateur super intuitive. Vous obtenez presque toutes les fonctionnalités de FCP dans Filmora.
En comparaison, il y a plus d'effets vidéo, d'éléments et de fichiers multimédias disponibles pour améliorer vos vidéos. Vous obtenez les derniers effets de temps en temps afin d'avoir les éléments tendance dans la vidéo, vous pouvez également enregistrer la vidéo modifiée dans différents formats de fichiers vidéo selon vos besoins, et même enregistrer une vidéo via une webcam et capturer l'écran à l'aide de Filmora.
Plusieurs effets d'IA, autocollants et éléments sont disponibles pour améliorer vos vidéos. La plupart des utilisateurs trouvent plus facile de modifier des vidéos sur Filmora que sur Final Cut Pro.
Comment changer la vitesse d'une vidéo dans Filmora?
Changer la vitesse d'une vidéo dans Filmora est très facile. Vous pouvez accélérer votre vidéo selon vos besoins de plusieurs façons. C'est pourquoi Filmora est une meilleure option que Final Cut Pro. Nous illustrerons toutes les différentes méthodes pour changer la vitesse d'une vidéo dans Filmora.
Vous pouvez regarder this video pour comprendre comment changer la vitesse de la vidéo dans Filmora.
Méthode 1. La façon la plus simple - Cliquez sur les options de vitesse "2x-100x"
Tout comme Final Cut Pro, vous pouvez choisir parmi des options de vitesse prédéfinies pour changer la vitesse de la vidéo. C'est sans aucun doute le moyen le plus facile de changer instantanément la vitesse de la vidéo. Alors que Final Cut Pro propose des options de vitesse de 2X à 20X, Filmora propose des préréglages de vitesse de 2X à 100X. Voici les étapes à suivre pour accélérer la vidéo en choisissant une option de vitesse prédéfinie.
Step1Téléchargez, installez et lancez simplement Filmora. Appuyez sur l'option Créer un nouveau projet.

Step2Allez dans Fichier> Importer des médias> Importer des fichiers multimédias et choisissez le fichier vidéo. La vidéo sélectionnée sera importée dans le dossier Média du projet. Vous pouvez également utiliser la fonction de glisser-déposer.

Step3Faites glisser et déposez le fichier vidéo sur la timeline. Sélectionnez le clip vidéo de la timeline et cliquez sur l'option Vitesse (icône de la minuterie) en haut de la timeline. Si vous souhaitez accélérer une partie de la vidéo, vous devez diviser le clip vidéo.

Step4Dans le menu, allez dans Rapide et sélectionnez une option de vitesse selon vos besoins. Ensuite, jouez la vidéo pour voir les changements.

Step5Appuyez sur Exporter pour enregistrer le fichier vidéo dans le format souhaité.
Méthode 2. Utiliser une vitesse uniforme pour changer la vitesse.
If you want to customize the video speed uniformly, there is a dedicated option called Uniform Speed in Filmora. This means you do not want to choose from the preset speed options. You may want to set the speed of the video to 3X, but it is not available in the preset options.
That is where Uniform Speed comes in handy, and you can set any speed from 0.01X to 100X. Here are the steps to follow.
Step1 Once you have dropped the video file onto the timeline, click on the Speed(timer) icon.
Step2 Click on the Uniform Speed option. This will open the Uniform Speed tab above the timeline.

Step3 Adjust the speed slider to set the desired speed as per your requirements. The duration will change as per the speed you set, and you can set the duration below the speed slider. Just like Final Cut Pro, you can turn on Ripple and Audio Pitch as per your preference.

Step4 Once you are satisfied with the speed, click on the Ok button. Thereafter, tap Export to save the edited video file.
Method 3. Use Speed Ramping to Change Speed
There is a unique way to change your video speed called speed ramping. You can speed up some parts and slow down the other parts, like crests and troughs in a graph.
The speed ramping feature comes with several graphical presets. You can choose from the presets and customize the speed as per your requirements. Check the steps to use speed ramping to change your video speed.
Step1 Drag and drop the video file onto the timeline. Click on the Speed(timer) icon at the top of the timeline.
Step2Clicca sull'opzione Speed Rope. Questo aprirà la pendenza della velocità sopra la linea temporale.

Step3Scegli tra i preset disponibili in base alle tue esigenze. Altrimenti, puoi scegliere un'opzione personalizzata e modificare il nodo secondo necessità.
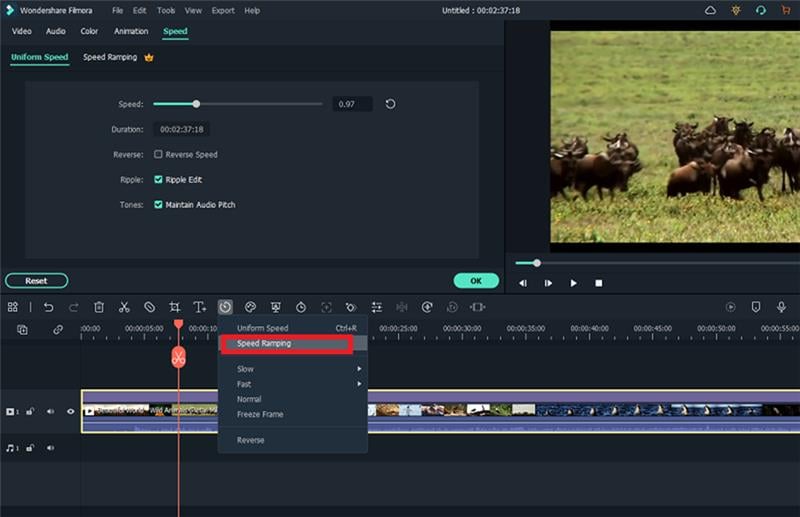
Step4Quando sei soddisfatto del risultato, fai clic sul pulsante OK. Infine, fai clic su Esporta
Conclusione
In alcuni video, potrebbe essere necessario accelerare alcune parti. Abbiamo spiegato come velocizzare il video in Final Cut Pro. Tuttavia, se Lei non ha Final Cut Pro o non è soddisfatto di FCP, Wondershare Filmora è una buona scelta. Soprattutto, i passaggi di tutti i diversi metodi sono molto semplici e possono essere seguiti da tutti.
 Garanzia di Download Sicuro, zero malware


