Cresci e cresci dalla guida per l'utente di Filmora
-
Guida per Filmora Windows
- Navigazione di Filmora
- Importazione dei File Multimediali
- Dividere, Regolare, Silenziare e Scollegare l'Audio
- Modifica delle Immagini
- Testo e Titoli
- Filtri e Sovrapposizioni
- Come Aggiungere Elementi, Transizioni ed Effetti Sonori in Filmora
- Effetto PIP (Picture in Picture)
- Rilevamento Scene
- Effetto Split Screen
- Schermo Verde
- Acquisizione di Istantanee dei Video
- Esportazione e Condivisione
- Rimozione della Filigrana
- Riproduzione Inversa dei Video
- Stabilizzazione dei Video
- Come Registrare lo Schermo del Computer
- Elenco delle Scorciatoie di Tastiera (Windows)
- Download, Installazione, Attivazione, Aggiornamento e Disinstallazione (Windows)
- Pan e Zoom per Sistema Windows
- Regolazione Avanzata del Colore
- Taglierina Istantanea
- Modifica dei Video Ripresi con Action Cam
- Accesso allo Store di Effetti Filmstock
- Accorciare, Dividere, Ruotare, Ritagliare e Unire Video
- Animazione con i Fotogrammi Chiave
- Tracciamento Moto (Motion Tracking)
- Componente Aggiuntivo Silence Detection
- Riframe automatico
- Ultime versioni e funzionalità di Filmroa11
- Piano per i Membri
- Aggiungere e Personalizzare le Sovrapposizioni
- Risorsa Filmstock
- Tipi di Transizione
- Aggiungere Transizioni
- Lista di Tutte le Versioni
- Modificare le Transizioni
- Tipi di Audio
- Requisiti di Sistema di Windows
- Specifiche Tecniche
- Aggiungere e Modificare l’Audio
- Tipi di Titoli
- Requisiti dei Driver GPU e GPU
- Aggiungere Risorse Titoli
- Rendering Accelerato Tramite GPU
- Correzione dell'Obiettivo
- Modificare e Personalizzare i Testi
- Dividere e Ritagliare Video
- Layout Pannello
- Media da Usare
- Animazione del Testo
- Preset di testo
- Tipi di Elementi
- Creare con la Modalità Istantanea
- Aggiungere e Personalizzare Elementi
- Imposta preferenza
- Impostazioni del Progetto
- Esportare su YouTube
- Flusso di Lavoro e Panoramica per l'Esportazione
- Cos’è l’Editing Video Proxy
- Esportare in Locale
- Esportare su Dispositivo
- Esportare su Vimeo
- Masterizzare un DVD
- Creare un Nuovo Progetto
- Regolare l’Audio
- Modificare la Velocità di Riproduzione del Video
- Panoramica su Wondershare Drive
- Ottenere 1 GB di Spazio di Archiviazione Cloud Gratuito in Filmora
- Usare Wondershare Drive
- Salvare i file in Wondershare Drive
- Creare con Modello Componente
- Trovare i File in Wondershare Drive
- Gestire Wondershare Drive in Filmora
- Aprire Progetto
- Rimuovere l’Audio
- Zittire in Filmora
- Rilevamento del Battito
- Ritagliare/Dividere/Tagliare l'Audio
- Mixer Audio
- Aggiungere Effetti Audio al Video
- Animazione Predefinita
- Personalizzare
- Fotogrammi Chiave di Animazione
- Condividere file con Wondershare Drive in Filmora
- Rilevamento della Compatibilità del Sistema
- Velocità Uniforme
- Anteprima dei File di Rendering
- Speed ramping
- Spostare Progetti
- Effetti AI Portrait in Filmora
- Reframe Automatico Video
- Sincronizzazione automatica del battito
- Evidenziazione Automatica (Auto Highlight)
- Aggiungere Sticker AR
- Gestire la Timeline
- Rilevamento del Silenzio
- Normalizzazione Automatica
- Modificare la Qualità di Riproduzione
- Ducking in Filmora
- Come Marcare una clip
- Auto Denoise
- Funzione di rilevamento della scena
- Modifica Gruppo
- Tipi di Effetti
- Effetti Boris FX
- Aggiungere e Modificare gli Effetti NewBlue FX
- Aggiungere e Personalizzare Filtri
- Applica la maschera al video
- Usare l’Effetto Sfocatura Mosaico
- Usare l’Effetto Face-Off
- Usare il Fermo Immagine
- Applicare Ombra Esterna
- Riposizionare i Progetti
- Miglioramento Automatico
- Modifica con Modelli Predefiniti
- Miglioramento del Colore
- Bilanciamento del Bianco
- Regolare il Tono nella Correzione del Colore
- Applicare 3D LUT in Correzione del Colore
- Dissolvenza Audio in Entrata e in Uscita
- Cambiare il Tono dell'Audio
- Equalizzatore Audio
- Migliori Pratiche: Backup sul Cloud
- Opzione Bordo
- Trasformare
- Compositing
- Note sulla Versione
- Sincronizzazione Automatica
- Introduzione del Programma | Guida di Wondershare Filmora 11
- Problemi noti e bug risolti
- Registrati/aggiorna/disinstalla
- Ritaglio Intelligente IA per Windows
- Estensione dell'Audio IA per Windows
- Audio Denoise IA per Windows
- Finestra di avvio di Filmora
- Regolazione del tono su Windows
- Livello di regolazione per Windows
- Area di lavoro Filmora per Windows
- Visualizzatore audio
- Elenco delle scorciatoie da tastiera
- Registra/Aggiorna/Disinstalla
- La funzione HDR su Filmora
- Condividere video su TikTok da Filmora
- Presentazione avatar
- Audio Stretch per Windows
- Effetti Audio-Driven per Windows
- Gestisci tracce di Windows
- Strumento di taglio istantaneo per Windows
- HSL per Windows
- Istogramma per Windows
- Accesso agli indicatori audio in Windows
- Schermatura intelligente dell'intelligenza artificiale per Windows
- Impostazioni di esportazione per Windows
- Barra degli strumenti personalizzata di Windows
- Ondulazione automatica di Windows
- Editor di testo avanzato per Windows
- Contrassegna e segna per Windows
- Esporta intervallo clip per Windows
- Abilita/Disabilita clip in Windows
- Editor di copilota di intelligenza artificiale per Windows
- Oscilloscopio video professionale per Windows
- Clip composito per Windows
- Creatore di miniature AI per Windows
- Etichetta della finestra
- Editor grafico dei fotogrammi chiave di Windows
- Sfondo personalizzabile per video e immagini in Windows
- AI Sound Remover per Windows
- Editing di testo di intelligenza artificiale per Windows
- Protezione del colore della pelle AI per Windows
- Intelligenza Artificiale Generatore di Musica per Windows
- Curva RGB video
- Esporta clip selezionate per Windows
- Intelligenza artificiale da testo a video per Windows
- Modifica multi-clip per Windows
- Ultra rallentatore e flusso ottico per Windows
- Scorciatoie per la velocità di riproduzione per Windows
- Plugin ChatGPT-Intelligenza artificiale copywriting
- Importa file da unità cloud di terze parti
- Effetto conto alla rovescia in Filmora
- AI Image per Windows
- Rimuovere la filigrana
- Evidenziazione auto
- Rendering accelerato da GPU
- Elementi e Transizioni ed Effetti sonori
- Come utilizzare la funzione di testo curvo in Wondershare Filmora?
- Come utilizzare la funzione AI Sticker in Wondershare Filmora?
- Come eseguire la clonazione vocale AI in Wondershare Filmora?
- Rimozione oggetti video AI per Windows
- Ricerca intelligente AI per Windows
- Creare clip multi-camera
- Miglioratore vocale AI
- Curva di percorso del keyframe per Windows
- Mosaico del viso AI per Windows
- Timeline magnetica per Windows
- Compressore video su Windows
- Effetto sonoro AI
- Tracciamento planare
- Miglioratore video AI
- Riduzione rumore video per Windows
- Traduzione AI per Windows
- Ruote di colore per Windows
- Ritaglio ritratto AI
- Da voce a testo/da testo a voce/SRT
- Palette di colori AI per Windows
-
Guida per Filmora Macos
- Elenco delle Scorciatoie di Tastiera
- Creare Progetti
- Modificare l'Audio
- Inserire le Transizioni
- Usare Testo e Titoli
- PIP (Immagine nell'immagine)
- Creare un Video con Schermo Verde
- Rilevazione Automatica delle Scene
- Rimuovere la Filigrana dai Video
- Salvare e Condividere
- Come Stabilizzare i Video
- Registrazione dello schermo per Mac
- Tipi di Transizioni
- Come Modificare le Transizioni
- Tipologie di Contenuti Audio
- Aggiungere e modificare l'audio su Mac
- Tipologie di Titoli su Mac
- Come Modificare e Personalizzare il Testo su Mac
- Come Animare il Testo su Mac
- Come Usare i Preset Testuali su Mac
- Tipologie di Elementi su Mac
- Come Aggiungere e Personalizzare gli Elementi su Mac
- Come Esportare i Progetti su Mac
- Esportazione di video su computer locale su Mac
- Come Esportare Video Ottimizzati per Altri Dispositivi su Mac
- Come Caricare Video su YouTube su Mac
- Guida di Come Caricare un Video sul Vimeo
- Come Masterizzare Video su DVD su Mac
- Wondershare Drive su Mac
- Come Ottenere 1 GB di Spazio di Archiviazione Cloud Gratis su Mac
- Come Usare Wondershare Drive su Mac
- Come Trovare File su Wondershare Drive su Mac
- Come Gestire Wondershare Drive su Mac
- Come Condividere i File con Wondershare Drive su Mac
- Impostazioni Progetto su Mac
- Come Utilizzare i File di Proxy su Mac
- Rilevazione della Compatibilità di Sistema su Mac
- Come Renderizzare i File di Anteprima
- Gestione della Timeline su Mac
- Come Modificare la Qualità di Riproduzione su Mac
- Come Raggruppare le Clip su Mac
- Come Aggiungere Marcatori alle Clip su Mac
- Come Silenziare l'Audio su Mac
- Come Rilevare i Beat su Mac
- Come Accorciare, Dividere e Tagliare l'Audio
- Come Mixare l'Audio su Mac
- Effetti Audio su Mac
- Come Uniformare la Velocità su Mac
- Come Utilizzare lo Speed Ramping su Mac
- Come Usare l'Effetto PIP (Picture-in-Picture) su Mac
- Come Eseguire il Bilanciamento dei Bianchi su Mac
- Come Eseguire il Miglioramento dei Colori su Mac
- Come Regolare il Tono delle Clip su Mac
- Come Applicare le LUT 3D su Mac
- Come Usare i Preset di Animazione su Mac
- Come Personalizzare le Animazioni su Mac
- Come Eseguire la Correzione dell'Obiettivo su Mac
- Animazione con i Fotogrammi Chiave su Mac
- Dividere e Tagliare Video su Mac
- Come Utilizzare la Funzione Stilizzazione IA su Mac
- Come Aggiungere l'Ombra Esterna su Mac
- Effetto Face-Off
- Rendering su GPU e codifica hardware
- Schermata Iniziale su Mac
- Panoramica dei Pannelli su Mac
- Come Modificare la Velocità dei Video su Mac
- Come Eseguire il Reframe Automatico su Mac
- Come Usare le Maschere su Mac
- Istantanea video su Mac
- Come Aprire Progetti su Mac
- Come Spostare Progetti su Mac
- Come Ricollegare i File Multimediali su Mac
- Fermo immagine su Mac
- Come Effettuare il Miglioramento Automatico su Mac
- Come Applicare la Dissolvenza in Entrata e in Uscita su Mac
- Come Regolare il Tono dell'Audio su Mac
- Come Regolare l'Audio su Mac
- Come Separare l'Audio su Mac
- Come Equalizzare l'Audio su Mac
- Come Usare gli Adesivi AR su Mac
- Come Usare Adesivi AR su Mac
- Come Eseguire l'Audio Ducking su Mac
- Come Eliminare i Rumori di Sottofondo su Mac
- Elenco Versioni e Funzioni di Filmora su Mac
- Ultime Versioni e Caratteristiche: V12
- Tipologie di Effetti su Mac
- Come Aggiungere e Modificare gli Effetti Boris FX su Mac
- Come Aggiungere e Modificare gli Effetti NewBlue FX su Mac
- Add and customize filters on Mac
- Come Aggiungere e Personalizzare le Sovrapposizioni su Mac
- Come Usare le Risorse di Filmstock su Mac
- Come Eseguire il Backup sul Cloud su Mac
- Come Importare Contenuti su Mac
- Come Aggiungere Bordi su Mac
- Applica la Trasformazione per Mac
- Come Effettuare la Composizione dei Video su Mac
- Come Stabilizzare i Video su Mac
- Note di Rilascio per Mac
- Piani di Abbonamento per Mac
- Requisiti di Sistema per Mac
- Specifiche Tecniche per Mac
- Requisiti GPU e Driver GPU per Mac
- Come Utilizzare la TouchBar su Mac
- Contenuti Multimediali Utilizzabili su Mac
- Auto synchronization for Mac
- Inizia con Filmora per Mac
- Scarica/Registrati/Disinstalla per Filmora per Mac
- Aggiungi un visualizzatore audio su Mac
- Ritaglio Intelligente IA per Mac
- Sincronizzazione automatica per Mac
- Filmora Workspace per Mac
- Livello di regolazione per Mac
- AI Audio Denoise per Mac
- AI Audio Stretch per Mac
- Audio Stretch per Mac
- Effetti audio per Mac
- Aggiungi maschere effetto per Mac
- Flusso ottico ultra lento per Mac
- Video Oscilloscopio Professionale per Mac
- Tag per Mac
- Affilare la versione per Mac
- Intelligenza Artificiale Testo a Video per Mac
- Artificial Intelligence Vocal Remover per Mac
- Importa media da unità di terze parti su Mac
- Ultima versione e funzionalità: V13
- Crea con la modalità istantanea su Mac
- Crea con il modello di componente su Mac
- Come applicare la funzione di testo curvo in Wondershare Filmora?
- Come utilizzare la funzione AI Sticker in Wondershare Filmora su Mac?
- Come eseguire la clonazione vocale AI in Wondershare Filmora?
- Ricerca intelligente AI per Mac
- Rimozione oggetti AI per Mac
- Curva di percorso del keyframe per Mac
- Mosaico del viso AI per Mac
- Miglioratore video AI per Mac
- Tracciamento planare per Mac
- Effetto sonoro AI per Mac
- Riduzione rumore video per Mac
- Traduzione AI in Filmora Mac
- Ritaglio ritratto AI su Mac
- Tavolozza dei colori AI per Mac (Color Match)
- Timeline magnetica per Filmora Mac
- Compressore video per Mac
- Ruote dei colori per Mac
- Miglioratore vocale AI per Mac
- Crea clip multicamera per Mac
- Da voce a testo/da testo a voce su Mac
Export Clip Range for Windows
To maintain the seamless editing flow in Filmora, users can set a specific range from the existing clip and export it. This function has many benefits, as users do not need to trim and export the clip. Scroll down to find more about how to export selected ranges with ease:
Set the Clip
There are two methods to choose the clip’s range before exporting
Method 1: Using the Preview Window
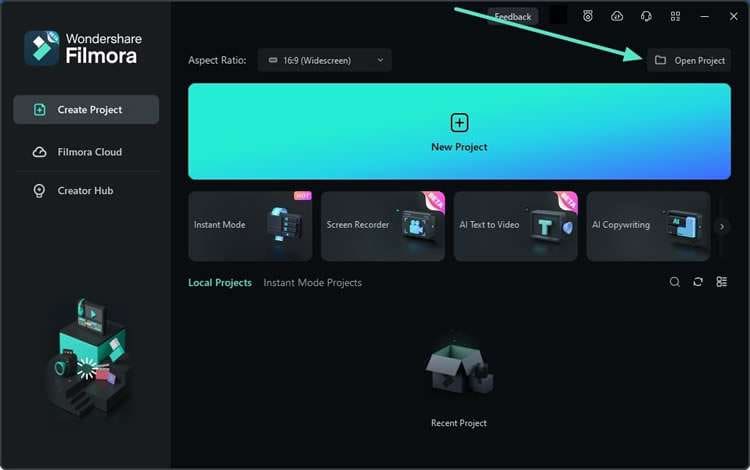
Step 1: Open the Project and Import Your Clip to the Timeline
After downloading and launching Filmora, direct towards the right side of the main menu and click the "Apre un progetto"I pulsanti importano i file direttamente nella linea temporale.
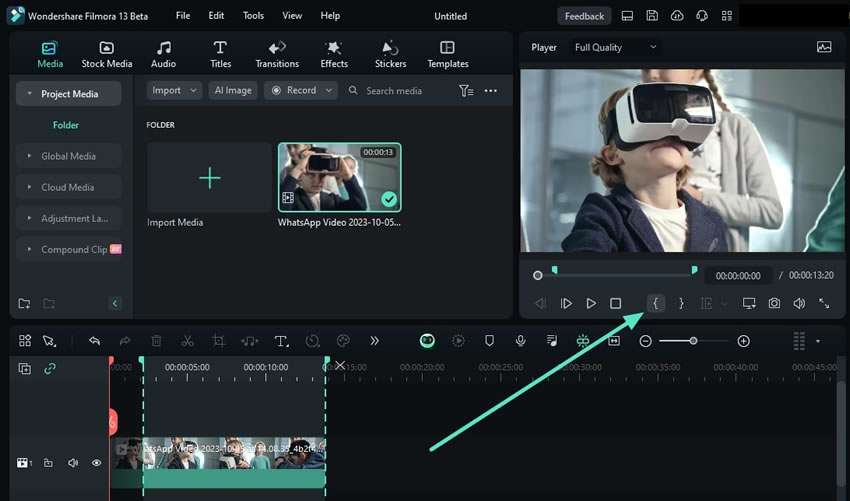
Passaggio 2: selezionare il punto iniziale dell'intervallo di clip
Dopo aver importato le clip in Filmora, passa il mouse sulla finestra di anteprima e fai clic{"Icona, apparirà un cursore per regolare il punto di partenza della clip.
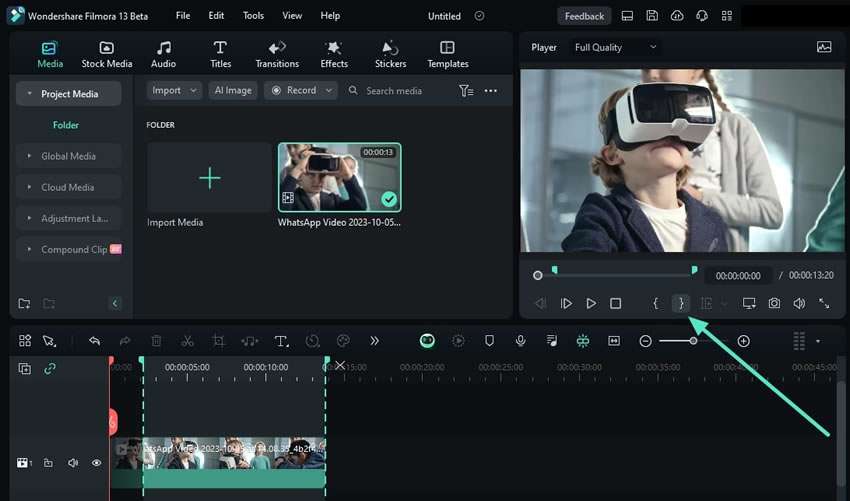
Passaggio 3: selezionare la fine dell'intervallo di clip
Ripetere lo stesso processo per regolare gli endpoint di questa clip; Tuttavia, selezionare "}"Icona questa volta.
Method 2: Using the Keyboard Shortcuts
An alternative method for commencing the same action is using the "I" key to define the start and the "O" key to define the endpoint.
Export the Clip Range
Upon selecting the clip range, we'll learn the step-by-step approach to exporting them:
Method: Utilizing the Export Button
Once the clip range has been set, move towards the "Export" button and click it. A "Seleziona un intervallo di clipFinestra; Da lì, impostare le impostazioni pertinenti come la cartella per la tua clip, il suo nome, e molto altro, e fare clic su "Export"Pulsante.
