Cresci e cresci dalla guida per l'utente di Filmora
-
Guida per Filmora Mobile
- Backup delle bozze su Cloud per Android e iPhone
- Esporta e condividi per Android e iPhone
- Aggiungi Traccia progressi per Android e iPhone
- Personalizza filigrana per Android e iPhone
- Ridimensiona su Android e iPhone
- Aggiungi sfondo su Android e iPhone
- Tracciamento del movimento su Android e iPhone
- Picture in Picture su Android e iPhone
- Aggiungi Keyframe su Android e iPhone
- Aggiungi filtri su Android e iPhone
- Aggiungi transizioni su Android e iPhone
- Aggiungi effetti su Android e iPhone
- Aggiungi adesivi su Android e iPhone
- Tracciamento del testo su Android e iPhone
- Aggiungi testo su Android e iPhone
- Registra voce fuoricampo su Android e iPhone
- Estrai audio per Android e iPhone
- Allunga audio su Android e iPhone
- Rilevamento del ritmo su Android e iPhone
- Importa audio da file locali su Android e iPhone
- Aggiungi Sound FX su Android e iPhone
- Aggiungi musica per Android e iPhone
- Utilizzo della fotocamera in Filmora per dispositivi mobili
- Registra una voce fuori campo per Android e iPhone
- Scambio traccia per Android e iPhone
- Riduzione del rumore per Android e iPhone
- Modifica delle miniature su Android e iPhone
- Schermo verde per Android e iPhone
- Aggiungi Fermo immagine per Android e iPhone
- Aggiungi Filtro su Android e iPhone
- Aggiungi Mosaic su Android e iPhone
- Aggiungi Maschera su Android e iPhone
- Regola il colore delle clip su iPhone e Android
- Regola l'opacità delle clip su Android e iPhone
- Regola il volume delle clip su Android e iPhone
- Regola la sequenza di clip
- Velocizza video
- Inverti video
- Ruota video
- Sostituisci video
- Ritaglia video
- Elimina video
- Aggiungi sfondo su Android e iPhone
- Duplica video
- Taglia video
- Da testo a voce
- Da voce a testo
- Riduzione rumore AI
- Ritaglio intelligente
- Ritratto AI - Guida Filmora per Mobile
- Modalità istantanea
- Da Testo a Video AI
- Musica AI
- Visualizzazione AI
- Taglio automatico AI
- AI Remover
- Apri un progetto
- Gestisci i tuoi progetti
- Importa file multimediali
- Crea un nuovo progetto per Android e iPhone
- Scopri di più sull'interfaccia
- Filmora per ios 18+: flusso di lavoro video di alta qualità
- VEO 3 in Filmora Mobile
- Immagine in Video per Android e iPhone
- Miglioratore AI - App Filmora
- Filmora Retouch per dispositivi mobili
-
Guida per Filmora Windows
- Navigazione di Filmora
- Importazione dei File Multimediali
- Dividere, Regolare, Silenziare e Scollegare l'Audio
- Modifica delle Immagini
- Testo e Titoli
- Filtri e Sovrapposizioni
- Come Aggiungere Elementi, Transizioni ed Effetti Sonori in Filmora
- Effetto PIP (Picture in Picture)
- Rilevamento Scene
- Effetto Split Screen
- Schermo Verde
- Acquisizione di Istantanee dei Video
- Esportazione e Condivisione
- Rimozione della Filigrana
- Riproduzione Inversa dei Video
- Elenco delle Scorciatoie di Tastiera (Windows)
- Download, Installazione, Attivazione, Aggiornamento e Disinstallazione (Windows)
- Pan e Zoom per Sistema Windows
- Regolazione Avanzata del Colore
- Taglierina Istantanea
- Modifica dei Video Ripresi con Action Cam
- Accesso allo Store di Effetti Filmstock
- Accorciare, Dividere, Ruotare, Ritagliare e Unire Video
- Animazione con i Fotogrammi Chiave
- Riframe automatico
- Aggiungere e Personalizzare le Sovrapposizioni
- Risorsa Filmstock
- Tipi di Transizione
- Aggiungere Transizioni
- Lista di Tutte le Versioni
- Modificare le Transizioni
- Tipi di Audio
- Requisiti di Sistema di Windows
- Specifiche Tecniche
- Tipi di Titoli
- Requisiti dei Driver GPU e GPU
- Aggiungere Risorse Titoli
- Rendering Accelerato Tramite GPU
- Correzione dell'Obiettivo
- Modificare e Personalizzare i Testi
- Dividere e Ritagliare Video
- Layout Pannello
- Media da Usare
- Animazione del Testo
- Preset di testo
- Tipi di Elementi
- Creare con la Modalità Istantanea
- Imposta preferenza
- Impostazioni del Progetto
- Esportare su YouTube
- Flusso di Lavoro e Panoramica per l'Esportazione
- Cos’è l’Editing Video Proxy
- Esportare su Dispositivo
- Esportare su Vimeo
- Masterizzare un DVD
- Creare un Nuovo Progetto
- Regolare l’Audio
- Modificare la Velocità di Riproduzione del Video
- Panoramica su Wondershare Drive
- Ottenere 1 GB di Spazio di Archiviazione Cloud Gratuito in Filmora
- Usare Wondershare Drive
- Salvare i file in Wondershare Drive
- Creare con Modello Componente
- Trovare i File in Wondershare Drive
- Gestire Wondershare Drive in Filmora
- Aprire Progetto
- Rimuovere l’Audio
- Zittire in Filmora
- Rilevamento del Battito
- Ritagliare/Dividere/Tagliare l'Audio
- Mixer Audio
- Aggiungere Effetti Audio al Video
- Animazione Predefinita
- Condividere file con Wondershare Drive in Filmora
- Rilevamento della Compatibilità del Sistema
- Velocità Uniforme
- Anteprima dei File di Rendering
- Speed ramping
- Spostare Progetti
- Effetti AI Portrait in Filmora
- Reframe Automatico Video
- Sincronizzazione automatica del battito
- Evidenziazione Automatica (Auto Highlight)
- Aggiungere Sticker AR
- Rilevamento del Silenzio
- Normalizzazione Automatica
- Modificare la Qualità di Riproduzione
- Ducking in Filmora
- Come Marcare una clip
- Auto Denoise
- Funzione di rilevamento della scena
- Modifica Gruppo
- Tipi di Effetti
- Effetti Boris FX
- Aggiungere e Modificare gli Effetti NewBlue FX
- Aggiungere e Personalizzare Filtri
- Applica la maschera al video
- Usare l’Effetto Sfocatura Mosaico
- Usare l’Effetto Face-Off
- Usare il Fermo Immagine
- Applicare Ombra Esterna
- Riposizionare i Progetti
- Miglioramento Automatico
- Modifica con Modelli Predefiniti
- Miglioramento del Colore
- Bilanciamento del Bianco
- Regolare il Tono nella Correzione del Colore
- Applicare 3D LUT in Correzione del Colore
- Dissolvenza Audio in Entrata e in Uscita
- Cambiare il Tono dell'Audio
- Equalizzatore Audio
- Migliori Pratiche: Backup sul Cloud
- Opzione Bordo
- Compositing
- Sincronizzazione Automatica
- Introduzione del Programma | Guida di Wondershare Filmora 11
- Problemi noti e bug risolti
- Registrati/aggiorna/disinstalla
- Estensione dell'Audio IA per Windows
- Audio Denoise IA per Windows
- Finestra di avvio di Filmora
- Regolazione del tono su Windows
- Livello di regolazione per Windows
- Area di lavoro Filmora per Windows
- Visualizzatore audio
- Elenco delle scorciatoie da tastiera
- Registra/Aggiorna/Disinstalla
- La funzione HDR su Filmora
- Condividere video su TikTok da Filmora
- Presentazione avatar
- Audio Stretch per Windows
- Effetti Audio-Driven per Windows
- Gestisci tracce di Windows
- Plugin ChatGPT-Intelligenza artificiale copywriting
- AI Image per Windows
- Rimuovere la filigrana
- Evidenziazione auto
- Rendering accelerato da GPU
- Elementi e Transizioni ed Effetti sonori
- Come utilizzare la funzione di testo curvo in Wondershare Filmora?
- Come eseguire la clonazione vocale AI in Wondershare Filmora?
- Ricerca intelligente AI per Windows
- Creare clip multi-camera
- Miglioratore vocale AI
- Curva di percorso del keyframe per Windows
- Mosaico del viso AI per Windows
- Compressore video su Windows
- Effetto sonoro AI
- Tracciamento planare
- Riduzione rumore video per Windows
- Traduzione AI per Windows
- Ruote di colore per Windows
- Ritaglio ritratto AI
- Palette di colori AI per Windows
- Percorso di animazione di testo per finestre
- Seleziona tutte le clip sulla linea temporale per finestre
- Progetto video breve
- Audio a video
- Brevi clip intelligenti per Windows
- Dall'Idea a Video AI per Windows
- Centro risorse
- Filmora-assetti creativi
- Stilizzatore di immagini ai
- Come trasformare da Immagine in video su Windows
- Filmora-impostazioni di esportazione [Win & Mac]
- AI Da Testo a Video per Windows
- Generatore di musica AI per Windows
- Registrazione degli schermi del computer
- Rilevamento del silenzio
- Mocha Filmora - Per Windows
- Miglioratore Video AI
- Voce a testo/Testo a voce/SRT
- Gestire Timeline e Tracce
- Strumenti di disegno per Windows
- Rimozione oggetti da video/foto con AI per Windows
- Guida alla funzione di didascalia automatica | Filmora Windows
- personalizza Animazione su Windows
- Aggiungi e modifica l'audio su Windows
- Filtro di bellezza AI
- Estensione AI
- Modifica dell'anteprima di origine e della sequenza temporale su Windows
- Importa sottoprogetti su Windows
- Rimozione vocale AI per Windows
- Ritaglio intelligente AI
- Grafici animati
- Esporta le clip selezionate
- Configurazione a doppio monitor per il montaggio video su Windows
- Generatore di Adesivi AI
- Stabilizzazione video per Windows
- Esegui il tracciamento del movimento
- Aggiungi il keyframing dell'animazione per Windows
- Aggiungi e personalizza gli adesivi per Windows
- Filmora AI Relight - Windows
- Guida al miglioramento delle immagini AI di Filmora per Windows
- Filmora AI Eye Contact per Windows: software per correggere lo sguardo nei video
- Filmora Image to Prompt: Generatore di prompt da immagini per Windows
- Effetto AI Motion Blur su Filmora | Windows
-
Guida per Filmora Macos
- Elenco delle Scorciatoie di Tastiera
- Creare Progetti
- Modificare l'Audio
- Inserire le Transizioni
- Usare Testo e Titoli
- PIP (Immagine nell'immagine)
- Rilevazione Automatica delle Scene
- Rimuovere la Filigrana dai Video
- Salvare e Condividere
- Come Stabilizzare i Video
- Tipi di Transizioni
- Come Modificare le Transizioni
- Tipologie di Contenuti Audio
- Aggiungere e modificare l'audio su Mac
- Tipologie di Titoli su Mac
- Come Modificare e Personalizzare il Testo su Mac
- Come Animare il Testo su Mac
- Come Usare i Preset Testuali su Mac
- Tipologie di Elementi su Mac
- Come Aggiungere e Personalizzare gli Elementi su Mac
- Come Esportare i Progetti su Mac
- Esportazione di video su computer locale su Mac
- Come Esportare Video Ottimizzati per Altri Dispositivi su Mac
- Come Caricare Video su YouTube su Mac
- Guida di Come Caricare un Video sul Vimeo
- Come Masterizzare Video su DVD su Mac
- Wondershare Drive su Mac
- Come Ottenere 1 GB di Spazio di Archiviazione Cloud Gratis su Mac
- Come Usare Wondershare Drive su Mac
- Come Trovare File su Wondershare Drive su Mac
- Come Gestire Wondershare Drive su Mac
- Come Condividere i File con Wondershare Drive su Mac
- Impostazioni Progetto su Mac
- Come Utilizzare i File di Proxy su Mac
- Rilevazione della Compatibilità di Sistema su Mac
- Come Renderizzare i File di Anteprima
- Come Modificare la Qualità di Riproduzione su Mac
- Come Raggruppare le Clip su Mac
- Come Aggiungere Marcatori alle Clip su Mac
- Come Silenziare l'Audio su Mac
- Come Rilevare i Beat su Mac
- Come Accorciare, Dividere e Tagliare l'Audio
- Come Mixare l'Audio su Mac
- Effetti Audio su Mac
- Come Uniformare la Velocità su Mac
- Come Utilizzare lo Speed Ramping su Mac
- Come Usare l'Effetto PIP (Picture-in-Picture) su Mac
- Come Eseguire il Bilanciamento dei Bianchi su Mac
- Come Eseguire il Miglioramento dei Colori su Mac
- Come Regolare il Tono delle Clip su Mac
- Come Applicare le LUT 3D su Mac
- Come Usare i Preset di Animazione su Mac
- Come Eseguire la Correzione dell'Obiettivo su Mac
- Animazione con i Fotogrammi Chiave su Mac
- Dividere e Tagliare Video su Mac
- Come Utilizzare la Funzione Stilizzazione IA su Mac
- Come Aggiungere l'Ombra Esterna su Mac
- Effetto Face-Off
- Rendering su GPU e codifica hardware
- Schermata Iniziale su Mac
- Panoramica dei Pannelli su Mac
- Come Modificare la Velocità dei Video su Mac
- Come Eseguire il Reframe Automatico su Mac
- Come Usare le Maschere su Mac
- Istantanea video su Mac
- Come Aprire Progetti su Mac
- Come Spostare Progetti su Mac
- Come Ricollegare i File Multimediali su Mac
- Fermo immagine su Mac
- Come Effettuare il Miglioramento Automatico su Mac
- Come Applicare la Dissolvenza in Entrata e in Uscita su Mac
- Come Regolare il Tono dell'Audio su Mac
- Come Regolare l'Audio su Mac
- Come Separare l'Audio su Mac
- Come Equalizzare l'Audio su Mac
- Come Usare gli Adesivi AR su Mac
- Come Usare Adesivi AR su Mac
- Come Eseguire l'Audio Ducking su Mac
- Come Eliminare i Rumori di Sottofondo su Mac
- Elenco Versioni e Funzioni di Filmora su Mac
- Ultime Versioni e Caratteristiche: V12
- Tipologie di Effetti su Mac
- Come Aggiungere e Modificare gli Effetti Boris FX su Mac
- Come Aggiungere e Modificare gli Effetti NewBlue FX su Mac
- Add and customize filters on Mac
- Come Aggiungere e Personalizzare le Sovrapposizioni su Mac
- Come Usare le Risorse di Filmstock su Mac
- Come Eseguire il Backup sul Cloud su Mac
- Come Importare Contenuti su Mac
- Come Aggiungere Bordi su Mac
- Come Effettuare la Composizione dei Video su Mac
- Come Stabilizzare i Video su Mac
- Piani di Abbonamento per Mac
- Requisiti di Sistema per Mac
- Specifiche Tecniche per Mac
- Requisiti GPU e Driver GPU per Mac
- Come Utilizzare la TouchBar su Mac
- Contenuti Multimediali Utilizzabili su Mac
- Auto synchronization for Mac
- Inizia con Filmora per Mac
- Scarica/Registrati/Disinstalla per Filmora per Mac
- Aggiungi un visualizzatore audio su Mac
- Sincronizzazione automatica per Mac
- Filmora Workspace per Mac
- Livello di regolazione per Mac
- AI Audio Denoise per Mac
- AI Audio Stretch per Mac
- Audio Stretch per Mac
- Effetti audio per Mac
- Crea con la modalità istantanea su Mac
- Crea con il modello di componente su Mac
- Come applicare la funzione di testo curvo in Wondershare Filmora?
- Come eseguire la clonazione vocale AI in Wondershare Filmora?
- Ricerca intelligente AI per Mac
- Curva di percorso del keyframe per Mac
- Mosaico del viso AI per Mac
- Miglioratore video AI per Mac
- Tracciamento planare per Mac
- Effetto sonoro AI per Mac
- Riduzione rumore video per Mac
- Traduzione AI in Filmora Mac
- Ritaglio ritratto AI su Mac
- Tavolozza dei colori AI per Mac (Color Match)
- Compressore video per Mac
- Ruote dei colori per Mac
- Miglioratore vocale AI per Mac
- Crea clip multicamera per Mac
- Percorso di animazione di testo per mac
- Seleziona tutte le clip sulla timeline per mac
- Progetto video breve per mac
- Audio a video per mac
- Scarica/Installa/Registra/Aggiorna/Disinstalla Filmora
- Centro risorse per Mac
- Dall'idea a Video AI per Mac
- Stilizzatore di immagini ai per mac
- Guida da Immagine in Video per Mac
- AI da Testo a Video per Mac
- Generatore di Musica AI per Mac
- Rilevamento del silenzio su Mac
- Registrazione schermo ottimizzata per Mac
- Mocha Filmora - Per Mac
- Guida ai sottotitoli automatici per Mac
- Rimozione Vocale AI per Mac
- Ritaglio intelligente AI per Mac
- Grafici animati per Mac
- Esporta clip selezionati per Mac
- AI Estendi per Mac
- Ritocca per Mac
- Strumenti di disegno per Mac
- Rimozione oggetti AI per Mac
- Da voce a testo/da testo a voce su Mac
- Filmora Animazione Mac
- Gestisci la sequenza temporale su Mac
- Configurazione doppio monitor per montaggio video su Mac
- Importa sottoprogetti su Mac
- Generatore di Adesivi AI per Mac
- Schermata verde su Mac
- Animazione dei fotogrammi chiave su Mac
- Filmora AI Relight - Mac
- Guida all’uso di Filmora AI Image Enhancer su macOS
- Filmora AI Eye Contact: Software per Sguardo Diretto su Mac
- Filmora Image to Prompt: Genera prompt da immagini su Mac
- Filmora AI Motion Blur per Mac
Rimozione Vocale AI per Mac
Rimuovere le voci dai video aiuta ulteriormente in molte attività creative, e Filmora ha introdotto questa funzione nel suo nuovo aggiornamento. In questa guida, gli utenti impareranno come rimuovere le voci da una canzone tramite diversi metodi nella versione Mac di Filmora:
Indice
Accedi allo strumento AI Vocal Remover
Questo strumento utilizza la tecnologia AI all’avanguardia per rimuovere le voci dai video, che possono essere incorporate in altre attività. Per agevolarti, ecco una guida passo passo allo strumento di rimozione vocale di Filmora:
Metodo 1: Dal pannello delle opzioni della Timeline
Passaggio 1: Avvia Filmora e crea un nuovo progetto
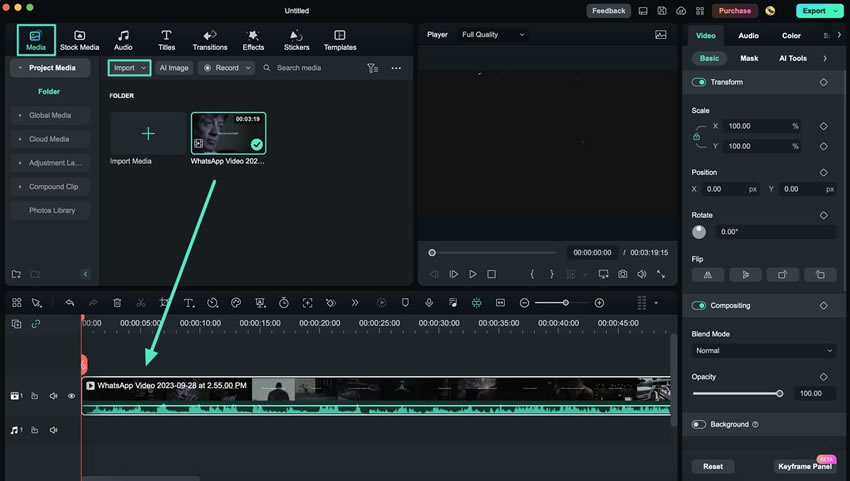
Dopo aver completato l’installazione di Filmora sul tuo Mac, aprilo. Una volta effettuato l’accesso al tuo account o creato uno nuovo, vai al pulsante "Nuovo Progetto" nella schermata principale ed effettua l’accesso.
Passaggio 2: Porta il tuo video sulla Timeline
Quando l’interfaccia principale di Filmora è visualizzata sullo schermo, vai alla sezione "Media" e premi il pulsante "Importa" per importare i tuoi file. Dopo averli importati nella libreria Media, trascinali con il mouse e rilasciali su una traccia della timeline.
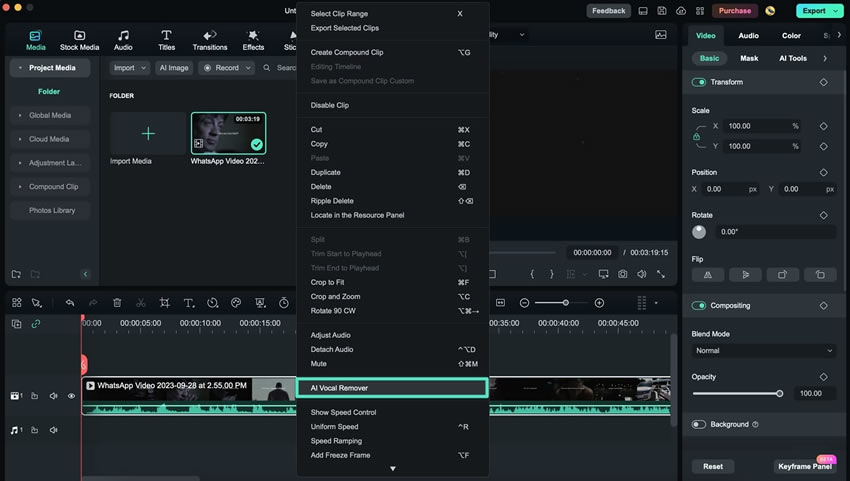
Passaggio 3: Accedi allo strumento Vocal Remover
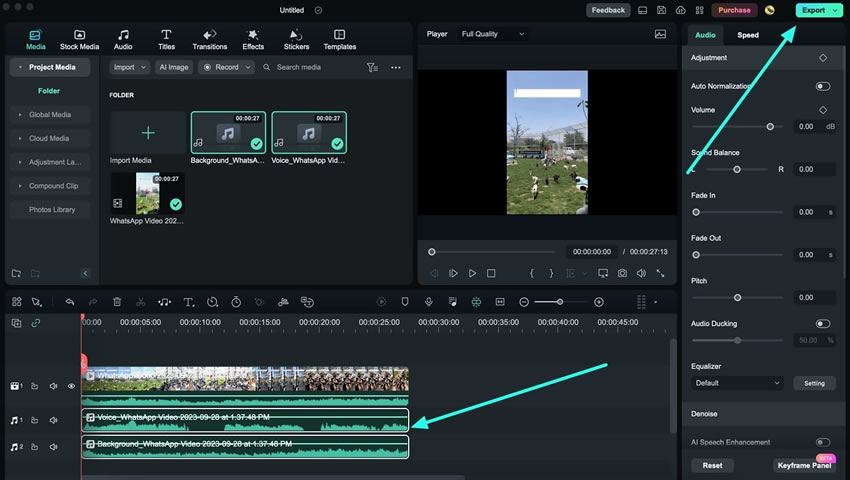
Ora seleziona la clip nella timeline e fai clic destro su di essa. Dal menu a tendina che appare, trova e scegli l’opzione "AI Vocal Remover". Apparirà una piccola finestra che mostra lo stato della tua attività.
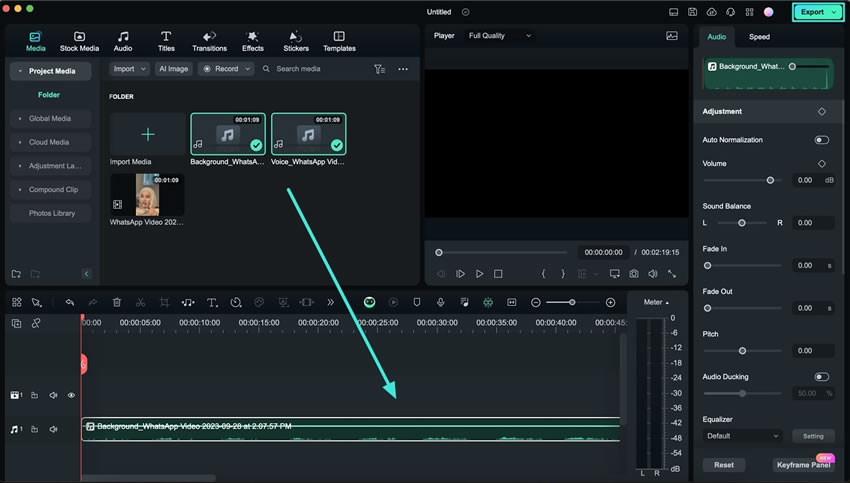
Passaggio 4: Modifica ed esporta le tracce vocali
Quando la rimozione vocale è completata, vedrai due tracce audio nella timeline. Una è la clip di musica di "Sfondo" o rumore, l’altra è la clip di "Voce" o voci. Puoi modificare ulteriormente la clip vocale tramite il pannello delle impostazioni ed esportarla cliccando il pulsante "Esporta" in alto a destra dello schermo.
Metodo 2: Utilizzando la barra degli strumenti superiore
Passaggio 1: Abilita la rimozione vocale
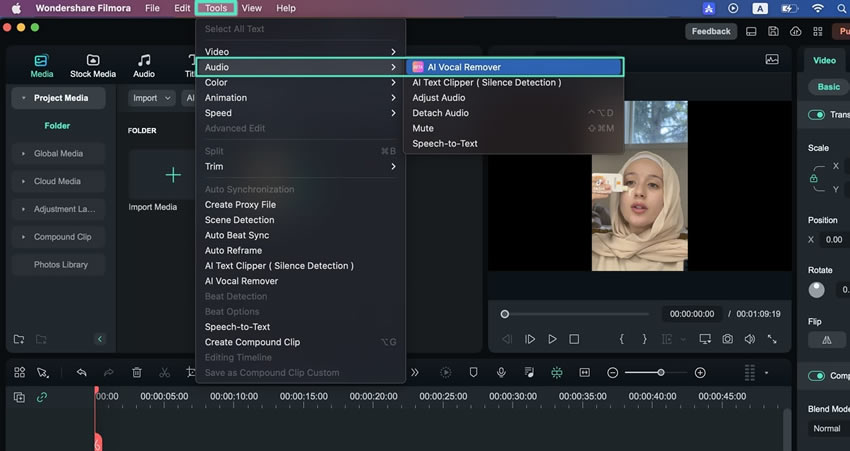
Porta la clip sulla timeline, selezionala e vai alla barra degli strumenti in alto. Apparirà un menu a tendina selezionando la scheda "Strumenti"; scegli l'opzione "Audio". Tra le opzioni audio che appaiono, clicca su "AI Vocal Remover", e il processo avrà inizio. Lo stato di rimozione vocale sarà mostrato sul dispositivo in una piccola finestra.
Passaggio 2: Esporta la traccia vocale
Una volta completato il processo, saranno disponibili due tracce audio nella timeline. Seleziona l’audio chiamato "Voce" perché contiene le voci, modificalo ed esportalo cliccando il pulsante "Esporta". Puoi regolare varie opzioni nel pannello di esportazione e cliccare di nuovo su "Esporta" per scaricare finalmente l’audio sul tuo dispositivo.