Tutorial di Filmora Come modificare il ritmo Sync Instagram Rolls Video
Instagram è un'applicazione di social media utilizzata in tutto il mondo con miliardi di utenti. Chiaramente, le bobine di Instagram con eccitante sincronizzazione del battito sono un nuovo tipo di cool perché permettono alle persone di creare brevi video avvincenti e divertenti e quindi vincere i fan
- Le 8 migliori app di editing video AI da utilizzare nel 2026 [Elenco aggiornato]
- Top 10 registratori audio di streaming facili da usare per tutti
- 9 compressori video online gratuiti per ridurre le dimensioni dei file senza perdere qualità
- Recensione di Snapseed: Cosa Puoi Davvero Fare con Questa App di Modifica Foto
- Come mettere 4 video in un unico riquadro per TikTok, Reels e Shorts
-
Come creare una recensione video di un film per YouTube
-
Netflix, Prime Video o Disney+: quale scegliere nel 2026?
-
Come creare una recensione video di un film per YouTube e TikTok
-
Come creare un video recap delle vacanze in stile cinematografico
-
I film d'animazione più attesi in uscita nel 2026
-
Le migliori app per guardare film offline in viaggio
-
I migliori cartoni animati per bambini divisi per età
-
I migliori film per famiglie da vedere in estate: 12 scelte sicure
-
Film in uscita ad agosto 2026: i 10 titoli più attesi
-
I migliori film del 2026: 20 titoli da vedere assolutamente
-
I migliori film d'animazione del 2026 per bambini e adulti
-
Le migliori piattaforme streaming per film nel 2026
-
Come aggiungere sottotitoli YouTube senza errori: SRT, automatici e caption nel video
-
Come censurare un video: sfocare volti, oggetti, testo e parti audio
-
Come creare Stories Instagram efficaci con foto, video, musica e sticker
-
Come correggere i colori di un video: esposizione, bianco, contrasto e look finale
-
Come stabilizzare un video mosso da smartphone, action cam o riprese a mano
-
Come creare TikTok con foto: guida pratica per slideshow, Photo Mode e video verticali
-
Come velocizzare un video su PC, mobile e online senza rovinare ritmo e audio
-
AI per trasformare immagini in video: come animare foto, grafiche e prodotti
-
Come rallentare un video e ottenere uno slow motion fluido
-
Come tradurre automaticamente i sottotitoli senza perdere significato
-
Come comprimere un video senza trasformarlo in un file sgranato
-
Come creare miniature YouTube che attirano clic senza sembrare forzate
-
Come sfocare un volto in un video senza rovinare il montaggio
-
Come creare un meme video che si capisce in tre secondi
-
Come eliminare il rumore da un video: metodi AI, manuali e online
-
Come creare video TikTok con l'AI: idee, prompt e strumenti migliori
-
Come aggiungere sottotitoli ai Reels di Instagram automaticamente
-
Come creare Reels virali su Instagram: strategie, idee e montaggio
-
Come creare un trailer con l'AI: guida completa per film, YouTube e social
-
Come creare intro YouTube: guida pratica per un inizio chiaro e memorabile
-
Come creare outro YouTube: guida pratica per chiudere bene i video e aumentare i clic
-
Come creare video per CV: guida pratica per presentarti meglio ai recruiter
-
Come creare video per LinkedIn: guida pratica per contenuti professionali efficaci
-
Come creare YouTube Shorts: guida completa da telefono, PC e con AI
-
Come creare GIF per WhatsApp: guida completa da iPhone, Android e PC
-
Come aggiungere effetti video: guida completa per smartphone, PC e social
-
Come eliminare oggetti da un video: guida completa con AI, app e PC
-
Come tagliare un video: guida completa su PC, iPhone, Android e online
-
Come rimuovere lo sfondo da un video con l'AI
-
Come creare un video delle vacanze con foto e video
-
I 20 migliori strumenti AI per creare e modificare video nel 2026
-
Come migliorare la qualità di un video con l'AI: guida completa, gratis e online
-
Frasi di Ferragosto 2026: belle, brevi, simpatiche e perfette per social e chat
-
Sticker Ferragosto WhatsApp: risorse, idee e guida per Android e iPhone
-
Auguri di Ferragosto 2026: messaggi belli, divertenti e pronti da inviare
-
Stati WhatsApp estate: 220 frasi brevi da copiare
-
Come Convertire Sottotitoli Online: Formati TXT, SRT e VTT
-
[Guida 2026] Migliori Editor Video per Principianti su YouTube
-
Video Editor Gratis per Studenti: Semplifica lo Studio
-
Migliori editor video gratis per PC: guida pratica completa
-
Come correggere il contatto visivo su CapCut: Tutorial AI completo
-
Correggere l'Eye Contact su Riverside: Tutorial AI e Alternative
-
Come correggere il contatto visivo nei video: Guida AI
-
Come usare Descript AI Eye Contact: Correggere lo sguardo
-
Come usare NVIDIA Eye Contact: Guida completa allo sguardo AI
-
Miglior App per Editare Reel su PC: Guida alla Scelta
-
Migliori Software di Editing Video in India: Opzioni da Provare
-
Migliori LUT e Filtri TikTok per Video Ristoranti e Food Creator
-
12 Filtri Instagram LUT Coffee Shop per Reels Aesthetic
-
Migliori LUT e Filtri per Desk Setup YouTube dei Tech Creator
-
12 Filtri LUT CapCut per Short e Video di Viaggio Cinematografici
-
Download LUT per Droni Gratis: Filtri Cinematici per Riprese Aeree
-
12 Filtri LUT Sony ZV-E1 per Vlog dal Look Cinematografico
-
Sony FX9: Migliori LUTs e Filtri per Produzioni Commerciali
-
12 Filtri Stile LUT Sony A1 per Fotografi e Videomaker Pro
-
12 Filtri LUT Canon R3 per Video Sportivi Professionali
-
Migliori LUT e Filtri Canon C80 per Look Cinematografico in Filmora
-
12 Filtri LUT Canon R50: Video Social per Creator Principianti
-
Migliori LUT e Filtri Fujifilm X-T50 per Travel Creator
-
I migliori LUT e filtri Fujifilm X-M5 per content creator
-
Panasonic S9: Migliori Filtri Stile LUT per Travel Creator
-
Migliori Filtri LUT Panasonic GH7 per Produzioni Cinematografiche
-
Migliori LUT e Filtri Nikon Z8 per Creatori Ibridi Professionisti
-
Migliori Filtri LUT per Nikon Zf: Look Vintage Lifestyle
-
Migliori Filtri LUT DJI Osmo Pocket 3 per Vlog e Creator
-
Migliori LUT e Filtri Insta360 X4 per Creator di Avventura
-
12 Migliori Filtri LUT per GoPro Hero 13: Video d'Azione Epici
-
Broadcasting nel Calcio: Cos'è e Come Funziona
-
Goal-Line Technology nel Calcio: Cos'è e Come Funziona
-
VEGAS Pro Motion Blur: Recensione 2026 e Come Applicarlo
-
Come Aggiungere il Motion Blur in Adobe After Effects
-
Premiere Pro Motion Blur: Recensione e Come Creare Sfocature Fluide
-
Motion Blur in Adobe Illustrator: Come Creare l'Effetto
-
Creare e Aggiungere Motion Blur alle Foto su iPhone: Guida 2026
-
Recensione Picsart Motion Blur 2026: Crea Effetti Sfocati Facilmente
-
Recensione Qcut: Editor Video Online Gratis e Senza Watermark
-
Recensione Runway Aleph 2.0: Dai un nuovo look ai tuoi video
-
Recensione Recast Studio 2026: Estrai il Meglio dai Tuoi Video
-
Recensione Dreamega AI: Modelli e Strumenti Creativi
-
Recensione Magnific AI 2026: Da Freepik a Piattaforma Creativa AI
-
Migliori creatori di highlights sportivi per Mondiali 2026
-
Migliori Editor Video di Calcio 2026: Crea Highlights Professionali
-
5 Migliori Generatori Video AI per Video Virali sui Mondiali
-
Recensione HypeCut: Buona App Video AI ma con alcuni limiti
-
Recensione Aivvid AI 2026: Piattaforma AI Multimodale Valida?
-
Recensione TopMediai: Test Tool per Creare Musica, Voce e Video
-
Idee per video classe maturità 2026
-
I migliori template per video matrimonio e cerimonie
-
Come trasformare foto vacanze in video cinematico
-
Come montare un video vacanze da smartphone in pochi minuti
-
Come fare un recap evento per Instagram/TikTok
-
Come fare un montaggio foto e video per diploma
-
Come fare highlights sportivi per TikTok e Instagram
-
Come editare un video concerto senza perdere qualità
-
Come creare un video viaggio di maturità da condividere con gli amici
-
Come creare un video matrimonio emozionante
-
10 idee per Reel estivi da pubblicare a giugno 2026
-
Mondiali 2026 in Italia: guida completa per tifosi
-
CapCut vs Filmora: Confronto completo e dettagliato 2026https://images.wondershare.com/filmora/article-images/capcut-filmora-04.png
-
Le migliori app di doppiaggio video da provare nel 2026: 12 opzioni consigliate
-
Migliori strumenti per il doppiaggio YouTube nel 2026: guida aggiornata
-
Come salvare un progetto Capcut: guida completa e risposte utili
-
Migliori 8 convertitori video Android gratuiti
-
Le 7 migliori app mobile per creare video lyric: guida aggiornata 2024https://images.wondershare.com/filmora/article-trans-image/328/lyric-video-maker-apps-1.gif
-
Migliori 5 app gratis per creare trailer di film su Android e iPhone 2026https://images.wondershare.com/filmora/article-trans-image/595/movie-trailer-apps-1.jpg
-
Miglior Strumento per Cambiare Velocità GIF 2026: Windows, Mac e Online
-
I migliori creatori di loghi trasparenti per il tuo brand nel 2026
-
I 8 migliori creatori di collage video nel 2026 per collage facilihttps://images.wondershare.com/filmora/article-trans-image/1195/collage-video-maker-1.jpg
-
Wondershare Filmora: Best Free AI AVI Editor & Premiere Pro Alternative 2026
-
Migliori alternative ad Adobe After Effects: Filmora e altre soluzioni
-
Migliori alternative a Synthesia: strumenti AI per creazione e editing video
-
Migliori app per modificare video Snapchat 2026: strumenti AI e gratis con Filmora
-
Lightworks vs. migliori editor video: confronto funzionalità, pro e contro
-
Migliori software professionali per filmmaker consigliati dagli esperti
-
I migliori software gratuiti per montare video YouTube
-
Strumenti video AI più popolari su Reddit: le tendenze del momento
-
I migliori software gratuiti per il montaggio video secondo Reddit
-
PowerDirector vs Altri Editor Video: Confronto Funzioni, Vantaggi e Prestazioni
-
Confronto tra Muvee Reveal e i moderni software di editing video
-
Confronto tra VideoReDo e i migliori software di editing video
-
Editor Video Samsung: Come Modificare Video Samsung [PC e Mobile inclusi]
-
Color Correction vs. Color Grading: The Ultimate Guide for Creators
-
VivaVideo for PC: The Ultimate Download Guide and Best Alternatives
-
Le migliori app e siti web per guardare il live streaming di partite di calcio nel 2026 (mobile & PC)
-
I migliori siti per vedere film gratis nel 2026 (streaming legale e senza registrazione)
-
Come Creare un Video di Pasqua 2026 con Wondershare Filmora (Idee, Musiche e Template Gratis)
-
🏈📺Dove guardare il Super Bowl LX 2026 in diretta, online e gratis?
-
I 5 migliori generatori di video AI senza volto nel 2026 (Gratis e senza filigrana)
-
Guida ai filtri per la forma del viso 2026: Migliori app AI e tendenze TikTok
-
Come ottenere il filtro Fragola su TikTok e Snapchat: Guida alle tendenze 2026
-
Come ottenere il filtro virale dell'anatra su TikTok e Snapchat (Guida 2026)
-
Z-Image Turbo AI: Cos'è, come usarlo, prompt e spiegazione Immagine-a-Immaginehttps://images.wondershare.com/filmora/article-images/z-image-turbo-ai-review-2.png
-
AI Così Carino Mini Trend: Come Ottenere l'Effetto Mini Me Virale nel 2026
-
Top 10 YouTuber Italiani 2025: Chi guadagna di più?
-
San Valentino 2026: Come creare il video del bacio da foto con l'IA
-
Come creare Video Highlight Sportivi per sport invernali 2026: Guida all'Editing con l'IA
-
Come rimuovere una persona da un video con l'AI: migliori strumenti e guida pratica
-
Come rimuovere filigrana da video su PC con l'AI (Guida 2026)
-
5 Migliori Generatori Immagini AI Gratis per Sostituire Midjourney nel 2026
-
Video Recap 2026: La Guida Definitiva su Cos'è e Come Farlo al Meglio
-
Da foto a video: Come creare un Recap 2026 emozionale in pochi minuti
-
Come raccontare il tuo 2026 in un video di 60 secondi: Guida al Montaggio AI
-
Video Recap 2026: Le Migliori Idee Creative, Esempi e Stili da Copiare
-
AI per TikTok, Reel e Shorts: Strumenti per Creare Contenuti Virali
-
I Migliori Generatori di Musica AI per Colonne Sonore e Video Social (2026)
-
Le migliori AI gratuite da usare nel 2026
-
Idee Audio Virali per Natale su TikTok e Instagram Reels (2026)
-
Come creare un video natalizio con foto della famiglia: guida passo passo
-
Come creare un Highlight Reel 2026 in pochi minuti | Filmora
-
Come creare un video recap 2026 – guida facile
-
Che cos'è un codec video?
-
Taglio J vs Taglio L: Definizione, Differenze Chiave ed Esempi di Montaggio Professionalehttps://images.wondershare.com/filmora/article-images/what-is-j-cut-l-cut-101.png
-
Che cos'è il filmato B-roll? Guida completa per i creatori di videohttps://images.wondershare.com/filmora/article-images/what-is-b-roll-101.jpg
-
Che cos'è una vignetta nella fotografia e nel montaggio video?
-
Che cos'è il rallentatore? Uno sguardo più da vicino al montaggio in slow motionhttps://images.wondershare.com/filmora/article-images/what-is-slow-motion-101.png
-
Che cos'è la rimozione di oggetti tramite AI?
-
Che cos'è un potenziatore video basato sull'intelligenza artificiale?
-
Che cos'è il montaggio multicamera?
-
Che cos'è un sistema di riconoscimento facciale?
-
Che cos'è il rendering in tempo reale?
-
Che cos'è la colorazione AI?
-
Che cos'è il ritaglio intelligente?
-
Che cos'è la clonazione vocale?
-
Cos'è il tracciamento della telecamera 3D?
-
Cos'è il Motion Tracking?
-
Cos'è la risoluzione video? La chiave per video più nitidi e chiari
-
Che cos'è la Color Grading e come utilizzarla nel montaggio video
-
Che cos'è un Sound Bite? Definizione e esempi
-
Che cos'è un video proxy e perché usarlo?
-
Cos'è Storyboard?
-
Che cos'è la transcodifica nel montaggio video?
-
Cos'è l'effetto schermo diviso nell'editing video?https://images.wondershare.com/filmora/article-trans-image/1097/split-screen-filmora-1.jpg
-
Che cos'è l'audio a 32 bit in virgola mobile e perché è importante nella produzione video
-
48 kHz vs 44,1 kHz Frequenza di campionamento: Qual è la differenza?
-
Che cos'è la codifica video? Definizione, funzionamento e applicazione
-
Cos'è il Face Swap? Ti interesserà!
-
Che cos'è l'audio ad alta risoluzione?
-
Che cos'è la Motion Graphics? Definizione ed esempi
-
Che cos'è la curva Gamma? Tecnologia video spiegata
-
Che cos'è un filtro polarizzatore e come migliora le tue foto?
-
Che cos'è lo spazio colore e come influenza i tuoi video
-
Che cos'è il video a 360 gradi?
-
Cos'è una Long Shot nel Cinema? Una guida completa per registi e appassionatihttps://images.wondershare.com/filmora/article-images/what-is-a-long-shot-in-film-01.jpg
-
Che cos'è la tecnologia di tracciamento oculare?
-
Cos'è la produzione virtuale? Una guida introduttiva agli effetti visivi sul set
-
Che cos'è la rimozione dello sfondo video con l'IA?
-
Che cos'è la mascheratura nell'editing video?
-
Che cos'è un video reattivo?
-
Cosa sono i video delle Backrooms? Origini, teorie e come vengono creati
-
Migliore Subtitle Edit per Mac: 5 strumenti da provare assolutamente nel 2026
-
Miglior formato video per YouTube: tipi di file, dimensioni e risoluzioni
-
Cosa sapere su Adobe Premiere Pro nel 2026: costo, piani e sconti
-
Le 20 migliori palette di colori verdi per progetti creativi (con codici HEX)
-
I 10 migliori editor video GoPro nel 2026 per creare filmati d'azione epicihttps://images.wondershare.com/filmora/article-images/best-gopro-video-editors-1.jpg
-
I 5 migliori generatori di forme d'onda audio (offline e online) nel 2026 per creatori ed editori
-
I 7 migliori generatori di meme AI nel 2026 per una creazione di contenuti facile e divertentehttps://images.wondershare.com/filmora/article-images/ai-meme-generator-1.jpg
-
I migliori strumenti di IA del 2026: Video, Musica, Immagini, Podcast e altro
-
I 8 migliori editor video per Windows 11: opzioni gratuite e a pagamento
-
Che cos'è un'inquadratura medio-primo piano?https://images.wondershare.com/filmora/article-trans-image/1216/medium-close-up-filmora-1.jpg
-
Che cos'è un Long Take?
-
Che cos'è una ripresa media?https://images.wondershare.com/filmora/article-trans-image/1283/medium-shot-filmora-1.jpg
-
Che cos'è la post-produzione?
-
Cos'è il controllo delle versioni e perché è importante
-
Che cos'è la sincronizzazione audio?
-
Che cos'è la modifica collaborativa?
-
Che cos'è una ripresa zoom?https://images.wondershare.com/filmora/article-images/zoom-shot-filmora-4.gif
-
Che cos'è una ripresa dall'alto?https://images.wondershare.com/filmora/article-images/high-angle-shot-filmora-1.jpg
-
Che cos'è una ripresa a bassa angolazione?https://images.wondershare.com/filmora/article-images/low-angle-shot-filmora-1.jpg
-
Che cos'è una ripresa aerea?https://images.wondershare.com/filmora/article-images/areal-shot-filmora-1.jpg
-
Che cos'è una ripresa dall'alto?
-
Che cos'è una ripresa sopra la spalla (OTS)?
-
Una recensione dettagliata dell'editor video Lightworkshttps://images.wondershare.com/filmora/article-images/lightworks-video-editor-1.jpg
-
Una recensione su InShot: analizzando a fondo e cercando opzioni migliori
-
Una recensione dettagliata di Lightroom: scopri tutte le funzionalità e una migliore alternativahttps://images.wondershare.com/filmora/article-images/lightroom-review-1.jpg
-
Guida completa alle alternative a Sony VEGAS: recensione dettagliata e scelte consigliate
-
Il miglior editor video AI per gaming nel 2026 | Filmora per streamer e creatori
-
I migliori convertitori online da audio a video che puoi provare nel 2026
-
Filmora vs. Splice App 2026 Recensione: La migliore alternativa di editor video AI
-
Miglior software di editing musicale per Mac 2026 | Editor musicale AI in Filmora
-
Le 5 migliori app Memoji per personalizzare i tuoi video
-
Filmora AI Photo Slideshow Maker: Gratuito e migliore alternativa per PC/Mac
-
Miglior software di mix audio AI 2026: Filmora e le migliori app gratuite per video
-
I 7 migliori software di color grading per effetti cinematografici nel 2026
-
Top 7 alternative per la camera di luce che dovresti provare nel 2026 (gratuito e pagato)
-
Recensione di GoPro Quik: È sufficiente per le tue esigenze video?
-
Principali strumenti alternativi ad Avidemux per un editing rapido e intelligente
-
InShot per PC: I migliori editor video simili a InShot che puoi usare su desktop
-
Recensione del software Avidemux per il 2026 con opinioni reali degli utenti
-
Filmora vs DaVinci Resolve: Confronto approfondito 2026 per editor video
-
Modi migliori per usare KineMaster per PC nel 2026 (con alternative migliori)
-
Strumenti alternativi migliori all'app GoPro Quik nel 2026
-
I 10 migliori editor di luminosità video nel 2026 per filmati dall'aspetto migliore
-
Recensione dettagliata di Adobe Premiere Rush 2026
-
Top 10 registratori audio di streaming facili da usare per tuttihttps://images.wondershare.com/filmora/article-images/streaming-audio-recorder-filmora-1.jpg
-
Le 3 migliori creatrici di slideshow di matrimonio più popolari per i neosposi nel 2026
-
I 10 migliori software di conversione audio per file audio
-
I 9 migliori software di montaggio video gratuiti e open source da scaricare nel 2026
-
Qual è il miglior software di montaggio video per matrimoni nel 2026?https://images.wondershare.com/filmora/article-images/wedding-video-editor-software-filmora-1.jpg
-
Progetta video di apertura di livello professionale utilizzando la migliore app gratuita per la creazione di intro
-
2026 Recensione del software di montaggio video DJI più potente
-
Adobe Firefly vs. Filmora: La guida definitiva 2026 alla generazione di video e immagini con l'IA
-
Il miglior software di montaggio video per droni nel 2026: le migliori scelte per riprese fluide e cinematografiche
-
Miglior strumenti di convertitore di youtube flv a mp4 nel 2026 (gratuito e Online)
-
Top 7 youtube a mpeg convertitori (gratuito e Online) nel 2026
-
Adobe Premiere Pro vs Final Cut Pro: Quale software di editing dovresti scegliere nel 2026?
-
Adobe After Effects vs Premiere Pro: Quale strumento Adobe è migliore per l'editing video e il motion design?
-
Recensione di Cyberlink PowerDirector 2026
-
I 5 migliori creatori online di Stop Motion nel 2026 per creatori, studenti e appassionati
-
Le migliori alternative a CapCut per PC, Mobile e Mac (Recensione 2026)
-
Le 7 migliori app per creare Reels automatici su Instagram per creatori nel 2026
-
Shotcut vs OpenShot: Quale editor video gratuito dovresti davvero usare?
-
DaVinci Resolve vs OpenShot: Il potente o la scelta più semplice?
-
Recensione di InVideo 2026: tantissimi modelli online — ma è abbastanza flessibile?
-
VEED.IO Recensione 2026: Vantaggi, Svantaggi e Migliore Alternativa a Filmora
-
Recensione di DaVinci Resolve 2026: È ancora il migliore per i professionisti dell'editing?
-
Recensione di Clideo Video Maker 2026: Ne Vale la Pena? (Un'Analisi Dettagliata)
-
Migliori alternative a OpenShot: opzioni gratuite e a pagamento per principianti nel 2026
-
Migliori app per rimuovere lo sfondo dalle foto: le migliori scelte per il 2026https://images.wondershare.com/filmora/article-images/image-background-remover-apps-1.jpg
-
Recensione di Blipcut AI Video Translator: Analisi completa 2026 e migliori alternativehttps://images.wondershare.com/filmora/article-images/blipcut-ai-video-translator-review-1.jpg
-
Le 8 migliori app di editing video AI da utilizzare nel 2026 [Elenco aggiornato]https://images.wondershare.com/filmora/article-images/ai-video-editing-apps-1.jpg
-
Blender 2026 Recensione: Un software 3D gratuito e editor video
-
WavePad Editor può soddisfare le tue esigenze audio nel 2026? Ecco la panoramica completa
-
Recensione completa dell'app Funimate nel 2026 per creatori mobili
-
Che cos'è l'effetto Dolly Zoom?https://images.wondershare.com/filmora/article-trans-image/1101/dolly-zoom-filmora-1.gif
-
Che cos'è l'effetto Ken Burns?https://images.wondershare.com/filmora/article-trans-image/1105/ken-burns-effect-filmora-1.gif
-
Che cos'è una carrellata (Tracking Shot) nel cinema?
-
Cos'è un primo piano estremo (ECU)?https://images.wondershare.com/filmora/article-trans-image/1218/extreme-close-up-filmora-1.jpg
-
La guida definitiva ai tipi di inquadratura e angolazioni della fotocamera
-
Che cos'è un'inquadratura ravvicinata?https://images.wondershare.com/filmora/article-trans-image/1274/close-up-shot-filmora-1.jpg
-
Che cos'è la tecnica Shot/Reverse Shot?
-
Che cos'è una ripresa panoramica?https://images.wondershare.com/filmora/article-trans-image/1284/wide-shot-filmora-1.jpg
-
Che cos'è il movimento della camera? Una guida completa ai tipi e agli utilizzihttps://images.wondershare.com/filmora/article-trans-image/1337/camera-movement-filmora-1.jpg
-
Che cos'è l'animazione in stop motion?https://images.wondershare.com/filmora/article-trans-image/1338/stop-motion-animation-filmora-1.jpg
-
Che cos'è la sovrapposizione?https://images.wondershare.com/filmora/article-trans-image/1339/what-is-superimposition-filmora-1.jpg
-
I 10 Migliori Siti per Guardare Film Gratis Online in Italia (Guida 2026)
-
Come montare un video ricordo perfetto delle vacanze estive 2026
-
Come migliorare la qualità video: facili correzioni prima e dopo la ripresa
-
Nintendo Switch 2: tutto quello che sappiamo finora (aggiornato a maggio 2026)
-
Pop Mart e il fenomeno Labubu: perché tutti li vogliono
-
Guida completa a WhatsApp Web e WhatsApp Desktop: come usarli su PC
-
La guida definitiva al miglior software di editing video gratis per Windows a 32 bit
-
I migliori editor video per PC di fascia bassa
-
Converti facilmente i video in slow motion in velocità normale: Passaggi rapidi e semplicihttps://images.wondershare.com/filmora/article-images/convert-slow-motion-video-to-regular-01.jpg
-
Come velocizzare un video in PowerPoint: Una guida semplice
-
Come creare adesivi GIF per WhatsApp - 3 metodihttps://images.wondershare.com/filmora/article-images/gif-to-whatsapp-stickers-01.jpg
-
Crea e modifica video di alta qualità con questo creatore di video 4Khttps://images.wondershare.com/filmora/article-images/hd-video-maker-1.jpg
-
I migliori creatori di eCard per San Valentino [Online + Desktop + App]
-
Le 8 migliori app per sottotitoli da non perdere
-
10 app per creare video con immagini e musica | Aggiornato
-
Le migliori app per creare storie su Instagram nel 2026
-
Guida completa su come creare un canale di benvenuto Discord
-
La guida definitiva all'ottimizzazione delle dimensioni delle GIF su Discord
-
Clonazione vocale HeyGen: Una guida completa con alternative
-
Cose che devi sapere sul ruolo delle LUT video
-
Come scegliere e utilizzare le migliori LUT video per i contenuti vlog
-
Le 5 migliori LUT video per l'Editor video VN che dovresti provare
-
Pianifica i Reel di Instagram: Revisione dei metodi migliori
-
Registrazione dello schermo iOS: Tutte le tecniche efficaci [2026]
-
Come fare video xiaohongshu: passi semplici e miglior editor da provare
-
Guida per principianti all'utilizzo dello strumento di Photoshop “Digita su un percorso”.
-
Tutorial passo a passo: Come utilizzare lo strumento Testo su un percorso in Illustrator
-
Guida dettagliata all'utilizzo dello strumento Illustrator iPad Digita su un percorso
-
Impara a conoscere la funzione “Digita su un percorso” di InDesign: Una guida completa
-
Adattare il testo al percorso in CorelDRAW: Una guida completa
-
Una guida completa per la frequenza fotogrammatica del film
-
Tutto da sapere sui migliori fps per il rallentamento
-
Tutto quello che devi sapere sulla frequenza dei fotogrammi della videocamera
-
Guida semplice su come impostare la frequenza dei fotogrammi di registrazione video
-
Come impostare la migliore frequenza di fotogrammi per i video di YouTube?
-
Come dividere un video su iPhone in più cliphttps://images.wondershare.com/filmora/article-images/how-to-split-video-on-iphone-1.jpg
-
Trucchi video creativi per iPhone: come mettere due video sul tuo iPhonehttps://images.wondershare.com/filmora/article-images/put-two-videos-side-by-side-on-iphone-1.jpg
-
Come dividere un video in due parti o più su iphone [2026]https://images.wondershare.com/filmora/article-images/split-video-into-parts-iphone-1.jpg
-
Video splitter per android: 10 migliori applicazioni che devi provarehttps://images.wondershare.com/filmora/article-images/android-split-video-1.jpg
-
Guida finale per combinare video su iPhone: unire, unire e modificare con facilitàhttps://images.wondershare.com/filmora/article-images/how-to-combine-two-iphone-videos-1.jpg
-
Come combinare video sul tuo dispositivo Android: facile e veloce!https://images.wondershare.com/filmora/article-images/combine-videos-android-1.jpg
-
Come aprire file srt su mac-tutto quello che devi sapere
-
La guida finale: come importare, modificare ed esportare video in imovie
-
Come creare un collage fotografico su mac: guida passo passo
-
Davinci Resolve Freeze Guida del frame: tutto quello che devi sapere
-
Final cut pro x freez-frame e rallentamento: una guida per principianti
-
Come creare frame di congelamento in capcut: guida passo passo
-
Come congelare i cornici in Sony Vegas-guida completa
-
Tutorial: come utilizzare i frame di freeze in final cut pro e le sue alternative
-
Cos'è un frame di congelamento e come crearlo nei film
-
Come fare immagine in immagine (PIP) in finale taglio pro
-
Come fare un video immagine in immagine su imovie
-
Guida completa per la creazione di un effetto immagine in immagine in davinci resolve
-
Come creare video immagine in immagine su qualsiasi dispositivo
-
La guida finale per gli editori video immagine in immagine (PIP): gli strumenti migliori per il 2026
-
Come creare un effetto immagine in immagine (PiP) nell'editor video inshot
-
Topic: miglior editor di immagini dal vivo per mac: come modificare foto dal vivo in tempo reale
-
Migliori metodi per creare video immagine in immagine su mac
-
Modo migliore per congelare/estendere i frame in camtasia
-
Creazione di video con frame freezing con editor video: opzioni Desktop, Online e mobile
-
App di frame di congelamento superiore da utilizzare nel 2026
-
Come aggiungere sottotitoli e sottotitoli in imovie su iPhone
-
Come aggiungere sottotitoli in vlc: per gli utenti mobili [Android/iOS]
-
Come aggiungere sottotitoli ai video su dispositivi Android
-
Come realizzare un Video immagine in immagine (PIP): una guida completa
-
Come aggiungere facilmente sottotitoli ai film sul tuo telefono: guida per Android & iPhone
-
Modi creativi per dividere i video iPhone in parti
-
Come invertire il video utilizzando imovie su iPhone/iOS
-
Come fare video veloce motion su iPhone con filmora mobile
-
Come tagliare il centro del video su iPhone: una guida rapida e consigli per tagli lisci
-
Guida per i principianti per modificare video su Android utilizzando filmora
-
La Guida Ultima per Lenti Anamorfiche-Wondershare FilmoraPro
-
8 suggerimenti eccellenti per creare e generare lead attraverso video di spiegazione
-
10 migliori treppiedi di viaggio per scattare video/foto perfetti
-
Strategia di marketing video per aumentare la conversione nel 2026
-
Migliori alternative di discordia per una migliore esperienza
-
Slack contro. Discordia: quale è meglio per il tuo team
-
10 temi di discordia fresca per il 2026 [da BetterDiscord]
-
5 consigli per creare un video di viaggio impressionante
-
10 migliori YouTuber e video Vlogmas che devi sapere
-
Miglior Vlogmas Intro Maker per potenziare la tua creatività facilmente
-
#Travelanwayside: Come viaggiare senza viaggiare? Guida a Greenscreen
-
Tutto quello che dovresti sapere Axolotls Minecraft nel 2026
-
Podcast Statistiche e Insights Marketing
-
Migliori giochi di auto divertenti per bambini nel 2026
-
Come registrare il gioco LOL? (3 metodi)
-
Top 5 Giochi di Simulazione Fluidi
-
Top 6 Idee di Casa Minecraft Cool 2026
-
Come fare un video di streaming di gioco con un ritratto AI
-
Cos'è Imgur? La Guida definitiva per Imgur
-
3 modi veloci per scaricare imgur album gratis
-
Come aggiungere bordi al video su Windows e Mac
-
10 migliori siti per scaricare Gaming Intro modelli gratis
-
Taglio di un video in Final Cut Pro [Passo per Passo]
-
Tutorial dettagliato per tagliare un video in KineMaster
-
Come illuminare un video in Windows 10 facilmente
-
8 App per personalizzare i tuoi adesivi GIF
-
Suggerimenti per aggiungere musica alla foto online
-
Migliori 10 App per migliorare il tuo Instagram Story Slideshow
-
Come fare una diapositiva estetica
-
Come modificare video GoPro su Mac
-
Come fare GIF da video su Mac
-
Miglior software Green Screen per principianti su Mac
-
Top 10 App per iPad Slideshow per creare una diapositiva
-
Quali sono i migliori modelli di diapositive di Filmora? Scelta degli esperti
-
Come: Guida rapida per fare Google Slideshow
-
Come usare LUTS per colorare il grado sul tuo iPhone
-
I 15 migliori LUT da usare per foto e video: raccolta 2026 + guida Filmora
-
Come usare LUT in Lumafusion & Risorse LUT gratuite
-
Come fare un montaggio di gioco-Guida e consigli
-
Qual è il miglior laptop per la modifica video
-
Come aggiungere un terzo inferiore al tuo videoxctBgvw7IEE
-
Come avviare un VlogfbUAYy7QQ9Q
-
Come cambiare il colore del testo in Premiere Pro
-
Esplorare le migliori 6 alternative al cambiatore di voce del pesce pagliaccio nel 2026
-
I migliori modi per aggiungere testo di meme ai video
-
Miglior servizio di archiviazione cloud per video 2026
-
Guida passo passo per creare effetti mezzattoni in Photoshop
-
Crea un effetto risografo in Photoshop: una guida per principianti
-
Come aggiungere sottotitoli in QuickTime Player?
-
Come essere un buon host di podcast (aggiornato 2026)
-
Guida completa per aggiungere LUT in Premiere Pro con facilità
-
[Guida completa 2026] Recensione su 3D LUT Creator
-
Introduzione ai migliori LUT cinematografici del mercato
-
Trovare i migliori LUT Filmic Pro per la modifica video
-
Come fare zoom attraverso l'effetto testo in modo rapido e semplice in Filmora
-
Come creare effetto VHS sui tuoi video in Premiere Pro?
-
Come fai-da-te VHS sovrapposizione in After Effects?
-
Divisione del video in frame con il FFmpeg [Passo per Passo]
-
4 modi per ruotare i tuoi video GoPro professionalmente
-
6 mp4 istantaneo a GIF strumenti online
-
Come unire file FLV [Windows, Mac, Android, iPhone & Online]
-
Qual è il miglior tagliatore MP4 per YouTuber su Mac?
-
Perché dovresti padroneggiare le diapositive in Lightroom, Fresh Insight?
-
Come creare una diapositiva istantanea su Mac
-
10+ Migliori modelli di diapositive FCPX illimitati
-
Quali modelli di diapositive possono insegnare sull'estetica
-
Migliori 8 modelli di diapositive Premiere Pro Top
-
Download gratis Top 12 modelli di diapositive Sony Vegas
-
Come creare semplici diapositive Word
-
11 Modi per accelerare un video su iPhone
-
Impara a usare il montaggio con questi film
-
Come fare video sottotitoli
-
Come rimuovere l'audio dal video senza filigrana?
-
Come rimuovere l'audio dal video su Mac? Soluzioni Ufficiali e Gratuite.
-
Come accelerare il video su splicing
-
Aumenta il ritmo dei tuoi video di Instagram con questi semplici trucchi
-
Come fare Fortnite Thumbnail con Motion Blur?
-
Guida finale su come pianificare e storyboard un video musicale
-
10 Modelli di Video Compleanno Creativi per KineMaster
-
4 Modi per unire MP4 e MP3
-
Miglior frame rate per i video in slow motion
-
I migliori podcast su Google Podcasts per il 2026
-
SRT non viene visualizzato: Come aprire e utilizzare il file SRT in VLC?
-
10 migliori app per accelerare la velocità dell'audio su dispositivi mobili
-
Come aggiungere il livello di regolazione (Clip) in DaVinci Resolve?
-
Come attivare/disattivare la sfocatura in Fortnite? È un bene per Fortnite?
-
[Updated 2026] Le migliori LUT vintage gratis da usare
-
La migliore app LUT per iPhone da utilizzare nel 2026
-
8 Migliori servizi di promozione video di YouTube (reale)
-
Come realizzare video in loop per Instagram?
-
Come creare GIF di compleanno animate: guida completa con idee e strumenti
-
Elenco dei formati video Whatsapp supportati che potresti voler sapere
-
Guida su come creare l'effetto Zoom di Google Map
-
Creare video Time-Lapse su MacBook [Guida completa]
-
I migliori strumenti Voice Changer per YouTubers: Trova l'opzione migliore per i tuoi video
-
Come vedere i commenti che piacciono a YouTube
-
Tutorial finale: Come aggiungere un timer per il conto alla rovescia in OBS
-
Monetizzazione di YouTube: Techno Gamerz Reddito YouTube 2026
-
Come rimuovere i podcast consigliati da Spotify
-
Come pubblicare un'immagine su YouTube
-
I migliori canali YouTube di narrazione da seguire quest'anno
-
Come cambiare la velocità dei video su Instagram Storie [2026]
-
Il modo più semplice per verificare e modificare l'età su TikTok (2026)
-
I migliori hashtag per YouTube per ottenere le tue visualizzazioni a 6 cifre
-
Le migliori LUT per Sony HLG da scaricare
-
I 5 migliori siti di foto ritocco AI gratis che possono trasformare le tue foto
-
Scarica i video di Telegram da cellulare o PC [2026]
-
Minecraft per San Valentino: Cosa si può fare
-
Passo dopo passo per ruotare i video usando OBS
-
Tutorial - Creare Effetto Zoom Foto 3D in Filmora02:11
-
Tutorial – Come Rendere Bello il Tuo Viso nel Video con Filmora
-
Guida su come bloccare qualcuno su Instagram senza che lo sappiano
-
Guida per rimuovere gli oggetti dal video con o senza la riproduzione pulita
-
Top 5 Registratore di Schermo Time lapse
-
3 modi per lo streaming e la registrazione allo stesso tempo
-
Guida completa per aiutarti a scegliere le migliori fotocamere HDR nel 2026
-
Top 10 Podcast Apps per l'ascolto di Podcast su un Mac (aggiornato)
-
Confronto tra i prezzi dell'Archivio Cloud 2026 e il miglior prezzo
-
Come Creare e Aggiungere un Livello di Regolazione in Final Cut Pro
-
I 3 migliori plug-in Motion Blur per Adobe After Effects
-
Come trovare il video di sfondo di TikTok: Alcuni modelli
-
Come risolvere il problema dell'anteprima dei cortometraggi di YouTube che non viene visualizzata
-
8 Suggerimenti per Creare Attraenti Instagram Unboxing Reel
-
Guida Migliori siti web per trovare Google Pixel Suonerie e come personalizzare Google Pixel Suonerie
-
Adobe Premiere Pro Rec 709 LUT: Trovare le migliori opzioni
-
Editor di VN: Un'opzione di spicco per l'aggiunta di Luts per l'editing video
-
Le 10 migliori app per il Ritocco della pelle AI che devi provare nel 2026
-
Verifica della monetizzazione di YouTube Studio: Assicura la monetizzazione del tuo canale
-
Come creare un fantastico video TikTok usando un modello
-
Raccomandazione: il miglior sito Web per scaricare la suoneria "Game of Thrones"
-
Siti Web per scaricare musica di gioco senza copyright
-
Scopri come realizzare il cortometraggio YouTube perfetto per ottenere un grande coinvolgimento
-
Come fare soldi dai cortometraggi di YouTube: requisiti e potenziale di profitto
-
Come Realizzare video al rallentatore in Premiere Pro
-
33 migliori divisori video consigliati
-
Guida completa per realizzare un video introduttivo
-
Suggerimenti per l'editing video da sapere prima di modificare la prima bozza
-
Come creare animazioni di testo per i video
-
I migliori trucchi di editing Jump Cut
-
Come realizzare un video time lapse sbalorditivo? [Guida completa]
-
I migliori suggerimenti video per l'insegnamento online per gli insegnanti
-
I 5 migliori software di filtraggio video del 2026: Migliora i tuoi video con i filtri
-
I 5 migliori editor di filtri video online gratis del 2026: Migliora i tuoi video con i filtri
-
Come aggiungere gratuitamente effetti VHS ai video 2026
-
Come creare una sequenza predefinita personalizzata in Premiere Pro
-
Modi gratis per scaricare video e immagini sullo schermo verde del cellulare: nessun copyright
-
Le ultime 100+ migliori didascalie TikTok per migliorare il tuo prossimo post
-
6 siti Web per scaricare gratuitamente filmati motivazionali
-
Creare video motivazionali con l'IA: Guida completa 2026
-
Come applicare il filtro video nel 2026: Miglior software di editing
-
TOP 10 tipi di inquadratura video: Da principiante a maestro
-
Come eseguire modifiche alla velocità su PC
-
Come rallentare i video time-lapse su iPhone
-
I TOP 6 controller di velocità video online per Chrome, Safari ecc
-
Come rallentare i video time-lapse su iPhone
-
[Top 9] Le migliori soluzioni da adottare quando si crea una miniatura AI
-
Utilizzo del mascherino traccia e del tracciamento in Adobe After Effects: Revisione di tutte le possibilità
-
Sostituzione del cielo nelle immagini online e offline
-
Scopri Come Cambiare lo Sfondo del Cielo con le Migliori Applicazioni? Una recensione!
-
Imparare i dettagli su come sostituire Sky in Lightroom
-
Alcuni dei migliori siti per sostituire lo sfondo del cielo nei video
-
Sostituzione dello sfondo del cielo utilizzando Adobe Photoshop: Una guida completa
-
I principali strumenti di AI per sostituire sfondi del cielo
-
Semplici passaggi per rallentare un video su iPhone e Android
-
Rallenta o accelera facilmente i video su PC, online e telefono
-
Le 10 migliori scelte per una generazione video al rallentatore impeccabile
-
Una guida completa ai video YouTube al rallentatore e come gestirli
-
Ottenere il rallentatore GoPro con qualità: Una panoramica approfondita
-
Aggiunta del rallentatore in DaVinci Resolve: Una panoramica completa
-
Adobe Premiere Pro: Guida al rallentamento dei video
-
I migliori modelli CapCut per la tendenza dei video al rallentatore
-
L'approccio migliore per rallentare un video: CapCut Editor video tutto in uno
-
Guida competitiva per l'uso del rallentatore in After Effects
-
[Migliori soluzioni iOS] Trovare app premium al rallentatore per la creazione di video
-
10 migliori fotocamere al rallentatore da provare nel 2026
-
Sperimenta il tempo in modo diverso con le migliori applicazioni al rallentatore
-
Trasformare un video al rallentatore in normale
-
Padroneggiare la tecnica: Riprodurre video al rallentatore sul tuo iPhone come un professionista
-
Guida per rallentare i video su Snapchat discutendo i dettagli
-
Innovazione al rallentatore con la funzione S&Q di Sony
-
I modi giusti per rallentare un video su iPhone
-
I modi perfetti per convertire un video al rallentatore in normale
-
Invertire i video time lapse su iPhone utilizzando le applicazioni principali
-
La fotocamera economica per realizzare video al rallentatore
-
Alla ricerca del miglior effetto rallentatore in Premiere Pro
-
Esaminando le migliori app gratis per rallentatore (Android e iOS)
-
Realizzare video al rallentatore in Final Cut Pro: I metodi migliori
-
Perfezionare l'arte di rallentare i video su Instagram
-
Registrazione di video al rallentatore: Alcuni punti considerevoli!
-
I 15 migliori modelli CapCut al rallentatore con cui lavorare
-
HSL e classificazione del colore: Un passo creativo e innovativo verso la gestione del colore
-
Tutorial di Wondershare Filmora | Riformulazione automatica dell'IA
-
Come puoi importare e modificare i video clip su Wondershare Filmora?
-
Comprendere il funzionamento dell'audio nei video: Aggiunta o rimozione
-
Effetto zoom: Lavorare sugli effetti con i migliori editor video
-
Migliora la tua grafica video con Wondershare Filmora: Correzione del colore estesa
-
Come colorare perfettamente i video con Wondershare Filmora
-
MTS/M2TS Cutter: Come tagliare file MTS/M2TS
-
Come unire file MTS/M2TS
-
M4V Editor: Modifica file M4V con M4V Video Editor
-
Come realizzare un video con immagini con musica
-
Come convertire AIFF in MP3 con i migliori convertitori AIFF in MP3
-
Converti M4A in MP4 con i migliori convertitori
-
Convertire M4A in MP3: I migliori convertitori M4A
-
Le migliori soluzioni per convertire AC3 in MP3
-
Come scaricare video YouTube 4K e convertirli in mp3?
-
10 migliori corsi di editing video online
-
Come aggiungere effetti glitch ai video senza scaricare i plugin 2026?
-
8 migliori modelli di trailer di film per After Effects
-
Come convertire gratuitamente SWF in MP4 per Windows/Mac/Online
-
I migliori convertitori di formato DVD in digitale
-
I migliori convertitori: Modi semplici per convertire WMV in MP4
-
8 tipi di tutorial sul trucco che ti ispireranno
-
20 migliori modelli gratuiti di Final Cut Pro 2026
-
Momenti salienti delle Olimpiadi di pattinaggio di velocità su short track 2026
-
Come modificare la velocità di QuickTime Player su Mac?
-
Come far sembrare fantastici i video noiosi con B Rolls
-
Come realizzare video a schermo diviso in Filmora
-
Come creare effetti di teletrasporto nel viaggio nel tempo?
-
Come scegliere la posizione e la programmazione del video musicale
-
Esegui il backup e organizza tonnellate di filmati in pochi minuti
-
Sblocca il tuo potenziale di editing video con Wondershare Filmora
-
Come eseguire la gradazione e la correzione del colore in Filmora
-
Suggerimenti e trucchi per utilizzare perfettamente il mixer audio in Filmora
-
Sincronizza facilmente audio e video con Filmora
-
Le migliori app per applicare il miglior effetto della fotocamera VHS
-
Soluzioni progressive per aggiungere facilmente effetti VHS ai video
-
Cerchi i migliori produttori di effetti video VHS? Conosci la lista dei migliori!
-
[Elenco principale] I migliori effetti sonori VHS che puoi utilizzare nella creazione di video
-
Una guida completa sulla tecnologia VHS e la sua influenza sull'editing video
-
Una guida per aggiungere audio in Wondershare Filmora
-
Doppiaggio di video con voci fuori campo | Utilizzando Wondershare Filmora
-
Trovare il modo migliore per aggiungere sottotitoli ai video | Filmora
-
Guida per sincronizzare correttamente audio e video?
-
Funzionalità AI di Wondershare Filmora - Rilevamento del silenzio nei video
-
Come ridurre il rumore audio con gli strumenti giusti (offline/online)
-
Scopri di più sull'nterfaccia di editing video di Wondershare Filmora
-
Il modo per realizzare collage video dinamici?
-
Una guida al tracciamento del movimento utilizzando i migliori editor video
-
L'effetto del movimento della fotocamera in creazione di video
-
Frame rate, velocità e Wondershare Filmora: Una panoramica
-
Guida per ritagliare e combinare contenuti in Wondershare Filmora
-
Guida alla creazione dei migliori collage video nel 2026
-
L'editing video efficiente | Scorciatoie da tastiera in Filmora
-
Guida al ridimensionamento e all'impostazione dei video in Filmora | Esercitazione
-
Creazione dell'effetto Tilt-Shift utilizzando le migliori opzioni disponibili
-
Un metodo popolare per migliorare i tuoi contenuti: Effetto di riproduzione video
-
Imparare a neutralizzare la sovraesposizione nei video
-
Creare le migliori forme di dattilografia dinamica con Wondershare Filmora
-
Creazione di keyframe con Filmora: Una guida per i nuovi editor video
-
Come aggiungere transizioni al video utilizzando Filmora
-
Video in stop-motion | Come realizzarli perfettamente?
-
Esporta un video con un solo clic con Wondershare Filmora
-
Esplorazione delle migliori tecniche affidabili per stabilizzare un video
-
Comprensione del bilanciamento del bianco e delle sue opzioni di regolazione
-
Utilizzo delle LUT 3D in Wondershare Filmora: Una guida completa
-
Semplificare i concetti di keyframing con Wondershare Filmora
-
Effetto di modifica ondulata: Realizzare video di qualità
-
Miglioramento della grafica video con la gradazione del colore della forma d'onda e dell'istogramma
-
Elevare la creazione di contenuti con le funzionalità di mascheramento di Filmora
-
Scopri di più su alcune delle migliori tecniche di composizione video nell'editing
-
I 9 migliori suggerimenti per padroneggiare gli annunci pop-up
-
Utilizzo della funzione PiP ai massimi livelli con Wondershare Filmora
-
Come Convertire documenti Word in PowerPoint con l'IA: Guida completa 2026
-
Zoom avanti e indietro su Discord
-
格式 可读性 提炼 一目了然 统一性
-
sdas asd as sd asd das d
-
Volete inviare uno snap dal camera roll? Scoprite come si fa!
-
I migliori 8 creatori di montaggi fotografici online
-
Capire il tremolio della fotocamera in fotografia/video
-
Come distorcere una foto utilizzando diversi strumenti
-
I migliori miglioratori di foto gratis online e app per smartphone
-
10 Migliori editor di volti per Android e iPhone
-
5 Migliori app di fotoritocco per telefoni Android
-
Come modificare, sfocare o rimuovere lo sfondo di una foto?
-
10 suggerimenti segreti per il fotoritocco con Photoshop per i principianti
-
Guida per principianti all'uso delle funzioni di editing fotografico di Snapseed [2026]
-
7 tipi di color grading che vale la pena di provare
-
Le 10 migliori lut cinematografiche per il montaggio video nel 2026
-
Come utilizzare le LUT in PhotoShop CC
-
3 semplici metodi per schiarire un video su iPhone
-
Come schiarire un video su Android
-
Come sfocare una parte di un'immagine su PC/Mobile
-
8 strumenti utili che consentono di pixelare il volto sulle foto
-
Come sfocare i volti in Picsart in modo semplice
-
Come sfocare volti/sfondo/immagini in Photoshop
-
I migliori strumenti per creare collage di immagini miste
-
Come modificare la velocità di riproduzione di Netflix?
-
Modi rapidi per creare collage di foto su Mac
-
Come creare un rapido collage di foto su Google
-
12 incredibili esempi di collage e come realizzarli
-
Le migliori 10 app di collage per Android nel 2026
-
Il foglio di istruzioni definitivo per realizzare un collage
-
Come creare splendidi collage di foto a mosaico
-
Trucco facile su come fare un collage su Instagram
-
Come creare facilmente un avatar del metaverso: An Ultimate Guide
-
Metaverso vs. Multiverso: Quali sono le differenze [Guida completa]
-
Tutto sul Metaverse Marketing: Esempi, strategie e altro ancora
-
I 10 migliori film di fantascienza sul metaverso vi porteranno in un mondo completamente nuovo
-
6 esempi di metaverso per aiutarvi ad avere una visione approfondita del fenomeno [Utile].
-
Come migliorare la qualità video delle riunioni Zoom ?
-
10 modelli di cornici video di tendenza nel 2026 [per Youtube/IG/FB].
-
Come scrivere una sceneggiatura video senza sforzo [con 6 modelli di sceneggiatura video].
-
Il miglior Mac per il montaggio video [2026]
-
Come fare un video di bellezza
-
Come aggiungere adesivi in video
-
Come realizzare il video Jujutsu Kaisen Tiktok?
-
Come rimuovere il silenzio dai video automaticamente
-
Incorporare video in PowerPoint: Per far risaltare le presentazioni
-
Come aggiungere i crediti video in Wondershare Filmora con facilità
-
Come realizzare un montaggio video su Android e iPhone
-
Come aggiungere musica a un video online gratuitamente
-
Le migliori telecamere a rallentatore del 2026
-
Come Creare l’Effetto Specchio in un Video su PC e Mac
-
Le migliori app di editing video per LinkedIn nel 2026
-
Come aggiungere un effetto vignetta online?
-
Guida per principianti alla fotografia con sfocatura di movimento
-
Come usare l'iPhone come lente d'ingrandimento?
-
Come creare video su Windows 10
-
Come creare titoli in Premiere Elements
-
Come ritagliare un video in AVS Video Editor
-
Montaggio video di matrimonio - Come montare i video di matrimonio
-
Come bloccare il volto in un video
-
Come distorcere il volto in un video
-
Il miglior programma per modificare i video Flip
-
Il miglior programma di editing video per principianti 【2026】
-
I 10 migliori convertitori di sottotitoli online per convertire GRATIS i file SRT
-
HDR quantistico: tutto ciò che si vuole sapere sull'HDR quantistico
-
Dove trovare musica di sottofondo per i video
-
Recensione di Pinnacle Studio 25
-
I migliori generatori di testi di meme da utilizzare
-
10 migliori LUT gratuite con link da scaricare
-
Come ottenere foto stock senza filigrana
-
Guida definitiva su come creare un file SRT (più suggerimenti)
-
Quanto costa una promozione su YouTube
-
I migliori modelli di meme gratuiti
-
I migliori modelli di titolo gratuiti per After Effects
-
Trovare il giusto rapporto di aspetto per il video
-
Recensione di FFmpeg Audio: FFmpeg può estrarre l'audio nel formato originale?
-
Guida SRT: Tutto quello che c'è da sapere sulla SRT [Aggiornato]
-
11 migliori esercitazioni sulla correzione del colore e sulla gradazione del colore
-
La migliore app per la correzione del colore
-
I migliori siti web di grafica e arte vettoriale gratis
-
Cos'è la sceneggiatura
-
Che cos'è la dissolvenza incrociata
-
I migliori preset per l'animazione del testo
-
Esempio di sceneggiatura per cortometraggio
-
Il miglior sito web per la scrittura di sceneggiature
-
Migliori sceneggiature di radiodrammi
-
Come creare un buon trailer per un podcast
-
Come realizzare un buon trailer di film
-
Recensione di Magix Video Pro X
-
Come dissolvere l'audio in Lumafusion
-
Come sfumare l'audio in Logic Pro
-
Passi per eseguire una dissolvenza incrociata dell'audio in Logic Pro X
-
Recensioni su Aurora HDR: Aurora HDR è una Buona Scelta nel 2026?
-
HDR Photoshop: Come creare immagini HDR in Photoshop come un professionista
-
Come aggiungere filtri video in Zoom
-
La teoria del colore e il suo utilizzo
-
5 esempi di buoni trailer di libri
-
I migliori trailer cinematografici
-
Il miglior generatore di titoli clickbait
-
Cinque suggerimenti per la scrittura di dialoghi e sceneggiature narrative
-
Come scrivere una buona sceneggiatura per un documentario
-
Cos'è lo Slug Line e come si usa
-
I 10 migliori siti web per le immagini HDR del cielo
-
SDR vs HDR Perché l'HDR è una parte migliore del vostro flusso di lavoro video
-
Da SDR a HDR Guida definitiva alla conversione video da SDR a HDR
-
Recensione di Luminance HDR È una buona scelta per creare HDR ?
-
Passi per sfumare l'audio con FL Studio
-
Come sfumare in Audacity
-
Come sfumare la musica su Windows/Mac
-
Come sfumare l'audio senza sforzo con Garageband
-
Come fare un dissolvenza incrociata dell'audio con Audacity
-
Tutorial Lightroom HDR Come creare e unire immagini HDR straordinarie in Lightroom
-
2 modi per sfumare l'audio in Ableton
-
[Le 4 soluzioni più efficaci per i video HDR dell'iPhone sbiaditi in Premiere Pro
-
3 modi migliori per far scaricare i video Pinterest in MP3
-
Creatori di meme gratis
-
Attrezzatura per realizzare un video di viaggio
-
Generatore di meme di Canva
-
Migliori idee per i Meme
-
Come fare lo zoom online
-
Come creare un video con effetto testo con Filmora
-
Il miglior visualizzatore di foto veloce per Windows 10?
-
5 Migliori creatori di titoli online
-
I migliori tipi di effetti per titoli di testo in After Effects
-
I 10 migliori effetti di testo per i video
-
I 5 migliori siti per scarica effetti di testo
-
I migliori 14 esempi di animazione del testo
-
Semplici passaggi per curvare un'immagine in Photoshop
-
Samsung Photo Editor: recensione 2026 - Pro, contro, caratteristiche e guida
-
Guida per principianti agli effetti di testo di Premiere Pro
-
Come creare effetti di testo in movimento per i vostri video?
-
Una recensione completa dell'app Lightroom su Android
-
App KineMaster per Android - Recensione completa 2026
-
InShot è la migliore app di editing video ? Il nostro approfondimento
-
Come usare le LUT in Premiere Pro
-
Come disattivare l'anteprima dei video di YouTube? [Soluzione per tutte le piattaforme]
-
Come visualizzare l'anteprima delle attività fuori da Facebook e dovrei lasciarla attiva? Guarda qui!
-
Come avviare un canale di recensioni di prodotti
-
Come realizzare un filmato con Windows Movie Maker?
-
Come creare un video di trucco
-
[Come aggiungere i sottotitoli a un video su iPhone
-
Guida completa all'anteprima a schermo intero di Premiere Pro
-
8 Migliori Title Maker gratis da provare e utilizzare
-
10 Final Cut Pro-Plug-Ins
-
Facetune Photos App Recensione completa e guida 2026
-
La guida completa per la conversione di SRT in XML, SSA, TTML e altri formati.
-
I 10 migliori obiettivi per fotocamere del 2026
-
I migliori microfoni ASMR con prestazioni sorprendenti e prezzi accessibili
-
I 10 migliori preset di testo per After Effects
-
Tutorial completo per realizzare un impressionante video con conto alla rovescia
-
10 Migliori applicazioni per il conto alla rovescia del matrimonio per Android e iOS
-
Recensione dell'app YouCut: È l'app di editing video che fa per voi?
-
Scaricare e installare Windows XP Movie maker
-
Come Windows Movie Maker salva i file MP4
-
Recensione dell'app VivaVideo
-
VideoShow App recensione completa e guida 2026
-
ToonApp: recensione e guida completa 2026
-
Recensione e guida completa dell'app PowerDirector 2026
-
App PicsArt Recensione completa e guida 2026
-
Scaricare e utilizzare Movie Maker su Windows 11
-
File SRT: Come aprire un file SRT su Windows o Mac [2026]
-
Come realizzare l'effetto Hand Shake con Final Cut Pro.
-
Come scaricare i sottotitoli SRT di YouTube in 3 modi ?
-
Guida definitiva per convertire SRT in TXT in pochi minuti 2026
-
Guida per principianti al codec AV1
-
Come aggiungere Testo Animato alle Storie di Instagram
-
Versioni di Windows Movie Maker
-
8 modi aggiornati per unire SRT con MP4 per il 2026
-
Come scattare foto HDR con l'iPhone
-
3 modi pratici per creare un'animazione conto alla rovescia per i video
-
Motivatevi con le 20 migliori musiche di sottofondo per l'esercizio fisico
-
10 alternative gratis a Windows Movie Maker
-
Scaricare Windows Movie Maker [Guida completa]
-
La guida completa al hand tracking e alle sue tipologie
-
La vera soluzione per l'esportazione di SRT da Premiere non funzionante
-
I 8 migliori programmi per tradurre SRT gratis Online nel 2026
-
sRGB VS RGB
-
Mostrare la forma d'onda audio e aggiungere l'animazione della forma d'onda in Premiere Pro | Tutorial
-
Mostrare la forma d'onda audio e aggiungere l'animazione della forma d'onda in Final Cut Pro | Tutorial
-
Cose da sapere su Pexels.com.
-
Le migliori applicazioni di sintesi vocale su Mac che potrebbero sfuggirvi [gratis e senza download].
-
Il miglior generatore di titoli di YouTube
-
Come aggiungere un timestamp ai video di YouTube
-
Tutto sui messaggi vocali whatsapp
-
Quali sono i migliori siti per promuovere i video di YouTube ?
-
Fotografia al computer : cosa sono le modalità di ripresa Auto HDR, Smart HDR 3 e 4 ?
-
Guida definitiva ai memo vocali
-
Guida definitiva per aggiungere SRT a MP4 2026
-
I 8 più efficaci convertitori SUB in SRT per Online, Windows & Mac
-
OBS Vs Twitch Studio : Quale è meglio ?
-
Come risolvere il non funzionamento della telecamera OBS
-
Come scaricare OBS Studio per Mac
-
Come registrare gli spettacoli TV online
-
Modi semplici per registrare il gameplay della console
-
Modi semplici per registrare il gameplay di Steam 2026
-
Come registrare video con webcam su Mac: 4 metodi semplici e professionali
-
Come registrare il gioco della PS3
-
Come registrare video con Logitech webcam
-
5 modi per registrare il gameplay in VR
-
4 modi per registrare il gameplay di Sims 4
-
Come registrare una presentazione di PowerPoint con la webcam
-
Come registrare il Gameplay e la webcam
-
Come registrare una chat via webcam
-
Come registrare League of Legends
-
Le migliori alternative a Bandicam per Mac [Top 5 degli strumenti].
-
Come registrare una chiamata WhatsApp
-
Come registrare il gioco su PS4
-
Come registrare il gioco di Minecraft [Guida completa]
-
Il miglior software di registrazione dei flussi
-
15 migliori modelli gratuiti di intro in After Effects da provare nel 2026
-
Come cambiare lo sfondo di video: I 7 migliori programmi (2026)
-
Come Montare Video con Mac Mini [recensione 2026].
-
Il miglior iMac per il montaggio video nel 2026
-
Il miglior MacBook per il montaggio video [2026]
-
Come scaricare video da qualsiasi URL [Piattaforma calda inclusa]
-
Come creare facilmente una fastidiosa faccia arancione con Filmora
-
Come scaricare le serie web di Netflix su Android, iOS e desktop
-
Le 10 migliori serie web di Amazon Prime da amare assolutamente
-
Come creare un trailer di un libro partendo da zero
-
Come aggiungere un video al testo
-
Il logo è la base del vostro branding: Come crearlo?
-
Come aggiungere transizioni dissolvibili ai video?
-
Come aggiungere l'effetto fantasma ai vostri video? [4 modi]
-
Avengers Effetti di disintegrazione: Come far scomparire le persone
-
Cos'è la vignettatura e come usarla per scattare foto migliori ?
-
Come modificare una ripresa video verticale per IGTV
-
PowerDirector per Mac: Una recensione dettagliata e le sue migliori alternative
-
Semplici passi per creare un meme [Memes foto e video].
-
Easy Movie Maker : Come creare facilmente un filmato
-
Come tagliare facilmente i file video
-
MKV Merge: come unire file video MKV senza gap
-
Dividi/taglia/taglia facilmente file MKV in Windows/Mac
-
Come modificare il volume nei file multimediali con Filmora
-
5 migliori scelte per il software di registrazione video per il tuo computer
-
Le 6 migliori videocamere a 360 gradi recensite
-
Come scaricare video 4K da Netflix
-
La migliore recensione online del scaricatore di video 4k
-
Le 5 migliori applicazioni di riproduzione video per Android
-
Le migliori 6 app di acquisizione video Android per la registrazione dello schermo
-
Qual è il Aspect Ratio
-
Film horror classici di Halloween da guardare
-
Come stabilizzare i video dell'iPhone?
-
4 consigli utili per un migliore utilizzo di Inshot
-
Come sapere se qualcuno vi ha bloccato su Snapchat
-
10 filtri CapCut popolari per lucidare i video in un Snap
-
Airdrop non funziona, come risolverlo su iPhone, iPad e Mac
-
20+ popolari Twitch Sub Badge [Twitch Loyalty Badges]
-
Trucchi Whatsapp e funzioni nascoste che dovreste conoscere
-
Come creare una storia privata su Snapchat: A Complete Guide
-
Le migliori app per video e foto live
-
Vuoi acquistare follower e visualizzazioni su Twitch ? Non fatevi truffare
-
La Top Ten dei giochi più visti su Twitch
-
Banner Twitch : I migliori modelli e creatori di banner Twitch gratuiti
-
Come fare lo streaming in diretta su Twitter
-
Come guadagnare con Periscope se si è nuovi in questo settore
-
Come scrivere e pubblicare articoli su LinkedIn in modo efficace
-
10 Suggerimenti e trucchi per l' iPhone X mancante da raccogliere
-
Suggerimenti per la registrazione di video in time lapse su iPhone
-
10 regole di composizione fotografica per iPhone
-
Come scattare foto di paesaggi con l' iPhone [Suggerimenti utili].
-
Suggerimenti per la fotografia di silhouette con l' iPhone
-
Come organizzare l'album di foto su iPhone e iCloud
-
Come risolvere il problema della fotocamera dell'iPhone non a fuoco
-
Suggerimenti per la fotografia di riflessi per iPhone
-
Suggerimenti per la fotografia con iPhone
-
Come scattare foto a lunga esposizione con l'iPhone in iOS 11 o precedente
-
Suggerimenti per la fotografia notturna con iPhone: Scattare foto notturne con l'iPhone
-
Come scattare foto mentre si registrano video su iPhone
-
La guida definitiva alle foto HDR con la fotocamera dell'iPhone
-
Come trasferire foto e video da iPhone a iPhone
-
Come salvare e riprodurre GIF su un iPhone
-
10 Migliori app per fotocamera per iPhone X / 8 / 8 Plus / 7 / 7 Plus - Gratis e a pagamento
-
Come trasferire foto e video da un telefono Android sull' iPhone
-
Modi facili e gratuiti per trasferire foto e video da un iPhone a un PC
-
Come ridimensionare le foto su iPhone
-
vMix VS Wirecast: qual è il miglior software di live streaming professionale?
-
Ustream Recensione e alternative
-
12 App di trasmissione video in diretta per la visione e la trasmissione di video
-
I migliori encoder e hardware per il streaming in diretta da conoscere
-
I 3 migliori smartphone per registrare video
-
Dividere M4A con il miglior software di divisione M4A
-
Come realizzare i video con il Tilt Shift
-
Creare effetti speciali autentici e gratuiti con Wondershare Filmora download effetti video
-
Il miglior software di compressione video per Mac per comprimere i file video
-
Recensione di Windows Movie Maker
-
Come scaricare e utilizzare Windows Movie Maker 10
-
TXT to SRT: 3 modi efficaci per convertire TXT in SRT
-
Traccia opaca: La guida definitiva per After Effects
-
Come creare sottotitoli nei video
-
Come convertire SRT in DOCX
-
11 suggerimenti per realizzare video pubblicitari sui prodotti
-
Impostazioni 3D Ray Traced in After Effects: Una guida completa
-
Tracciamento degli oggetti in OpenCV: La guida completa
-
2 modi efficaci per tradurre i file SRT come un professionista
-
Windows Movie Maker è ancora disponibile?
-
Come scaricare Windows Movie Maker versione 2012
-
Guida definitiva alla conversione di Word in SRT
-
Il miglior video trimmer YouTube online 2026
-
M31 LUT (teal e orange LUT) Scaricare gratis
-
Come utilizzare le LUT in VN Editor - Guida completa e scarica delle migliori LUT
-
Come dividere i video in Final Cut Pro
-
Come dividere i video in Premier Pro
-
Come usare il Face Tracking in After Effects per rendere i vostri video Pop
-
Come commentare la chat live di YouTube
-
Come utilizzare gli effetti di tracciamento 3D della telecamera in After Effects
-
Che cos'è l'HDRI? Tutto quello che dovete sapere sull' HDRI
-
Quali sono le migliori alternative a Pexels?
-
I migliori generatori di titoli video
-
Come aggiungere l'effetto eco a un video: metodi online, Windows e Mac
-
2 modi efficaci per estrarre i sottotitoli dai video MKV senza perdita di qualità
-
[I 5 modi più semplici per convertire i video HDR in SDR
-
Le migliori animazioni di testo in After Effects
-
Miglior creatore di titoli di film
-
Fotografia HDR: Come utilizzare la modalità HDR sui dispositivi Android
-
Titoli gratuiti per Final Cut Pro
-
I 9 migliori programmi per estrarre il suono dai video 2026
-
I migliori Memes generati da Ai
-
Come aggiungere testo in After Effects
-
Aggiungi testo al video: Come aggiungere effetto di testo scorrevole
-
Come sfumare l'audio con Movavi Editor
-
Come cambiare il colore del testo in Premiere Pro
-
Come aggiungere la dissolvenza nell'editor video di Windows
-
Creare veri effetti di testo in 3D con After Effects
-
Come cambiare i font in Premiere Pro
-
I migliori editor video per aggiungere testo a un video
-
Come usare green screen in montaggio video [2026]
-
Come modificare il testo in Premiere Pro
-
I migliori creatori di titoli animati
-
Come aggiungere testo in Adobe Rush
-
Modi semplici per aggiungere una sovrapposizione di testo ai video
-
Come aggiungere un fermo immagine al video da qualsiasi dispositivo?
-
Come aggiungere un filtro ai video online
-
Come aggiungere un filtro al video in Premiere Pro?
-
Come utilizzare iMovie Text Effects
-
Creare un video promozionale
-
Cambiare il colore dello sfondo in After Effects
-
Aggiungere effetti di schermo verde in Final Cut Pro
-
Aggiungere la dissolvenza nell'editor video di Windows
-
Aggiungere effetti ai video online
-
I vantaggi dell'uso dei video per il social media marketing
-
DVD Slideshow Builder 2026 Recensione e tutorial
-
Come modificare la velocità di un video su iPhone 【2026】
-
Come montare un video in time lapse su iPhone?
-
Controllo della velocità di riproduzione in Premiere Pro
-
Come creare una rampa di velocità fluida in Premiere Pro?
-
Come sfocare i volti nei video su iPhone
-
Panoramica sui formati video iPhone supportati e sul miglior editor e convertitore video per iPhone
-
Come tagliare i video in Premiere Pro in modi diversi
-
Come invertire un video su iPhone
-
Come registrare video al rallentatore sul telefono?
-
Come unire i video in HandBrake? Aspettative e realtà
-
Imparate a unire i clip in DaVinci Resolve con semplici passaggi
-
Recensione di Virtualdub e delle sue migliori alternative
-
Come usare l'effetto schermo verde in GIMP
-
I 15 migliori canali video educativi per studenti di tutte le età
-
I 6 migliori scaricatori di video di Linkedin per salvare i video da LinkedIn
-
Modi semplici per realizzare un video perfetto per il vostro progetto scolastico
-
Motion tracking: Evidenziare un oggetto in movimento in un video
-
Le 10 migliori alternative a Offliberty
-
Come Stabilizzare un Video Mosso e Rimuovere il Tremolio
-
Come scegliere la luce per il green screen
-
Facebook Video Maker: Come creare video su Facebook
-
Come unire file MTS
-
Tutto sull'aggiunta di effetti in Kinemaster
-
Come aggiungere uno sfondo al video con/senza uno schermo verde
-
Come aggiungere filtri ai video [PC e dispositivi mobili]
-
Come aggiungere la dissolvenza in entrata/uscita Premiere Pro
-
Guida dettagliata per aggiungere transizioni in Kinemaster
-
1 minuto per sfumare in nero in Premiere Pro
-
Suggerimenti per realizzare video su Instagram con la musica Inserisci tag (Opzione+1)
-
Come creare le tue LUT per il tuo video 2026
-
Come utilizzare la fusione dei fotogrammi in Adobe Premiere Pro
-
RECENSIONE: Qual è il miglior software 10 per realizzare video di upscaling AI
-
Apprendimento approfondito del riconoscimento video AI
-
10 migliori suggerimenti per interviste video AI
-
12 impressionanti idee video AI per creare contenuti video coinvolgenti
-
I 10 migliori generatori di video AI tra cui scegliere nel 2026
-
I 5 migliori creatori di video musicali con l'IA
-
I 10 editor video di intelligenza artificiale online e su PC
-
I migliori 8 software AI Video Denoise
-
Panoramica delle 10 migliori società di analisi video AI
-
Che cos'è l'app video composito AI e tutorial video composito AI
-
3 diversi metodi per correggere la distorsione del colore nei video
-
Come aggiungere musica in Premiere Pro?
-
Metti fine a questo problema! Realizza oggi un video con sfondo trasparente!
-
Metodi per rendere trasparente lo sfondo in Procreate
-
Come creare uno sfondo trasparente su Picsart
-
Eliminare lo sfondo bianco in Photoshop è difficile? No!
-
Come creare uno sfondo trasparente in paint [2026]
-
Guida passo passo per rendere Gimp sfondo trasparente PNG
-
Suggerimenti per Blender - Come rendere Blender uno sfondo trasparente
-
Difficile rimuovere lo sfondo nero in After Effects? Ecco il modo migliore per affrontarlo
-
Idee che ti aiuteranno a creare immagini trasparenti
-
10 creatori di collage video strabiliante per PC
-
Come creare un collage Polaroid?
-
Proporzioni del telefono Definizione verticale, tipi e suggerimenti
-
Come modificare le proporzioni di un video?
-
Semplici trucchi per creare GIF 3D per creare ispirazione
-
Come creare gif After Effects
-
Come fare un vlog? Una guida definitiva per principianti
-
3 modi per combinare 2 o 3 video in 1
-
Come velocizzare un video online
-
Come creare un collage di foto in Microsoft Word — Guida passo passo
-
Tutorial semplice passo dopo passo sulla creazione di un collage di Lightroom
-
Formato video AVI: come aprire, riprodurre, modificare file AVI?
-
Informazioni generali che devi sapere sul formato MKV
-
Formato video 3GP: cos'è il formato 3GP e come aprirlo?
-
Come tagliare/ritagliare video in Microsoft Powerpoint
-
Come tagliare i video in QuickTime Player su Mac
-
Tutorial dettagliato per ridimensionare il tuo video in VLC
-
Come realizzare video al rallentatore?
-
5 Interessante cambia voce per rendere divertente le tue chiamate
-
Come invertire i video su Android?
-
Come ritagliare un video in Windows Media Player
-
Tutorial dettagliato per ritagliare video utilizzando Openshot
-
Come stabilizzare video gratuitamente con l'app Google Foto
-
Come creare video in stile cinematografico?
-
Recensione GoPro Quik e alternative per PC GoPro Quik 【2026】
-
Come ruotare un video su un dispositivo Android
-
Come eseguire il mirroring del mio video su Zoom
-
15 migliori musica royalty free per vlog
-
I 10 migliori film d'animazione di tutti i tempi [2026].
-
10 incredibili disegni di personaggi degli Anime per ispirarvi
-
A quale personaggio degli anime assomigli?
-
Guida passo passo allo storyboard
-
Garantiti 10 creatori di storyboard per rendere l'animazione più facile per voi
-
Quanto tempo ci vuole per modificare i video
-
Come aggiungere foto ai video Tik Tok
-
Come cambiare l'anteprima di un video su Google Drive
-
I 10 bot Discord più divertenti di cui avete bisogno nel 2026
-
Come rendere semplice la dissolvenza in nero dei video in movie maker
-
Come combinare più video in uno su Instagram [2026]
-
Passi per rimuovere il rumore di fondo dai video Sony Vegas
-
10 migliori software gratuiti di conversione da testo a voce in spagnolo [Windows, Mac, Android, iPhone e online]
-
I 20 migliori software di sintesi vocale [Windows, Mac, Android, iPhone e online].
-
10 migliori generatori di voci per trailer di film [Windows, Mac, Android, iPhone e online]
-
10 migliori software di sintesi vocale gratuiti [Win, Mac, Android, iOS e online]
-
I 10 MIGLIORI PRODUTTORI DI VIDEO DI TESTO DA PARLARE
-
Personalizzare l'icona della presentazione di PowerPoint in 8 semplici modi
-
Ispirazione video per la presentazione di un compleanno
-
Come creare una presentazione Pinterest in modo semplice
-
Come creare una presentazione in loop in PowerPoint
-
I migliori 10 software per presentazioni 3D
-
I 5 migliori suggerimenti per il fermo immagine in After Effects
-
I migliori consigli per Camtasia Freeze-frame
-
I 12 migliori esempi di montaggio video con Freeze Frame
-
Guida all'uso dell'effetto distorsione in Premiere Pro
-
15 Preset per il vibrazioni della telecamera per Adobe Premiere Pro
-
Come aggiungere il Camera Shake ai video in Adobe After Effects
-
4 modi per aggiungere un bordo bianco ai video su mobile e desktop
-
Passaggi dettagliati per aggiungere un bordo al video con Premiere Pro
-
Come creare un GIF con il logo Discord
-
La guida definitiva alle GIF per il profilo di Discord
-
10 Migliori rimuovi sfondo GIF gratuiti per PC e online
-
Quali sono i 10 migliori creatori di GIF?
-
Come creare GIF con Photoshop in modo semplice al 100%
-
Modi semplici per creare GIF con Procreate
-
Come fare una GIF con sfondo trasparente su PC [2026]
-
Come utilizzare il colore Lumetri in Adobe After Effects
-
Passi dettagliati per ruotare i video con Kdenlive
-
Passo dopo passo per ruotare i video utilizzando OBS
-
Come schiarire i video in Premiere Pro
-
Le 5 migliori soluzioni per il montaggio video di OBS Studio
-
Passo dopo passo per ruotare i video in Davinci Resolve
-
2 Metodi per tagliare i video in VLC su Windows
-
Passo dopo passo per ridimensionare i video in Davinci Resolve
-
Come classificare le immagini in LightRoom
-
8 Collage di foto gratuiti con la creazione di video musicali
-
Qualcosa che dovreste sapere sul formato video MP4
-
Tutorial dettagliato per ruotare i video in Cyberlink PowerDirector
-
Pattinaggio di velocità su pista corta Olimpiadi 2026 Highlights
-
Come Unire i Video in VLC Media Player: Guida dettagliata [2026]
-
I 8 migliori siti per scaricare Glitch Transition per Premiere Pro
-
Come creare l'effetto Datamoshing alle vostre riprese in After Effects?
-
Come ottenere il filtro VHS e il filtro Glitch sulle immagini o sui video?
-
I migliori film con schermo verde
-
Come ruotare un video in Windows 10: i 5 metodi utili [2026]
-
Come si possono creare filmati nel Google Photos Software? [Suggerimenti per desktop e dispositivi mobili].
-
10 siti web consigliati per scoprire fantastici modelli video Premiere Pro
-
10 modelli gratuiti di logo per After Effects per creare intro di logo
-
Come aggiungere bordi ai video online
-
Come Rimuovere il Rumore dai Video con Adobe Premiere Pro - Rimozione Rumore Audio e Video
-
Le 5 Soluzioni Migliori per Rimuovere il Rumore dai Video
-
I 10 Software Gratuiti Migliori per Convertire la Voce in Testo
-
Come Scegliere il Corso di Montaggio Video Più Adatto alle Proprie Esigenze
-
Come Ridurre il Rumore con Final Cut Pro – Riduzione Rumore Audio e Video
-
I 10 Editor Video Online Gratuiti Migliori del 2026
-
Come Aumentare la Durata dei Video: 6 metodi utili 【2026】
-
Guida all'Utilizzo dei Bot per Giocare su Discord
-
Guida Completa ai Server Boost di Discord (2026)
-
Come Realizzare un Video Elettorale
-
Come Unire i Video su TikTok
-
Le 8 Soluzioni Migliori per Aggiungere Emoji alle Foto Online
-
I Metodi Migliori per Aggiungere Emoji alle Immagini su iPhone e Android
-
6 Metodi Veloci per Creare Presentazioni su Windows 10
-
Come Velocizzare le Immagini nelle Presentazioni di TikTok
-
5 Metodi Per Creare Una Finta Videochiamata di FaceTime
-
I 10 Convertitori di Testo in Voce Robotica Migliori [Windows, Mac, Android, iPhone e Online]
-
I 10 Generatori di Voce Fuori Campo Migliori [Windows, Mac, Android, iPhone e Online]
-
I 10 Strumenti di Sintesi Vocale Migliori per Creare Meme (su Windows, Mac, Android, iOS e Web)
-
Come Creare una Presentazione con l'iPhone
-
I Trucchi Migliori per Creare Presentazioni Fotografiche
-
Come Creare Presentazioni con OBS
-
Come Creare una Presentazione con Movavi Slideshow Maker
-
Come Creare Presentazioni con Clideo
-
La Guida Definitiva all'Utilizzo di VLC Media Player
-
Elenco Completo dei Formati Video Supportati da WhatsApp
-
Guida Completa alla Divisione dei Video con VLC
-
4 Consigli Utili per Utilizzare OpenShot
-
Guida allo Speed Ramping - Come Velocizzare e Rallentare i Video
-
Come Modificare il Video Registrato
-
Trovare i migliori siti web di GIF è facile come una torta : ecco cosa sapere
-
5 metodi collaudati per la creazione di GIF
-
Suggerimenti utili per i video Tiktok [Rapporto d'aspetto incluso].
-
Formato video supportato da Powerpoint e suggerimenti per l'utente
-
Come usare l'effetto Twixtor per creare video al rallentatore?
-
Come ritagliare un video in Davinci Resolve [passo dopo passo]
-
10 migliori siti di modelli di grafica in movimento gratuiti per After Effects e Premiere Pro
-
Come aggiungere bordi ai video su Windows e Mac
-
I 12 Modelli Migliori per Creare Slideshow e Presentazioni di Marketing
-
Consigli Utili per la Realizzazione di uno Slideshow di Viaggio
-
Come Creare uno Slideshow delle Vacanze in 5 Minuti
-
I 15 Esempi di Slideshow e Presentazioni Migliori e Più Apprezzati dal Pubblico
-
Le 20 Canzoni Migliori da Usare negli Slideshow per il Diploma
-
10 Esempi Straordinari di Applicazioni Video AR
-
10 Esempi di Utilizzo Innovativo della Realtà Aumentata nel Mondo dell'Educazione
-
Le 10 Applicazioni AR Migliori
-
Aumentare la Qualità dei Video: I 11 Video Enhancer [(AI e 4K Upscale 2026]
-
Recensione di Topaz Video Enhance AI e Guida alla Conversione dei Video
-
Come Creare Un Video di Foto con Musica
-
Guida Completa alla Rimozione dello Sfondo e alla Conversione delle Immagini JPG in PNG
-
I 10 Strumenti Online Migliori per Creare Immagini con Sfondo Trasparente
-
Come Rimuovere Facilmente lo Sfondo delle GIF Trasparenti
-
Le Applicazioni Migliori per Creare Video da Foto
-
Guida Completa alla Conversione delle GIF in Formato SVG
-
Convertire le GIF in JPG Non è Mai Stato Così Semplice [2026]
-
Guida Dettagliata alla Correzione dei Colori con OBS
-
Guida Dettagliata alla Rotazione dei Video con CapCut
-
Come Usare le LUT con Adobe Premiere Pro
-
Come Sfocare Oggetti e Soggetti Statici e in Movimento nei Video
-
Come Velocizzare i Video con Splice
-
Introduzione al Formato TS e Guida alla Riproduzione dei Video TS
-
Introduzione al Formato MOV e Guida alla Modifica Creativa dei Video MOV
-
I Migliori Editor Video Gratis per Ubuntu
-
I Migliori Editor Video Open Source Gratis nel 2026
-
Suggerimenti per il Convertitore Soundcloud to Mp3
-
Come Convertire il Parlato in Testo?
-
Come Personalizzare le Dimensioni delle Miniature dei Video di LinkedIn
-
Come dividere lo schermo su Tiktok
-
Come dividere una clip in After Effects
-
Come convertire una GIF in un video per Instagram
-
Modi gratuiti per dividere i video per lo stato di Whatsapp su tutte le piattaforme
-
10 modi efficaci per convertire facilmente YouTube in MOV [PC e online]
-
Personalizza e scarica i modelli di video outro gratuiti
-
Zoom su CapCut: ecco come farlo
-
Come ingrandire Discord
-
Come utilizzare Zoom su Google
-
Guida facile per ingrandire i video in VLC
-
I modi migliori per sfocare lo sfondo dello zoom gratuitamente
-
Come ingrandire la webcam su PC
-
Come abilitare e utilizzare OBS Zoom Camera
-
I 5 migliori convertitori video online per Instagram 2026
-
Come usare Kahoot! su Zoom
-
Come utilizzare l'effetto visivo per lo zoom
-
Come ingrandire l'immagine nell'immagine [soluzione semplice]
-
Come ottenere lo zoom sulla TV [Soluzioni facili]
-
Come ingrandire lo schermo del desktop
-
Come ingrandire PowerPoint [Metodi facili]
-
Come ingrandire e rimpicciolire su Mac
-
Come Effettuare lo Zoom nei Video di TikTok
-
I 5 Downloader Migliori per Scaricare Video da Pinterest nel 2026
-
Le Applicazioni di Riconoscimento Vocale Gratuite Migliori per Mac
-
Come Sovrapporre le Foto sul Computer (Desktop e Online)
-
Le 10 Applicazioni Gratuite Migliori per Sovrapporre Immagini su Android e iPhone
-
Come Usare il Servizio di Riconoscimento Vocale di Microsoft Azure
-
Come Eseguire la Digitazione Vocale (Dettatura) con Microsoft Word
-
Come Aggiungere la Data alle Foto
-
Guida Completa al Servizio di Riconoscimento Vocale di Documenti Google
-
I 3 Metodi Migliori per Convertire le Riunioni di Zoom
-
Come Effettuare lo Zoom su Roblox
-
I 10 Modi Migliori per Convertire i Video di YouTube in MPEG
-
Come Convertire i Video di YouTube in MP4 con VLC Media Player
-
Come Effettuare lo Zoom in Minecraft
-
Come Usare Zoom Tramite Gmail
-
Come Effettuare lo Zoom su Google Meet
-
Le Webcam Migliori da Usare con Zoom
-
I 10 Programmi Migliori per Applicare lo Zoom ai Video
-
Il Modo Più Semplice per Aggiungere Transizioni ai Video
-
Guida Pratica all'Applicazione dell'Effetto Zoom Lento ai Video
-
Panoramica Completa di VSCO Video Editor
-
Guida all'Aggiunta di Sovrapposizioni ai Video con Premiere Pro
-
Come Aggiungere l'Effetto Mosso con After Effects
-
I 9 Migliori Convertitori di Video Gratuiti per WhatsApp nel 2026
-
Come Aggiungere la Dissolvenza in Nero con Premiere Pro
-
Come Applicare la Dissolvenza in Entrata al Testo con Adobe Premiere Pro
-
Guida all'Aggiunta di Effetti di Transizione con Premiere Pro
-
Le 10 Applicazioni Migliori per Aggiungere Adesivi alle Foto su iPhone e Android (2026)
-
Come Aggiungere Font in After Effects
-
I Software e Siti Migliori per Aggiungere Cornici alle Foto nel 2026
-
Come Aggiungere Espressioni con After Effects
-
Come Aggiungere Effetti su TikTok
-
Come aggiungere effetti in Premiere Pro: guida pratica per video, testo e audio
-
Come Aggiungere Transizioni Personalizzate con OBS
-
I Migliori Rilevatori di Beat Online - Da Provare Subito! [Online e Gratis]
-
Netflix Picture-in-Picture non funziona? Come attivare la finestra flottante su iPhone, Android e PC
-
I 3 Metodi Migliori per Comprimere Video per IGTV, Feed e Storie di Instagram
-
Che cos'è Mukbang e come realizzare video Mukbang
-
I Migliori Convertitori Online da GIF a Immagine (PNG/JPG)
-
Come Convertire Video in Slow Motion?
-
Come Convertire Video di Facebook in MP4 720p/1080p/HD Online e Gratuitamente?
-
Alcuni Fatti che Poche Persone Conoscono Su Come Rendere Gli Sfondi Trasparenti Su Canva
-
Come ottenere Filmora gratuitamente senza crack [2026]
-
Migliori 15 Idee di Progetti Video Creativi per Studenti di Tutte le Età
-
Gli 8 Migliori Modelli di Storyboard Video e Come Creare le Storyboard
-
I 10 Migliori Modelli di Iscrizione per Aiutarti ad Attrarre Più Follower
-
Come Aggiungere la Firma su Outlook nel 2026
-
Come fare la Ricerca Immagini Inversa su Facebook
-
Come si fa a sfocare lo sfondo nelle Riunioni di Teams? [Desktop e cellulare]
-
Le 10 Migliori Alternative a Popcorn Time
-
Come utilizzare Chroma Key in Cyberlink PowerDirector
-
Come ritagliare video con PowerDirector di CyberLink
-
Tutorial per principianti: come utilizzare Cyberlink PowerDirector
-
Come sfocare i volti nelle foto [Miglior software di fotografia per computer e smartphone]
-
Come Montare video in Apple MacBook Air M1
-
Apple MacBook Air vs MacBook Pro: quale laptop M1 è migliore?
-
Tutorial Openshot: come aggiungere testo in Openshot
-
Come eseguire l'aggiornamento a Windows 11 nel 2026?
-
Come rimuovere o modificare lo sfondo di un video online e su PC [2026]
-
Come Rimuovere la Filigrana di Filmora [2026]
-
Convertire TikTok in MP4 Senza Filigrana: i Migliori Downloader di TikTok
-
Come Renderti Cartone - Diventare cartone
-
Come Creare un Video su Lavagna Bianca Passo per Passo
-
Come Creare l'Effetto di Tremolio Videocamera
-
Come creare uno straordinario effetto Glitch in Photoshop?
-
Iscriviti a Green Screen - Semplifica l'aggiunta di CTA video di YouTube
-
I migliori convertitori di video in testo di YouTube online (2026)
-
Guida tutorial per animare le immagini su Canva
-
Come Creare Video Didattico-Formativi Eccezionali nel 2026
-
I Migliori Strumenti Editor per Creare Sottotitoli Video
-
Rimuovere il Silenzio da Video: Migliori 8 Eliminatori su PC
-
Le migliori 10 web series su Netflix-Web series su Netflix perfette per te!
-
Come usare il Luma Key durante l'editing di un video sul Mac
-
Come creare un'immagine in movimento su Mac
-
Come Scaricare I Video Stati di WhatsApp: Una Guida Completa
-
Come creare un video in loop
-
Come Creare e Usare i File Proxy per Accelerare il Processo di Modifica dei Video
-
Come Ridurre Facilmente il Rumore in Audacity e in FilmoraPro.
-
Come Animare Facilmente il Testo nei Video con FilmoraPro
-
10 migliori lenti Fisheye ( a occhio pesce) per iPhone e Android su Amazon
-
15 Migliori Generatori Meme [Online, PC & Mac]
-
Come Risolvere i Problemi di Incompatibilità di PowerDirector MP4
-
Risoluzione video non supportata: Risolto
-
Come Aumentare la Luminosità di un Video in Modo Semplice
-
Ridimensionamento Video per Mac: Come Ridimensionare Video su Mac
-
Mixer video: come mixare più video su Mac/Windows
-
Editor video di Instagram: come modificare i video per Instagram
-
Fusione VOB: Come unire/combinare file VOB
-
I Migliori Video Cutter Online Gratis per Tagliare Video nel 2026
-
Magic Movie Maker: come realizzare facilmente filmati e presentazioni dall'aspetto professionale
-
I 10 Migliori Film Educativi per Studenti
-
Le migliori 6 app gratuite di conversione video per Android
-
Le migliori applicazioni per scaricare video per telefoni e tablet Android
-
Suggerimenti per la Riproduzione di File Audio M4A su Dispositivi Android
-
Top 3 migliori applicazioni per leggere FLAC su Android
-
Top 10 Free MP3 Joiner: Come unire file MP3 gratis!
-
Come modificare dei video con template video?
-
6 I Migliori Effetti Video Online per Creare Video Pluripremiati
-
Convertitore da MP3 a Video: Converti MP3 in Video
-
Come girare un video con schermo verde
-
Come Schiarire un Video Scuro: Guida Facile con Filmora
-
Come modificare i fotogrammi video su Windows
-
Come abbassare il volume dei file multimediali
-
Come fare un video con foto e musica: guida semplice con slideshow maker
-
Come ridimensionare i file MP4 (MPEG/MPG) per dimensioni più piccole
-
Come ridurre facilmente le dimensioni dei file video su Win/Mac/Online
-
Come Cambiare la Forma di un Video: Quadrato, Cerchio e Forme Personalizzate
-
6 migliori strumenti per creare e modificare i video MKV
-
Editor MPEG - Come modificare i file video MPEG
-
Come Scaricare i Video Dailymotion: 3 Semplici Modi per Te
-
I 15 migliori programmi TV di Amazon Prime Video [Aggiornato al 2026]
-
Come fare uno Schermo Verde Portatile/Fatto in Casa
-
Qual è il miglior formato video per YouTube?
-
Come scrivere una sceneggiatura per un video di YouTube
-
7 migliori DAW per la registrazione della chitarra ed altri strumenti
-
Come scaricare le miniature di YouTube in 3 modi [Online/Win/Mac]
-
10 migliori strumenti di videoconferenze gratis per business e scuola
-
La migliore fotocamera entry-level per principianti 2026 | Recensioni
-
Come fare un video in stop motion su Instagram
-
Mascheramento Video Editing: Come mascherare un video con FilmoraPro
-
Come fare una sovrapposizione su Twitch [+I migliori creatori di sovrapposizioni]
-
Convertitore MKV a MP4: come convertire senza perdere qualità
-
Come creare GIF da foto su Mac?
-
"Come tagliare, ridimensionare e comprimere video MOV su Mac?
-
I migliori formati di file video per l'editing e la condivisione
-
Come tagliare/rifilare video in VLC su MacOS?
-
Easy Blender 2.8 Tutorial: animazione dei keyframe per utenti Mac
-
Come utilizzare keyframing in Final Cut Pro X
-
Tutorial sul monitoraggio della fotocamera di Blender per principianti Mac
-
Come utilizzare 3D Camera Tracker in After Effects su Mac
-
Tracciamento del movimento in Final Cut Pro su Mac: guida completa
-
Tutorial Blender 2.8: Motion Tracking su Mac
-
Come Scaricare Amazon Prime Video su Computer, Android e iPhone
-
I 5 Software Gratuiti Migliori per Modificare i File M4A
-
Come Accorciare, Tagliare o Dividere i Video MP4 (MPEG/MPG)
-
Il modo più semplice per sfocare le immagini nei video
-
Come convertire le GIF in video: La guida definitiva
-
Qual è il miglior formato video per YouTube/Editing/FB/Ins?
-
10 migliori programmi per video musicali per realizzare fantastici MV
-
8 migliori modelli di After Effects per il compleanno
-
Come Tagliare o Ritagliare Video Clip su iPhone/iPad
-
Come Invertire i Colori nei Video: I migliori programmi su PC
-
Software per Aggiungere Loghi o Filigrana di Brand in video
-
I 9 Migliori Siti Web di Serie Web per Scaricare Serie Web
-
Come Aggiungere Sottotitoli a un Video [2026]
-
Come mettere in loop un video su iPhone?
-
Splice Video Editor per PC: Giuntare facilmente i video su PC
-
10 Siti per Guardare Web Serie GRATIS!
-
I Migliori Downloader per Video di Reddit (Aggiornato al 2026)
-
Come Montare Video: La Guida Definitiva per Principianti
-
Come tagliare video online gratuitamente?
-
Come Aggiungere Foto ai Video [3 Passaggi]
-
Come Trasferire i Video da Videocamera a Computer con USB/FireWire
-
Come Aggiungere Immagini a un Video: Guida Facile con Filmora
-
Come Riprodurre i Video al Contrario
-
Come Modificare Video MP4 su Computer Mac e Windows (anche Windows 8)
-
Come Migliorare Rapidamente la Qualità dei Video [2026]
-
Come Aggiungere Immagini ai Brani Musicali (MP3): Una Guida Definitiva
-
Come Cambiare la Risoluzione di un Video su Windows e Mac
-
Come Rimuovere i Sottotitoli da un Video MKV, MP4, AVI
-
Come Rimuovere i Loghi dai Video
-
Stabilizzazione Video: Come Stabilizzare un Filmato Video Mosso
-
Come Ritagliare le Video Clip (YouTube incluso)
-
Come Tagliare/Dividere/Ritagliare Video Senza Perdita di Qualità
-
Come Aggiungere un'Immagine a MP3 [Soli 3 Passi]
-
Come Aggiungere Rapidamente del Testo al Video
-
Come Sistemare i Video a Testa in Giù?
-
I migliori strumenti per estrarre l'audio da video online (2026)
-
Come ridurre le dimensioni di video e inviarli tramite email
-
15 Tipi di inquadrature che i principianti devono conoscere
-
Trimmer MP3 Gratuito per Mac: Guida Completa per Tagliare MP3 su Mac Gratuitamente
-
I 5 Migliori Compressori Video Gratuiti per Windows [2026]
-
Aggiungi una Barra Nera per Creare il tuo Video Cinematografico nel 2026
-
Come Ritagliare Video su Foto di Windows 10 Facilmente
-
Come creare e modificare video su Windows 10
-
Come sfumare i video clip in entrata e in uscita
-
Come modificare le proporzioni tra 16: 9, 9:16, 4: 3, 1: 1 (Windows 10/11 inclusi)
-
Come ridimensionare un video in proporzioni e dimensioni corrette
-
Come fare un video con multischermo
-
Come Ruotare o Capovolgere un Video su Windows e Mac
-
Come Velocizzare/Rallentare i Video [3 Modi Unici]
-
Come Fare una Ricerca Video Inversa su Google? [Solo 5 Passaggi]
-
8 Migliori Distorsioni Video da Usare Facilmente
-
Come Ridurre le dimensioni di Video: 10 Migliori Programmi Online Gratuiti
-
I 10 Migliori Generatori di Testo Animato [2026] (Efficaci 100%)
-
I 6 i migliori software video per fare spiegazioni che dovresti provare
-
I 7 migliori software per fare Lyric video per PC e telefono (download gratuito)
-
Come Cambiare la Velocità di Riproduzione di un Video su Windows 10?
-
Guida di Montaggio Video Completa per I Principianti [2026]
-
Come impostare il bilanciamento del bianco nei video registrati
-
I 4 migliori potenziatori di qualità video del 2016
-
I 5 migliori Video Frame Captures per Mac
-
Come girare un video lateralmente con un solo click
-
Come posizionare due video fianco a fianco: usare lo split screen
-
Come scegliere la migliore musica per il tuo progetto video
-
Come invertire i video
-
Modifica Filmati QuickTime su Windows
-
Come Unire Video Senza Perdere Qualità: Guida Facile con Filmora
-
I 10 Top siti Torrent più popolari
-
MPEG Splitter: Come Split MPEG/MPG to Small Files
-
Video Watermark - Come Aggiungere Watermark Video
-
Come Ridurre Peso file video
-
Come Comprimere un Video con Wondershare Video Editor
-
Come Fare un Video più Piccolo
-
Splice Video Editor per PC: Modificare Video su PC
-
Come Tagliare File TS
-
Come diminuire Velocità di una Canzone senza Modificare la Tonalità
-
Come Aggiungere Musica di Sottofondo a Video su Windows/Mac
-
Crop Video: Come Modificare Dimensioni Video
-
Come Tagliare MOV Files
-
Come Ruotare Video di 90 Gradi o di altra angolazione
-
Cambiare Risoluzione da 4:3 a 16:9 e Viceversa [2026]
Transcript
Oggi, in questo video, impareremo come creare un video live di sincronizzazione beat. Utilizzando il software Filmora, è possibile modificarlo senza sforzo.
Prima devi scaricare il software Filmora e poi aprirlo. Dopodiché, in cima, vedrai una scala che devi impostare a 9:16, che è un ritratto. Dopo questo, devi creare un nuovo progetto e vedrai questo tipo di interfaccia.
Ora devi aggiungere una canzone. Per fare ciò, è necessario fare clic su questa opzione e importarla. Dopo l'importazione, scorrilo nel livello in cui vedrai Song Like. Dopodiché, è necessario ingrandire il livello. Per lo zoom, questa è l'opzione aggiunta, dopo di che la musica verrà ingrandita. Ora puoi vedere la musica delle onde; Fondamentalmente, le tracce di battito alto sono visibili e sono possibili con lo zoom.
Ora devi posizionare l'immagine in base all'onda di battito alta. Per fare ciò, è necessario inserire "Importa supporto" e, dopo di che, se si desidera aggiungere qualsiasi immagine o video che si desidera aggiungere, aggiungere semplicemente. Una volta aggiunta, è necessario ingrandire l'immagine, che può essere fatta facendo scorrere e scalando la parte principale del centro.
Dopo averlo impostato, fai clic sul livello immagine per accorciarlo. Ad esempio, dove si trova il battito, quindi devi tenerlo 1 secondo prima del battito per combaciare perfettamente. Dopo questo, devi venire qui per aggiungere una seconda immagine. Dopo aver aggiunto, vai qui, fai clic con il tasto destro e seleziona l'opzione "Taglia per adattare", devi fare clic su questa opzione e puoi impostare l'immagine. Altrimenti, puoi fare clic manualmente sull'immagine, quindi scorrere gli angoli e posizionare l'immagine perfettamente al centro in questo modo. In questo modo, puoi impostare l'immagine.
After setting, you’ve to add your second image as well according to the beat mark. Then add the third image, and again you've to import it. Then click the image and slide it to save perfectly according to the screen. After saving, you need to reduce the image size and match it according to the beat. So this way, you adjust the images according to the high wave beats. So I have added an image according to beats which shows a perfect display.
Now you've to add transitions. For this, you've to click on "Transitions," and from here, you'll find many transitions. So you can add as per your requirements. What I have added, I will let you know as I have favorited and saved them after downloading. So as in the display, it shows "Cross Roll 3"; add it to the first image. After this, add the "Cross Roll 4" transition to the second image. Then add the "Cross Roll 3" effect on image 3. Then add "Cross Roll 4" on the fourth image. The fifth image is a bit long, so for this, I will add an effect, "Warp Zoom 6", from transitions.
After adding, right-click, navigate into "Duration," and set the duration according to your requirements. Like I have set 8 seconds, so you set it as per your needs. So you can see I have added, and I am watching it play and how perfectly it is matched. I will show you again by playing, and the width is matched.
Again, you must click the sixth image and add "Cross Roll 4" to it. Then I add "Cross Roll 3" on the next image. Again next image will be "Cross Roll 4". After this, on the next image, I will use the wave bar, "Warp 6", so I will visit the duration and set it to 8 seconds. So according to your requirements, you can reduce as much duration based on beat, so your speed and transition will come right. These are your other images, and you can add other effects, like “Wave Bar,” or you can download them to use.
You've to now add a vignette effect, "Vignette Radius," which you have to search in "Effects." So it will appear like it, and you've to download and add it to starting point. You can see on the side your "Vignette Radius" looks perfect. Just slide it till the end of the video, and you can make further adjustments. Thus, it's how you can get edit your video.
Now, to export the video, click on "Export," and here you can give the name to the video. After this, you can adjust the ratio and frame rate from the settings as needed. So finally, click on “Export” to export the video. On clicking, set the name of the video and proceed to "Settings" to manage more advanced video settings. You can also manage the frame rate and other settings, after which you must click "Export" to conclude.
Tutorial di Filmora Come modificare il ritmo Sync Instagram Rolls Video
What you need to prepare: (Ce dont vous avez besoin de préparer:)
- A computer (Windows or macOS) (Un ordinateur (Windows ou macOS))
- Your video materials. (Vos matériaux vidéo.)
- Filmora video editor (Éditeur vidéo Filmora)
Set Screen Ratio from Interface (Définir le rapport d'aspect depuis l'interface)
Once you open Filmora, at the beginning of the interface, click "Aspect Ratio" from the top and choose "9:16 (Portrait)” from the options. Then press “Create New Project” to proceed further. (Une fois que vous ouvrez Filmora, au début de l'interface, cliquez sur "Ratio d'aspect" en haut et choisissez "9:16 (Portrait)" parmi les options. Ensuite, appuyez sur "Créer un nouveau projet" pour continuer.)
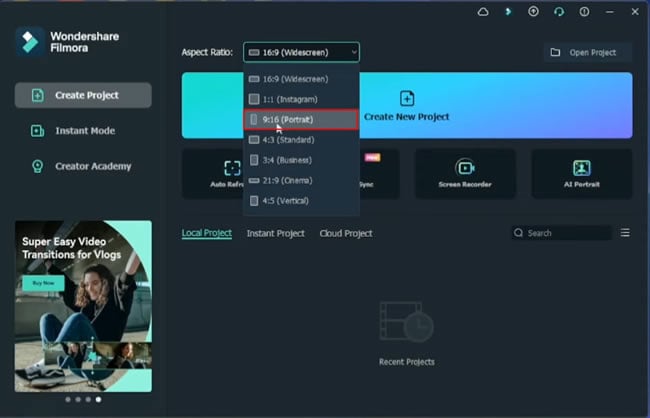
Importer la chanson et l'ajouter à la timeline
Cliquez maintenant sur l'onglet "Média" en haut et sélectionnez le bouton "Importer un média" pour importer le fichier audio ou musical depuis votre appareil. Ensuite, faites glisser votre fichier sur la timeline et zoomez en appuyant sur le bouton "Zoom avant".
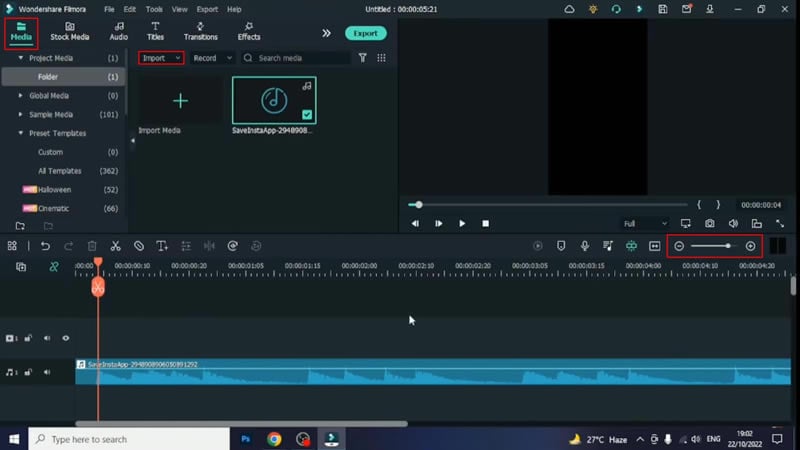
Sélectionner des images pour la vidéo
Si vous avez besoin de vos propres images, vous devez cliquer sur l'onglet "Média" en haut à gauche et appuyer sur le bouton "Importer un média". Si vous avez besoin d'images pré-faites, appuyez sur l'onglet "Média stock" et sélectionnez des images parmi les options disponibles. Ensuite, faites glisser vos images sélectionnées sur la timeline du projet ci-dessous.
Pour éditer l'image, double-cliquez dessus et vous pouvez ajuster ses marges et sa mise en page en utilisant l'écran de droite en ajustant les coins. Assurez-vous de réduire la taille de la piste d'image et de la régler selon le rythme des pistes musicales. Si vous avez plus d'images, répétez le même processus pour elles.
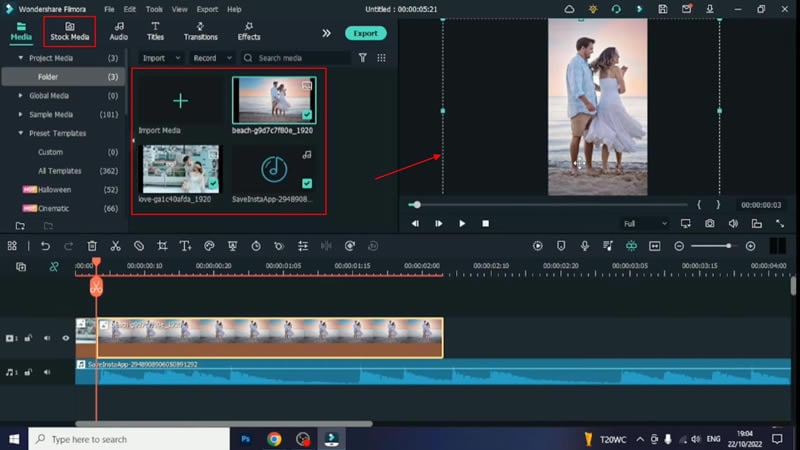
Implémenter des effets de transition
Naviguez dans l'onglet "Transitions" en haut et vous verrez de nombreuses catégories de transitions disponibles. Sélectionnez simplement celle qui vous semble intéressante, faites-la glisser sur la timeline et appliquez-la à n'importe quelle image. Ainsi, par exemple, si vous avez plus d'une image dans la timeline, vous pouvez leur appliquer plusieurs effets de transition.
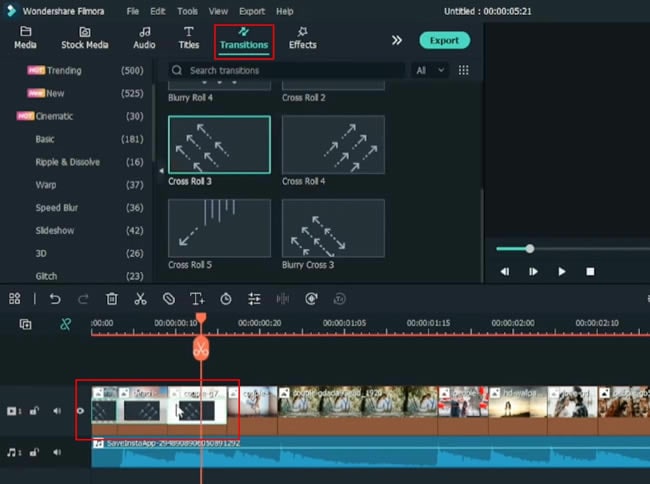
Visualize the Video with the Effect (VVE)
Now click on the “Effects” tab from the top and select your required effect from the given options. Whatever effect you choose, drag it to the timeline below and adjust the duration as required.
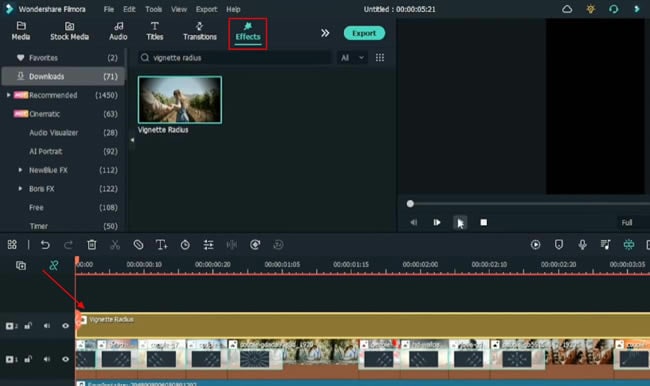
Render and Export Finalized Video (REFV)
Your final video for the Instagram reel is ready. Thus, press the "Render Preview" icon and witness a smooth playback with a cinematic experience. If you're satisfied with your creative effort, further export the video, which is done by clicking the "Export" button from the top.
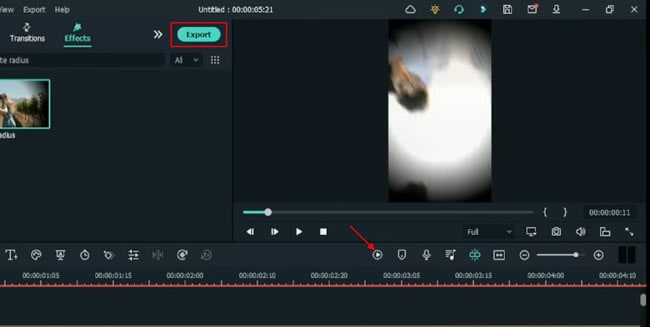
Instagram is a perfect platform to get entertained in an art-like creative environment. Thus, from an entertainment perspective, people like to watch, create and share their Instagram reels with beat sync functionalities, which everyone loves. With this tutorial on Filmora, you can design such edits for your reels smartly and efficiently.
