Tutorial: come ingrandire un'animazione su Filmora
Ingrandire l'animazione è un ottimo modo per spostare il focus principale sul tema del video. Questo Le permette di sfocare completamente o rimuovere oggetti di sfondo indesiderati, facendo apparire il Suo video male. Con questo tutorial su Filmora si può facilmente mescolare mag
-
Come aggiungere bordi al video su Windows e Mac
-
10 migliori siti per scaricare Gaming Intro modelli gratis
-
Taglio di un video in Final Cut Pro [Passo per Passo]
-
Tutorial dettagliato per tagliare un video in KineMaster
-
4 metodi per tagliare un video su Android facilmente
-
2 metodi per tagliare un video in VLC
-
2 metodi per tagliare un video utilizzando After Effects
-
Come colorare la tua immagine in LightRoom
-
Come illuminare un video in Windows 10 facilmente
-
8 App per personalizzare i tuoi adesivi GIF
-
Suggerimenti per aggiungere musica alla foto online
-
Migliori 10 App per migliorare il tuo Instagram Story Slideshow
-
Come fare una diapositiva estetica
-
Come modificare video GoPro su Mac
-
Come fare GIF da video su Mac
-
Miglior software Green Screen per principianti su Mac
-
Top 10 App per iPad Slideshow per creare una diapositiva
-
Tattiche per fare una diapositiva di chiave
-
Piccoli trucchi per creare una diapositiva Canva nessuno ti sta dicendo
-
Quali sono i migliori modelli di diapositive di Filmora? Scelta degli esperti
-
Come: Guida rapida per fare Google Slideshow
-
Come usare LUTS per colorare il grado sul tuo iPhone
-
15 migliori LUTS da acquistare nel 2024
-
Come usare LUT in Lumafusion & Risorse LUT gratuite
-
Come rendere il vostro montaggio CSGO impressionante
-
Come fare un montaggio di gioco-Guida e consigli
-
Guida più completa per realizzare il montaggio Fortnite
-
Guida per creare il tuo video di montaggio LOL
-
Qual è il miglior laptop per la modifica video
-
Come aggiungere un terzo inferiore al tuo videoxctBgvw7IEE
-
Come avviare un VlogfbUAYy7QQ9Q
-
Aggiungi animazione di testo a un video online
-
Come cambiare il colore del testo in Premiere Pro
-
Esplorare le migliori 6 alternative al cambiatore di voce del pesce pagliaccio nel 2024
-
I migliori modi per aggiungere testo di meme ai video
-
Miglior servizio di archiviazione cloud per video 2024
-
Una guida finale per Flexclip Trimmer Online
-
Spooky Halloween con i migliori 15+ Halloween Countdown video clip
-
Tutto ciò che si deve sapere su video montages-idee, tecniche e software
-
Guida passo passo per creare effetti mezzattoni in Photoshop
-
Crea un effetto risografo in Photoshop: una guida per principianti
-
Come aggiungere sottotitoli in QuickTime Player?
-
Hai troppe bozze TikTok? Impara come modificarli
-
Una guida finale per la modifica di un video musicale: rapporto aspetto e primo taglio
-
Come essere un buon host di podcast (aggiornato 2024)
-
Guida completa per aggiungere LUT in Premiere Pro con facilità
-
[Guida completa 2024] Recensione su 3D LUT Creator
-
Introduzione ai migliori LUT cinematografici del mercato
-
Trovare i migliori LUT Filmic Pro per la modifica video
-
Come fare zoom attraverso l'effetto testo in modo rapido e semplice in Filmora
-
Come creare effetto VHS sui tuoi video in Premiere Pro?
-
Come fai-da-te VHS sovrapposizione in After Effects?
-
Guida dettagliata per unire video in VLC Media Player
-
Divisione del video in frame con il FFmpeg [Passo per Passo]
-
4 modi per ruotare i tuoi video GoPro professionalmente
-
6 mp4 istantaneo a GIF strumenti online
-
Perché Vimeo Slideshow Maker diventa popolare
-
Come unire file FLV [Windows, Mac, Android, iPhone & Online]
-
Come ridimensionare in modo efficiente i video FLV [Windows, Mac, Android, iPhone & Online]
-
Qual è il miglior tagliatore MP4 per YouTuber su Mac?
-
Perché dovresti padroneggiare le diapositive in Lightroom, Fresh Insight?
-
Come creare una diapositiva istantanea su Mac
-
Modi per assicurarsi che la vostra diapositiva di registrazione in Powerpoint non sia sbagliata
-
10+ Migliori modelli di diapositive FCPX illimitati
-
Quali modelli di diapositive possono insegnare sull'estetica
-
Migliori 8 modelli di diapositive Premiere Pro Top
-
Download gratis Top 12 modelli di diapositive Sony Vegas
-
Come creare semplici diapositive Word
-
11 Modi per accelerare un video su iPhone
-
Guida passo passo per passo per storyboard
-
Come creare Photoshop GIF Il 100% facile modo
-
Impara a usare il montaggio con questi film
-
Top 10 Sony LUT per diversi scopi
-
Quali sono le tappe della produzione cinematografica
-
Qualcosa su idee di cura della pelle VlogM9RSki2y1wk
-
Come diventare un Vlogger di YouTuberOAbmihHEt8
-
Come usare i LUT in VN Editor-Guida completa e migliori LUT scaricare
-
Come fare video sottotitoli
-
Come rimuovere l'audio dal video senza filigrana?
-
Come rimuovere l'audio dal video su Mac? Soluzioni Ufficiali e Gratuite.
-
Come accelerare il video con Canva Online Tool?
-
Come accelerare il video su splicing
-
Come utilizzare il livello di regolazione in Photoshop?
-
Aumenta il ritmo dei tuoi video di Instagram con questi semplici trucchi
-
Come fare Fortnite Thumbnail con Motion Blur?
-
Guida finale per la realizzazione di film per video musicali
-
Guida finale su come pianificare e storyboard un video musicale
-
Introduzione alle TUT Il loro panorama e i vantaggi
-
10 Modelli di Video Compleanno Creativi per KineMaster
-
4 Modi per unire MP4 e MP3
-
Miglior frame rate per i video in slow motion
-
Salva gli snap da Snapchat nel rullino fotografico - una guida
-
Come fare un Time Lapse su telefoni Samsung
-
I migliori podcast su Google Podcasts per il 2024
-
SRT non viene visualizzato: Come aprire e utilizzare il file SRT in VLC?
-
Modi più semplici per cambiare la tua voce in PUBG!
-
10 migliori app per accelerare la velocità dell'audio su dispositivi mobili
-
Come aggiungere il livello di regolazione (Clip) in DaVinci Resolve?
-
Come sfocare lo sfondo in Adobe Premiere Pro: Guida dettagliata
-
Come aggiungere la sfocatura di movimento su CapCut? (iPhone ed Android)
-
Come attivare/disattivare la sfocatura in Fortnite? È un bene per Fortnite?
-
[Updated 2024] Le migliori LUT vintage gratis da usare
-
La migliore app LUT per iPhone da utilizzare nel 2024
-
8 Migliori servizi di promozione video di YouTube (reale)
-
Come realizzare video in loop per Instagram?
-
Tutorial completo su come creare una GIF animata di buon compleanno su Win
-
Elenco dei formati video Whatsapp supportati che potresti voler sapere
-
Guida su come creare l'effetto Zoom di Google Map
-
Creare video Time-Lapse su MacBook [Guida completa]
-
Esplorando la guida totale per utilizzare Xiaomi Gaming Turbo Voice Changer?
-
I migliori strumenti Voice Changer per YouTubers: Trova l'opzione migliore per i tuoi video
-
Come vedere i tuoi follower Twitch su desktop e dispositivi mobili?
-
Come vedere i commenti che piacciono a YouTube
-
Tutorial finale: Come aggiungere un timer per il conto alla rovescia in OBS
-
Lo YouTuber più pagato al mondo
-
Monetizzazione di YouTube: Techno Gamerz Reddito YouTube 2024
-
Creare video introduttivi con Flixpress
-
Come rimuovere i podcast consigliati da Spotify
-
Come pubblicare un'immagine su YouTube
-
I migliori canali YouTube di narrazione da seguire quest'anno
-
Come cambiare la velocità dei video su Instagram Storie?
-
Suggerimenti su come saltare facilmente i video di Edgenuity
-
Come invertire una playlist di YouTube
-
Il modo più semplice per verificare e modificare la tua età su TikTok
-
I migliori hashtag per YouTube per ottenere le tue visualizzazioni a 6 cifre
-
Le migliori LUT per Sony HLG da scaricare
-
I 5 migliori siti di foto ritocco AI gratis che possono trasformare le tue foto
-
10 Migliori Videocamere [Ultimate Review]
-
Migliori registratori di schermo Discord[Online/Windows/Mac/Phone]
-
10 Meme Minion più popolari di cui le mamme sono pazze
-
Scarica i video di Telegram da cellulare o PC [2024]
-
Cose che puoi fare su Minecraft per San Valentino
-
Passo dopo passo per ruotare i video usando OBS
-
Tutorial - Creare Effetto Zoom Foto 3D in Filmora02:11
-
Tutorial – Come Rendere Bello il Tuo Viso nel Video con Filmora
-
Guida su come bloccare qualcuno su Instagram senza che lo sappiano
-
Guida per rimuovere gli oggetti dal video con o senza la riproduzione pulita
-
Fare un Boomerang su Snapchat – Una guida completa
-
Top 5 Registratore di Schermo Time lapse
-
Come registrare video in streaming con FFmpeg su Windows e Mac?
-
3 modi per lo streaming e la registrazione allo stesso tempo
-
Monetizzazione di YouTube: Sourav Joshi Reddito su YouTube 2024
-
Guida completa per aiutarti a scegliere le migliori fotocamere HDR nel 2024
-
Top 10 Podcast Apps per l'ascolto di Podcast su un Mac (aggiornato)
-
Confronto tra i prezzi dell'Archivio Cloud 2024 e il miglior prezzo
-
Come usare KineMaster Online e le 10 migliori alternative online
-
Come Creare e Aggiungere un Livello di Regolazione in Final Cut Pro
-
I 3 migliori plug-in Motion Blur per Adobe After Effects
-
Come applicare l'effetto Gaussiana Blur ai video in Premiere Pro?
-
Come sfocare lo sfondo del video in After Effects
-
Come trovare il video di sfondo di TikTok: Alcuni modelli
-
Come risolvere il problema dell'anteprima dei cortometraggi di YouTube che non viene visualizzata
-
8 Suggerimenti per Creare Attraenti Instagram Unboxing Reel
-
Guida Migliori siti web per trovare Google Pixel Suonerie e come personalizzare Google Pixel Suonerie
-
Recensione completa dei migliori strumenti AI Melody Generator da utilizzare nel 2024
-
Adobe Premiere Pro Rec 709 LUT: Trovare le migliori opzioni
-
Editor di VN: Un'opzione di spicco per l'aggiunta di Luts per l'editing video
-
Le 10 migliori app per il Ritocco della pelle AI che devi provare nel 2024
-
Verifica della monetizzazione di YouTube Studio: Assicura la monetizzazione del tuo canale
-
Ecco un visualizzatore di storie di Instagram che non conosci
-
Che cos'è il nitro disarmonico
-
Quali sono i commenti evidenziati da YouTube?
-
Che cos'è un PFP discordante e come creare un PFP per discordia
-
Filmora Tutorial-Imposta un nuovo timer dinamico per il conto alla rovescia02:11
-
Crea una guida di animazione di testo circolare con Wondershare Filmora02:11
-
Guida su come sfocare lo sfondo video verticale con Filmora
-
Come faccio a registrare Snapchat sul mio telefono?
-
10 combinazioni di colori corrispondenti che lavorano insieme
-
Perché Instagram sfoglia sempre i miei video
-
Come creare la tua guida introduttiva Marvel
-
Come convertire un'immagine in una guida video 3D in Filmora
-
Guida su come decorare la pelle in un video
-
Usa Filmora per nascondere e mostrare le guide di testo dietro gli oggetti nel video
-
Guida alla creazione di effetti con fotogrammi chiave in Filmora
-
Guida su come migliorare la qualità audio in Filmora
-
Modifica una guida video multi-bit con Wondershare Filmora
-
Ultima versione e funzionalità: V13
-
Miglior Grabber Video per PC di Windows 10
-
Come registrare video in ritardo su iPad
-
Come usare il software EZ Grabber
-
Come creare un URL per il tuo video?
-
Come caricare un video su Twitch? Questa è una guida per principianti
-
Magic Call Sound Switcher App funziona? Ottieni sostituti qui!
-
Guida: eseguire il backup del film della fotocamera su Snapchat nel modo giusto
-
Twitch VOD: tutto ciò che devi sapere
-
Come modificare le foto su Snapchat
-
Idee per mantenere vivo il tuo Snapchat
-
Come registrare stazioni radio su Internet: una guida semplice
-
10 + royalty-free 5 secondi Countdown Lens HD e clip 4K inclusi
-
Tutorial finale su come aprire/modificare SRT su Mac
-
Come festeggiare il nuovo anno nel 2024?
-
Come cambiare il suono su PS5/PS4? Soluzioni software e hardware
-
Controlla i cinque convertitori di suono basati sul web o estesi per Chromebook
-
Tempo e frequenza: qual è la data migliore per pubblicare un podcast?
-
Podcast Migliori webcam
-
10 tag Instagram che si dovrebbe usare oggi
-
Come posso rimuovere o disattivare l'audio da un video con un telefono Android?
-
Come rimuovere l'eco dal video con Adobe Audition
-
15 cose da fare ascoltando podcast
-
Tutorial dettagliato su come usare lo schermo verde in Kinemaster
-
Come creare rapidamente un effetto di stampa dello schermo in Photoshop: una guida dettagliata
-
Una guida completa per convertire video al rallentatore in video a velocità normale su iPhone
-
Cambia la velocità del video con FFmpeg
-
Modo migliore per convertire il tasso di fotogrammi video a 60FPS [Software e selezione online]
-
Come accelerare in modo sicuro l'analisi completa dei file audio su Spotify
-
Guida per principianti per cambiare la velocità dei video su Snapchat
-
Massimizza il tuo impatto con i modelli di cortometraggi di YouTube
-
Frequenza fotogrammi ottimale per video 4K
-
Come scegliere la registrazione video tra 30 fps e 60 FPS?
-
Panoramica degli adesivi AR di Google e delle loro alternative
-
Usa il movimento della luce per aggiungere un effetto jitter al tuo video
-
[Desktop & Mobile Solutions] Come ruotare un video per Instagram?
-
Come aggiungere un livello di regolazione a Premiere Pro
-
Come creare un video di quiz: una guida dettagliata
-
11 strumenti per creare foto sfocate radiali per telefoni cellulari e desktop
-
Come ottenere il motion blur in Valorant?
-
Come tracciare e sfocare i volti in Premiere Pro
-
Premiere Pro Versione ReVisionFX ReelSmart Motion Blur Plugin
-
Qual è il motion blur nel gioco? Ne hai davvero bisogno?
-
Usa i modelli per creare meravigliose descrizioni di YouTube per ottenere più spettatori
-
Regola la lunghezza dei video di buffeting per renderli affascinanti
-
Scopri come ruotare il 100% del metodo di lavoro del video di buffeting
-
Miniature di YouTube Live Ultimate Guide
-
Come creare un fantastico video TikTok usando un modello
-
Come creare miniature di YouTube con il tuo telefono cellulare
-
Migliori 15 canali YouTube disimballati nel 2024
-
Dove posso scaricare le suonerie cristiane e come personalizzare le suonerie cristiane?
-
Come rimuovere lo sfondo di un'immagine con Photopea
-
Come scaricare podcast Apple?
-
Guida: utilizzare i preset di colore Lumetri in una classificazione dei colori efficace
-
Panoramica del miglior lut libero 2024
-
[Classifica] 20 migliori lut per video musicali
-
lut gratuito di OBS: come usarlo?
-
lut gratuito di alto livello utilizzato in Shotcut: panoramica
-
Ottieni il perfetto obiettivo del drone con il lut drone gratuito
-
Dove posso trovare le migliori Canon LUT gratuite? Per saperne di più!
-
20 LUTS gratuiti/a pagamento per DJI Mini 2/Air 2S/Mavic 2
-
Esplora alcuni dei migliori generatori di suoni di intelligenza artificiale
-
Panoramica della generazione vocale di Morgan Freeman: generatore vocale dedicato di intelligenza artificiale
-
Genera con precisione la voce WRLD del succo con strumenti di intelligenza artificiale
-
Cinque strumenti fotografici di decorazione di gioielli che possono migliorare le tue foto di gioielli
-
Rifacimento dell'intelligenza artificiale in Photoshop: un modo per rendere le foto più belle
-
Entra nel mondo dei Vocal Remover con X-Minus.Pro [AI]
-
Trova la rimozione esplicita della voce in SplitHit Vocal Remover
-
Vocalremover.org e rimozione vocale intuitiva: una recensione
-
DJI Action 4 vs GoPro Max 360 vs Insta360 X3 Qual è più adatto a voi?
-
L'ultima guida alla monetizzazione video: Dailymotion e YouTube
-
Massimizza le tue entrate: Rumble Video Monetization Guide
-
12 lavori di rimozione del suono: recensione degli strumenti di punta
-
Effetto conto alla rovescia in Filmora
-
Importa file da unità cloud di terze parti
-
Plugin ChatGPT-Intelligenza artificiale copywriting
-
Scorciatoie per la velocità di riproduzione per Windows
-
Ultra rallentatore e flusso ottico per Windows
-
Modifica multi-clip per Windows
-
Intelligenza artificiale da testo a video per Windows
-
Esporta clip selezionate per Windows
-
Top 10 video divertenti di criceti su YouTube
-
Strumenti di visualizzazione audio in Filmora02:24
-
Come usare Motion Tracking in Filmora 1202:23
-
Tutorial Come falsificare il movimento della fotocamera con Filmora 12
-
Come utilizzare Filmora per ottenere effetti esplosivi sui video
-
Come creare uno spettro audio in Filmora-Tutorial
-
Come fare pubblicità di prodotto in Filmora Video di pubblicità di prodotto in Filmora Editing di pubblicità di prodotto
-
Come utilizzare effettivamente la guida dei fotogrammi chiave su Filmora
-
Guida su come aggiungere effetti di fumo a Filmora
-
Guida alla realizzazione di poster animati 3D
-
Come creare una guida introduttiva scritta a mano in Filmora
-
Guida su come creare un effetto di scansione a raggi (luce)
-
Guida alla realizzazione di effetti beat audio in video musicali con Filmora
-
Scopri le nuove funzionalità e funzioni di intelligenza artificiale di Filmora
-
Utilizzare Filmora per aggiungere guide VFX ai video
-
Guida alla regolazione della frequenza dei fotogrammi in Filmora
-
Guida per aggiungere trasparenza e invisibilità ai video
-
Come creare una guida video agli effetti dei raggi X.
-
Crea video di effetti sportivi
-
Come fare un'animazione in Filmora
-
Come creare un effetto di scansione della luce (luce)
-
Come creare una guida agli effetti di Star Wars in Filmora
-
iMovie VS Filmora: quale è davvero migliore?
-
Come riprodurre in loop i video di QuickTime
-
Trova il miglior cambiatore di suoni per WhatsApp: gratuito e a pagamento
-
Che cos'è il formato AV1 e come influenza la tua vita?
-
AV1 è meglio di VP9? Studia qui
-
Guida completa al cambio di suono MorphVOX: trovare il modo migliore
-
Cosa sono gli abbonamenti e i prezzi di Twitch?
-
Come abbellire i tuoi file telegrafici
-
Come utilizzare un sito Web telegrafico: una guida dettagliata
-
Come utilizzare il ritardo GoPro
-
La guida definitiva per calcolare le visualizzazioni di pagina e i soldi di YouTube.
-
Come aggiungere motion blur alle foto in Adobe Illustrator
-
Migliori 10 Estrattore di Sottotitoli di YouTube Libero e Downloader
-
Modo più semplice per installare un clown Fish Sound Switcher su Windows
-
Come rimuovere Echo con Premiere Pro? La guida completa è qui!
-
Domande e risposte relative a Filmora
-
Che cos'è Google Podcast App?
-
10 consigli chiave su come progettare podcast cover art
-
Come creare un effetto di transizione di taglio liscio?
-
Guida completa all'estensione del miglior controller di velocità video 2024
-
Guida introduttiva alle immagini vettoriali: panoramica, tipo e selezione del software
-
Come creare video Instagram impressionanti
-
Cosa sono AR Emoticon adesivi e come aggiungerli al video
-
Come creare e utilizzare i livelli di regolazione in Effetti dopo
-
LumaFusion-che cos'è e qual è la migliore alternativa
-
I dieci migliori strumenti per realizzare video di quiz
-
Migliori 18 webcam nel 2024
-
Come aggiungere motion blur alla risoluzione Leonardo da Vinci?
-
Come ottenere il motion blur in Roblox?
-
Come utilizzare i modelli video Canva e le loro alternative
-
Miglior file PSD di testo 3D libero
-
Come modificare i video di TikTok dopo la pubblicazione
-
La guida perfetta per i principianti per fare jake con clip multiple
-
20 migliori font per le miniature di YouTube per stupire i tuoi video
-
Come creare una miniatura impressionante di Valorant per i video di YouTube
-
Istruzioni: download di suonerie Instagram e creazione di suonerie Instagram da soli
-
Instagram Guida completa alle norme sul copyright della musica
-
Come condividere le scalette di YouTube
-
Come rimuovere lo sfondo della firma in pochi secondi
-
17 migliori applicazioni per rimuovere lo sfondo dell'immagine
-
[Per saperne di più] Premiere Pro Best free lut
-
Scopri l'ultimo lut di Wondershare Filmora: scopri la risposta!
-
Applicazione mobile LUT 3D-Panoramica delle applicazioni composite di editing multimediale
-
Trova il miglior Dark Moody lut durante il processo di editing
-
Recensione di LUT: Search LUT di Danny Gevirtz
-
Dettagli approfonditi: recensione di Kodak LUT
-
Guida alla selezione e all'utilizzo dei migliori Braw Luts
-
Miglior Peter McKinnon LUT Perfect Video Editing
-
Vlog Best LUT: Panoramica del 2024
-
Scopri come creare LUT usando il generatore LUT
-
LUT Moody perfetti per VN Editor: panoramica
-
Trova il miglior lut per Lightroom 2024
-
Scopri le migliori opzioni per applicare effetti fotografici VHS sul tuo computer/online
-
2024 Piattaforma di clonazione vocale di intelligenza artificiale
-
Utilizza strumenti di interpretazione vocale di intelligenza artificiale di alto livello per generare la migliore voce
-
Piattaforme di clonazione vocale in tempo reale più riconosciute
-
Esplora Siri Voice Generator e va oltre l'innovazione
-
I primi dieci produttori dimostrativi di intelligenza artificiale che creano presentazioni affascinanti e professionali nel 2024
-
Usa lo strumento migliore per rimuovere il suono da un brano-Guida
-
Miglior rimozione del suono di YouTube sul mercato
-
La guida definitiva per fare soldi con la monetizzazione di Vimeo
-
Curva RGB video
-
Intelligenza Artificiale Generatore di Musica per Windows
-
Protezione del colore della pelle AI per Windows
-
Editing di testo di intelligenza artificiale per Windows
-
AI Sound Remover per Windows
-
Sfondo personalizzabile per video e immagini in Windows
-
Editor grafico dei fotogrammi chiave di Windows
-
Etichetta della finestra
-
Creatore di miniature AI per Windows
-
Clip composito per Windows
-
Oscilloscopio video professionale per Windows
-
Editor di copilota di intelligenza artificiale per Windows
-
Abilita/Disabilita clip in Windows
-
Esporta intervallo clip per Windows
-
Contrassegna e segna per Windows
-
20+ meme cool meta-cosmico e come fare il tuo meme
-
Ciò renderà i cartoni animati estetici più comprensibili
-
Crea animazioni tipografiche senza soluzione di continuità con Filmora 1202:11
-
Tutorial di Filmora Come modificare il ritmo Sync Instagram Rolls Video
-
Tutorial passo-passo su come creare cartine turistiche animate in Filmora
-
Come aggiungere HDR, classificazione dei colori e guida al bagliore del cielo con Filmora
-
Effetto colore di isolamento o effetto colore selettivo in Wondershare Filmora
-
Come fare soldi su YouTube con utili contenuti di copia e incolla-Tutorial di Filmora
-
Barra di animazione del testo-Parte inferiore dello schermo-Filmora-Tutorial
-
Guida a come sfocare lo sfondo di qualsiasi video in Filmora
-
Come creare interessanti guide di storie di Instagram in Filmora
-
Guida su come personalizzare il modello per il terzo successivo dei social media
-
Programma per convertire i video caricati in migliori buffets
-
Come creare una guida video musicale con testi
-
Guida su come cambiare il colore degli occhi in un video con Filmora
-
Guida video per illuminare il buio con Wondershare Filmora
-
Come fare una guida accattivante al blog di cibo [idee e guide]
-
Come creare effetti di transizione utilizzando trame corrispondenti: guida completa
-
Una semplice guida per la classificazione dei colori dei tuoi video in toni blu-verde e arancione
-
Semplice guida per creare effetti di transizione usando la sovrapposizione
-
Guida a come stabilizzare i video tremanti in Wondershare Filmora
-
Crea una guida agli effetti testa grande in Filmora
-
Crea una guida agli effetti di rotazione della testa in Filmora
-
Come realizzare video di clip sportive
-
Come effettuare una transizione mascherata
-
Come creare un effetto bordo luminoso in un video di danza TikTok
-
Crea effetti di illuminazione meteorologica con Wondershare Filmora
-
Guida alla creazione di effetti olografici in Filmora
-
Guida su come applicare l'effetto neve in Filmora 12
-
Come fare un video in loop in PowerPoint
-
Guida completa per l'uso di Cut Final Pro
-
Guida completa ai convertitori sonori Funcall e alle loro alternative
-
Valorant è il miglior cambiatore di suono gratuito che dovresti provare!
-
Quanti soldi possono fare i nastri convulsivi?
-
Osservazioni per MAGIX Photo Manager
-
Software di modellazione 3D per l'animazione
-
Come comunicare con gli utenti di YouTube
-
Miglior timer di conto alla rovescia gratuito
-
Che cos'è il motion tracking e come usarlo
-
Panzoid Top Ten Produttori Introduzione
-
I dieci migliori smartphone per realizzare video
-
Guida completa di Adobe Cloud Storage e le migliori alternative [2024]
-
Migliore applicazione di archiviazione cloud per Android 2024
-
AZ Screen Recorder Revisione completa dell'applicazione e sostituzione
-
8 modi per trasmettere video preregistrati
-
10 strumenti di fotoritocco online per eliminare la sfocatura della foto
-
Come aggiungere motion blur al tuo viso con Picsart
-
Zoom Podcast Registra tutorial completo
-
Come creare un podcast video
-
Migliori 8 applicazioni podcast per Windows
-
Come rimuovere l'audio dal video con FFmpeg?
-
Dove inviare il tuo spettacolo: un elenco completo delle directory dei podcast
-
10 buoni posti per i podcast per trovare musica
-
Aggiunge uno sfondo meraviglioso alle miniature di YouTube
-
Come creare un'introduzione alla rivelazione di acqua liquida?
-
Come creare strumenti di visualizzazione audio in Filmora [Easy]
-
Come creare un effetto di testo flash?
-
Come velocizzare il video con Lightworks Video Editor
-
2024 Migliori 10 siti di immagini di stock vettoriali di alta qualità
-
Come creare testo 3D in un video
-
2024 Migliori 11 canali video di domande e risposte di buon senso
-
[Tutorial] Come aggiungere motion blur a Blender?
-
Come attivare/disattivare motion blur in Death Light 2?
-
Come attivare/disattivare il motion blur in My World?
-
Come usare il motion blur su una stella video?
-
6 strumenti gratuiti per sfocare radialmente le foto online
-
I migliori siti web di 8 3D Graffiti Fonts
-
La migliore guida per impostare un timer per il conto alla rovescia di TikTok
-
20 migliori modelli di sfondo video
-
Guida: scarica la musica tamil come suoneria e come tagliare la canzone come suoneria
-
Raccomandazione: il miglior sito Web per scaricare la suoneria "Game of Thrones"
-
Siti Web per scaricare musica di gioco senza copyright
-
Come rimuovere lo sfondo da una foto di affinità
-
Come rimuovere lo sfondo con Picsart
-
Come rimuovere lo sfondo in Figma: una guida completa
-
Come condividere i podcast su Instagram Story o Post
-
Clipchamp AI Video Editing: crea i migliori contenuti di qualità
-
La rivoluzione dell'intelligenza artificiale che canta il generatore di suoni nella produzione musicale
-
Esplora i 4 migliori generatori vocali di intelligenza artificiale dei cartoni animati
-
Cerca alcuni dei più maturi generatori vocali di personaggi di intelligenza artificiale
-
Esplora il 2024 6 grandi strumenti di intelligenza artificiale da testo a voce
-
Genera i Suoi suoni preferiti di robot di intelligenza artificiale con un generatore vocale di alto livello
-
Prova alcuni generatori vocali Elon Musk di intelligenza artificiale di alta qualità
-
Rifacimento fotografico dell'intelligenza artificiale: 4 migliori strumenti per migliorare le immagini
-
Come creare una presentazione PowerPoint GPT Chat: Guida
-
Miglioramento del parlato in modo ottimale
-
Panoramica di Editor Perfetto di Miglior Songs Voce
-
Confronta GoPro Max 360 con Hero 11: Identifica una videocamera GoPro migliore
-
Come creare una voce fuori campo realistica e affascinante con Uberduck AI
-
Massimizza le tue entrate: come monetizzare con successo i video di Facebook
-
Come monetizzare su YouTube su dispositivi mobili: guida 2024
-
Editor di testo avanzato per Windows
-
Ondulazione automatica di Windows
-
Barra degli strumenti personalizzata di Windows
-
Impostazioni di esportazione per Windows
-
Importa media da unità di terze parti su Mac
-
Artificial Intelligence Vocal Remover per Mac
-
Intelligenza Artificiale Testo a Video per Mac
-
Affilare la versione per Mac
-
5 consigli di base per l'editing video che devi sapere su Wondershare Filmora02:11
-
Tutorial su come ritagliare o ingrandire un video con Filmora
-
Guida su come applicare i migliori effetti del titolo e l'animazione del testo in Filmora 11
-
Applica 8 nuovi suggerimenti, suggerimenti e guide di aggiornamento in Filmora
-
Come aggiungere una guida all'animazione del titolo di un film in Filmora
-
Come evidenziare la guida agli oggetti in movimento in Filmora
-
Come aggiungere una guida video al testo con Filmora
-
Tutorial: come utilizzare la modalità istantanea Filmora
-
Semplice tutorial di Photoslide con effetti diapositive in Filmora
-
Tutorial di transizione sfocata fluida in Filmora
-
Come aggiungere filigrana video Animation Guide in Filmora
-
Come fare Editor di Porta Magica
-
Tutorial di animazione testuale ripetuta
-
Effetto di testo di composizione dinamica "semplice e veloce"
-
Tutorial dettagliato sugli effetti DJ con Filmora
-
Come creare una guida agli effetti delle palle di fuoco in Filmora
-
Guida all'aggiunta di trucchi per le dita magiche con Filmora
-
Applicare un tutorial sugli effetti di esecuzione con Filmora
-
Come utilizzare Filmora per creare una guida per le transizioni sfocate con il jitter
-
Come creare un titolo di visualizzazione turbolento in Wondershare Filmora
-
Come creare una guida introduttiva al display subacqueo in Filmora
-
Tutorial sulla creazione di effetti occhi di zombie in Filmora
-
I dieci convertitori SRT impressionanti per Mac e Windows
-
L'ASMR ti fa bene? Scopri i vantaggi qui!
-
Come aggiungere effetti alla tua voce? C'è un cambio di suono gratuito qui!
-
Alla ricerca di un cambiatore di suono per Vtubers: consigliate due migliori applicazioni
-
Come donare su Twitch: una guida completa
-
Riepilogo Magix ACID Pro e Alternative
-
MAGIX Vegas Pro Review: Software di editing video professionale
-
15 migliori idee pubblicate su Snapchat
-
Grazie per aver visto il modello Outro (gratuito e a pagamento)
-
Come fare bobine su Instagram
-
Tutorial completo sull'aggiunta di timer per il conto alla rovescia post-effetto
-
Come trasmettere Google Meet su YouTube [Guida passo passo]
-
[Formula in tre passaggi] Come visualizzare le entrate di YouTube
-
Lascia che il tatuaggio scompaia come per magia
-
Guida completa ai migliori video della storia del marchio
-
Come aggiungere i sottotitoli ai video Instagram
-
Come aggiungere un effetto di sfocatura radiale a una foto in Photoshop
-
Come scrivere script podcast (più 10 + esempi gratuiti)
-
Come registrare podcast su iPhone o iPad (ideale per interviste e viaggi)
-
Aggiorna l'elenco delle domande dell'intervista podcast per attirare gli ascoltatori
-
2024 Podcast online Top Ten Generatori di nomi di intelligenza artificiale
-
Come fare un trailer di YouTube
-
Migliore app podcast per Android
-
5 migliori strumenti di visualizzazione podcast
-
Suggerimenti pratici su come pubblicare su Reddit-Guida passo-passo
-
Come creare una doppia esposizione in Filmora
-
Come posso lasciare che le lettere casuali rivelino l'introduzione?
-
Come modificare la velocità di un video in Final Cut Pro?
-
Come modificare la velocità di un video in Leonardo da Vinci Analysis?
-
Motion blur photos e GIMP: una guida passo-passo
-
Diversi modi per ritagliare video di alta qualità
-
Tutorial rapido su come convertire le immagini in miniature di YouTube
-
7 Idee per migliorare l'esperienza di disimballaggio
-
10 migliori siti per acquistare scatole misteriose
-
I primi dieci siti di shopping per scatole regalo personalizzate: trova il regalo personalizzato perfetto!
-
Metodo e posizione per scaricare la musica di sottofondo del video di disimballaggio
-
Guida dettagliata: come aggiungere suonerie e suoni personalizzati al tuo Android?
-
Come scaricare le suonerie WhatsApp e personalizzarle su iOS e Android
-
Come utilizzare lo strumento Gomma sfondo in Photoshop: una guida dettagliata
-
Diventa possibile trasformare il tuo testo in podcast (+ semplici tecniche di editing)
-
Come ascoltare podcast su iPhone
-
Scopri come realizzare il cortometraggio YouTube perfetto per ottenere un grande coinvolgimento
-
Premiere Pro Miglior film lut che si può incontrare
-
Classificazione dei colori LumaFusion: implementata tramite LUT
-
Uso perfetto della guida LUT in Final Cut Pro
-
Rilascia la creatività dell'editing video con l'intelligenza artificiale di Hegen
-
Incredibili 20 modelli di intelligenza artificiale PowerPoint e Google Slideshow
-
Ulteriori informazioni sui separatori vocali e musicali offline e online
-
DALL-E 3 per OpenAI: integrazione con ChatGPT e End-to-Tip Engineering
-
Crea un innovativo design del sito web di AI WordPress utilizzando la funzionalità Filmora di Wondershare
-
Imagen AI: Panoramica del nuovo modello di testo a immagine AI
-
YouTube Partner Program 2024: Come entrare nel tuo canale e trarne profitto
-
Come fare soldi dai cortometraggi di YouTube: requisiti e potenziale di profitto
-
Tag per Mac
-
Video Oscilloscopio Professionale per Mac
-
Flusso ottico ultra lento per Mac
-
Aggiungi maschere effetto per Mac
-
Schermatura intelligente dell'intelligenza artificiale per Windows
-
Accesso agli indicatori audio in Windows
-
Ruota dei colori di Windows
-
Istogramma per Windows
-
HSL per Windows
-
Strumento di taglio istantaneo per Windows
-
Gestisci tracce di Windows
-
Come Realizzare video al rallentatore in Premiere Pro
-
33 migliori divisori video consigliati
-
Guida completa per realizzare un video introduttivo
-
Suggerimenti per l'editing video da sapere prima di modificare la prima bozza
-
Come creare animazioni di testo per i video
-
I migliori trucchi di editing Jump Cut
-
Come realizzare un video time lapse sbalorditivo? [Guida completa]
-
I migliori suggerimenti video per l'insegnamento online per gli insegnanti
-
Esercitazione sullo schermo diviso: Montaggio video Wondershare Filmora
-
Generazione di uno schermo sfumato utilizzando Wondershare Filmora: Una guida
-
I 5 migliori software di filtraggio video del 2024: Migliora i tuoi video con i filtri
-
I 5 migliori editor di filtri video online gratis del 2024: Migliora i tuoi video con i filtri
-
Come aggiungere filtri personalizzati nell'app VN: Guida rapida 2023
-
Come aggiungere gratuitamente effetti VHS ai video 2024
-
Come creare una sequenza predefinita personalizzata in Premiere Pro
-
Modi gratis per scaricare video e immagini sullo schermo verde del cellulare: nessun copyright
-
Le ultime 100+ migliori didascalie TikTok per migliorare il tuo prossimo post
-
6 siti Web per scaricare gratuitamente filmati motivazionali
-
Creare video motivazionali con l'IA: Guida completa 2024
-
Come applicare il filtro video nel 2024: Miglior software di editing
-
TOP 10 tipi di inquadratura video: Da principiante a maestro
-
Come eseguire modifiche alla velocità su PC
-
Come rallentare i video time-lapse su iPhone
-
I TOP 6 controller di velocità video online per Chrome, Safari ecc
-
Come rallentare i video time-lapse su iPhone
-
[Top 9] Le migliori soluzioni da adottare quando si crea una miniatura AI
-
Come eseguire il monitoraggio della maschera: i migliori strumenti
-
Utilizzo del mascherino traccia e del tracciamento in Adobe After Effects: Revisione di tutte le possibilità
-
Sostituzione del cielo nelle immagini online e offline
-
Scopri Come Cambiare lo Sfondo del Cielo con le Migliori Applicazioni? Una recensione!
-
Imparare i dettagli su come sostituire Sky in Lightroom
-
Alcuni dei migliori siti per sostituire lo sfondo del cielo nei video
-
Sostituzione dello sfondo del cielo utilizzando Adobe Photoshop: Una guida completa
-
I principali strumenti di AI per sostituire sfondi del cielo
-
Sostituzione del cielo in Adobe After Effects: Una guida completa
-
Semplici passaggi per rallentare un video su iPhone e Android
-
Come realizzare un video al rallentatore: Guida completa
-
Rallenta o accelera facilmente i video su PC, online e telefono
-
Le 10 migliori scelte per una generazione video al rallentatore impeccabile
-
Una guida completa ai video YouTube al rallentatore e come gestirli
-
Una recensione dell'app Efectum: Realizzare video al rallentatore
-
Ottenere il rallentatore GoPro con qualità: Una panoramica approfondita
-
Gli ultimi creatori di video al rallentatore del 2024
-
Aggiunta del rallentatore in DaVinci Resolve: Una panoramica completa
-
Adobe Premiere Pro: Guida al rallentamento dei video
-
I migliori modelli CapCut per la tendenza dei video al rallentatore
-
L'approccio migliore per rallentare un video: CapCut Editor video tutto in uno
-
Guida competitiva per l'uso del rallentatore in After Effects
-
[Migliori soluzioni iOS] Trovare app premium al rallentatore per la creazione di video
-
10 migliori fotocamere al rallentatore da provare nel 2024
-
Scopri la migliore app per fotocamera al rallentatore nel 2024
-
Sperimenta il tempo in modo diverso con le migliori applicazioni al rallentatore
-
Trasformare un video al rallentatore in normale
-
Padroneggiare la tecnica: Riprodurre video al rallentatore sul tuo iPhone come un professionista
-
Guida per rallentare i video su Snapchat discutendo i dettagli
-
Innovazione al rallentatore con la funzione S&Q di Sony
-
Come risolvere i problemi di riproduzione lenta in DaVinci Resolve: Trovare le soluzioni migliori
-
Come rallentare la GIF: Costruire una comprensione
-
I modi giusti per rallentare un video su iPhone
-
I modi perfetti per convertire un video al rallentatore in normale
-
Invertire i video time lapse su iPhone utilizzando le applicazioni principali
-
La fotocamera economica per realizzare video al rallentatore
-
Alla ricerca del miglior effetto rallentatore in Premiere Pro
-
Come The Slow Mo Guys rivoluzionare il gioco del rallentatore
-
Esaminando le migliori app gratis per rallentatore (Android e iOS)
-
Realizzare video al rallentatore in Final Cut Pro: I metodi migliori
-
Perfezionare l'arte di rallentare i video su Instagram
-
Registra video al rallentatore con la fotocamera Phantom Slow-Mo
-
Registrazione di video al rallentatore: Alcuni punti considerevoli!
-
Revisione dell'app Efectum e delle migliori alternative per gli utenti di smartphone
-
Alcuni efficaci editor video al rallentatore che puoi provare
-
I 15 migliori modelli CapCut al rallentatore con cui lavorare
-
HSL e classificazione del colore: Un passo creativo e innovativo verso la gestione del colore
-
Tutorial di Wondershare Filmora | Riformulazione automatica dell'IA
-
Come puoi importare e modificare i video clip su Wondershare Filmora?
-
Dai vita ai video oscurati con Wondershare Filmora
-
Comprendere il funzionamento dell'audio nei video: Aggiunta o rimozione
-
Effetto zoom: Lavorare sugli effetti con i migliori editor video
-
Migliora la tua grafica video con Wondershare Filmora: Correzione del colore estesa
-
Come colorare perfettamente i video con Wondershare Filmora
-
Come scegliere un software Chroma Key?
-
MTS/M2TS Cutter: Come tagliare file MTS/M2TS
-
Come unire file MTS/M2TS
-
M4V Editor: Modifica file M4V con M4V Video Editor
-
RMVB Cutter: Come tagliare file RMVB senza perdita di qualità
-
Come realizzare un video con immagini con musica
-
Come convertire MP2 in MP3: 5 modi migliori per convertire MP2 in MP3
-
Come convertire AIFF in MP3 con i migliori convertitori AIFF in MP3
-
Converti M4A in MP4 con i migliori convertitori
-
La migliore attrezzatura per stabilizzare video portatile per riprendere scene fluide
-
Convertire M4A in MP3: I migliori convertitori M4A
-
Le migliori soluzioni per convertire AC3 in MP3
-
Come scaricare video YouTube 4K e convertirli in mp3?
-
Come ritagliare un video in Magix Movie Edit Pro
-
10 migliori corsi di editing video online
-
Come aggiungere effetti glitch ai video senza scaricare i plugin 2023?
-
8 migliori modelli di trailer di film per After Effects
-
Come convertire gratuitamente SWF in MP4 per Windows/Mac/Online
-
I migliori convertitori di formato DVD in digitale
-
I migliori convertitori: Modi semplici per convertire WMV in MP4
-
8 tipi di tutorial sul trucco che ti ispireranno
-
20 migliori modelli gratuiti di Final Cut Pro 2024
-
Come eseguire il mirroring dei video online
-
Momenti salienti delle Olimpiadi di pattinaggio di velocità su short track 2023
-
Come modificare la velocità di QuickTime Player su Mac?
-
Come far sembrare fantastici i video noiosi con B Rolls
-
Come realizzare video a schermo diviso in Filmora
-
Come creare effetti di teletrasporto nel viaggio nel tempo?
-
Come realizzare oggetti volanti in Wondershare Filmora
-
3 trucchi per effettuare transizioni nella fotocamera per realizzare video da professionista
-
Come scegliere la posizione e la programmazione del video musicale
-
Esegui il backup e organizza tonnellate di filmati in pochi minuti
-
Sblocca il tuo potenziale di editing video con Wondershare Filmora
-
Come perfezionare le modifiche dei tuoi video musicali utilizzando Filmora
-
Come eseguire la gradazione e la correzione del colore in Filmora
-
Suggerimenti e trucchi per utilizzare perfettamente il mixer audio in Filmora
-
Sincronizza facilmente audio e video con Filmora
-
Le migliori app per applicare il miglior effetto della fotocamera VHS
-
Soluzioni progressive per aggiungere facilmente effetti VHS ai video
-
Cerchi i migliori produttori di effetti video VHS? Conosci la lista dei migliori!
-
[Elenco principale] I migliori effetti sonori VHS che puoi utilizzare nella creazione di video
-
Una guida completa sulla tecnologia VHS e la sua influenza sull'editing video
-
Una guida per aggiungere audio in Wondershare Filmora
-
Doppiaggio di video con voci fuori campo | Utilizzando Wondershare Filmora
-
Trovare il modo migliore per aggiungere sottotitoli ai video | Filmora
-
Guida per sincronizzare correttamente audio e video?
-
Funzionalità AI di Wondershare Filmora - Rilevamento del silenzio nei video
-
Come ridurre il rumore audio con gli strumenti giusti (offline/online)
-
Scopri di più sull'nterfaccia di editing video di Wondershare Filmora
-
Il modo per realizzare collage video dinamici?
-
Una guida al tracciamento del movimento utilizzando i migliori editor video
-
L'effetto del movimento della fotocamera in creazione di video
-
Frame rate, velocità e Wondershare Filmora: Una panoramica
-
Guida per ritagliare e combinare contenuti in Wondershare Filmora
-
Guida alla creazione dei migliori collage video nel 2024
-
L'editing video efficiente | Scorciatoie da tastiera in Filmora
-
Guida al ridimensionamento e all'impostazione dei video in Filmora | Esercitazione
-
Creazione dell'effetto Tilt-Shift utilizzando le migliori opzioni disponibili
-
Un metodo popolare per migliorare i tuoi contenuti: Effetto di riproduzione video
-
Imparare a neutralizzare la sovraesposizione nei video
-
Creare le migliori forme di dattilografia dinamica con Wondershare Filmora
-
Armonizzare i toni video con Wondershare Filmora: Una guida
-
Creazione di keyframe con Filmora: Una guida per i nuovi editor video
-
Come aggiungere transizioni al video utilizzando Filmora
-
Video in stop-motion | Come realizzarli perfettamente?
-
Esporta un video con un solo clic con Wondershare Filmora
-
Esplorazione delle migliori tecniche affidabili per stabilizzare un video
-
Comprensione del bilanciamento del bianco e delle sue opzioni di regolazione
-
Utilizzo delle LUT 3D in Wondershare Filmora: Una guida completa
-
Semplificare i concetti di keyframing con Wondershare Filmora
-
Come gestire la velocità del tuo video in Wondershare Filmora?
-
Effetto di modifica ondulata: Realizzare video di qualità
-
Miglioramento della grafica video con la gradazione del colore della forma d'onda e dell'istogramma
-
Gradazione del colore con Wonderhsare Filmora: Una breve panoramica
-
Creare movimenti finti della telecamera con Filmora: Tutto quello che devi sapere
-
Elevare la creazione di contenuti con le funzionalità di mascheramento di Filmora
-
Scopri di più su alcune delle migliori tecniche di composizione video nell'editing
-
I 9 migliori suggerimenti per padroneggiare gli annunci pop-up
-
Utilizzo della funzione PiP ai massimi livelli con Wondershare Filmora
-
Come Convertire documenti Word in PowerPoint con l'IA: Guida completa 2024
-
sdas asd as sd asd das d
-
Volete inviare uno snap dal camera roll? Scoprite come si fa!
-
I migliori 8 creatori di montaggi fotografici online
-
Tutto quello che c'è da sapere su 3D LUT Creator
-
Riduzione del tremolio in Photoshop: è davvero utile?
-
Capire il tremolio della fotocamera in fotografia/video
-
Come distorcere una foto utilizzando diversi strumenti
-
Come creare effetti di distorsione in Photoshop
-
La migliore guida all'uso di 3D LUT in Photoshop
-
Come regolare le foto/video con 3D LUT Mobile
-
I migliori miglioratori di foto gratis online e app per smartphone
-
10 Migliori editor di volti per Android e iPhone
-
5 Migliori app di fotoritocco per telefoni Android
-
Come ritagliare un'immagine online?
-
Come modificare, sfocare o rimuovere lo sfondo di una foto?
-
10 suggerimenti segreti per il fotoritocco con Photoshop per i principianti
-
Guida per principianti all'uso delle funzioni di editing fotografico di Snapseed [2022]
-
Suggerimenti per l'editing fotografico per realizzare foto straordinarie
-
3 semplici metodi per la correzione del colore in PhotoShop
-
3 modi semplici per la sfumatura del colore in Photoshop
-
7 tipi di color grading che vale la pena di provare
-
Le 10 migliori lut cinematografiche per il montaggio video nel 2023
-
Come utilizzare le LUT in PhotoShop CC
-
5 Strumenti utili per illuminare i video online
-
3 semplici metodi per schiarire un video su iPhone
-
Come schiarire un video su Android
-
Come sfocare una parte di un'immagine su PC/Mobile
-
8 strumenti utili che consentono di pixelare il volto sulle foto
-
Come sfocare i volti in Picsart in modo semplice
-
Come sfocare volti/sfondo/immagini in Photoshop
-
I migliori strumenti per creare collage di immagini miste
-
Come modificare la velocità di riproduzione di Netflix?
-
Modi rapidi per creare collage di foto su Mac
-
Come creare un rapido collage di foto su Google
-
Perché Picshot rende più facile il collage di foto?
-
Come modificare la velocità dei video di PowerPoint
-
12 incredibili esempi di collage e come realizzarli
-
Le migliori 10 app di collage per Android nel 2023
-
Il foglio di istruzioni definitivo per realizzare un collage
-
Come creare splendidi collage di foto a mosaico
-
Trucco facile su come fare un collage su Instagram
-
Come usare Google Foto
-
Come creare facilmente un avatar del metaverso: An Ultimate Guide
-
Metaverso vs. Multiverso: Quali sono le differenze [Guida completa]
-
Tutto sul Metaverse Marketing: Esempi, strategie e altro ancora
-
20+ Memes del Metaverso e come creare i vostri memes personali
-
I 10 migliori film di fantascienza sul metaverso vi porteranno in un mondo completamente nuovo
-
6 esempi di metaverso per aiutarvi ad avere una visione approfondita del fenomeno [Utile].
-
Come migliorare la qualità video delle riunioni Zoom ?
-
10 modelli di cornici video di tendenza nel 2022 [per Youtube/IG/FB].
-
Come scrivere una sceneggiatura video senza sforzo [con 6 modelli di sceneggiatura video].
-
Il miglior Mac per il montaggio video [2023]
-
Come fare un video di bellezza
-
Come simulare il movimento della telecamera in Filmora
-
Come aggiungere adesivi in video
-
Come realizzare il video Jujutsu Kaisen Tiktok?
-
Come rimuovere il silenzio dai video automaticamente
-
Incorporare video in PowerPoint: Per far risaltare le presentazioni
-
Come aggiungere i crediti video in Wondershare Filmora con facilità
-
Come realizzare un montaggio video su Android e iPhone
-
Che cos'è l'HDR?
-
2 modi per aggiungere una casella di lettere ai video di Facebook
-
WebM a GIF : Gli oltre 10 migliori convertitori da WebM a GIF
-
Aggiungere emoji ai video su YouTube/Facebook/Snapchat [Guida passo passo].
-
Come aggiungere musica a un video online gratuitamente
-
Ezvid per Mac : Creare facilmente slideshow e video domestici in Mac OS
-
Le migliori telecamere a rallentatore del 2022
-
Come realizzare video esplicativi animati senza alcuna esperienza precedente
-
Come creare l'effetto videowall?
-
Come creare l'effetto specchio in un video?
-
Le migliori app di editing video per LinkedIn nel 2022
-
Come aggiungere un effetto vignetta online?
-
Guida per principianti alla fotografia con sfocatura di movimento
-
Come usare l'iPhone come lente d'ingrandimento?
-
Come utilizzare la scheda di bilanciamento del bianco per ottenere colori perfetti nelle vostre foto
-
Come creare video su Windows 10
-
Come diventare commentatore di giochi su YouTube?
-
Creare uno schermo diviso in Magix Movie Edit Pro
-
Come tracciare un oggetto in Magix Movie Edit Pro
-
Come aggiungere una filigrana a un video con Magix Movie Edit Pro
-
Come cambiare la velocità di un video in Magix Movie Edit Pro
-
Come ritagliare un video in Magix Movie Edit Pro
-
Come realizzare video con immagini in movimento con Magix Movie Edit Pro
-
Come modificare i video GoPro 4K con Magix Movie Edit Pro
-
Magix Movie Edit Pro Consigli per il montaggio video per i principianti
-
Come creare titoli in Premiere Elements
-
Come ritagliare un video in AVS Video Editor
-
Come realizzare un video PIP con AVS Video Editor
-
Guida al tracciamento del movimento di CyberLink PowerDirector
-
Le migliori alternative a PowerDirector per Android e iOS
-
Montaggio video di matrimonio - Come montare i video di matrimonio
-
Come realizzare un video senza telecamera
-
Come ridurre le dimensioni di un video
-
Come modificare i filmati
-
Creatore di film di qualità: Trasforma i videoclip di tutti i giorni in filmati di alta qualità
-
Ridimensionamento MOV: Come ridimensionare i file Quicktime MOV
-
MOV Joiner: Come unire i file MOV (Quicktime)
-
MOV Cutter: Come tagliare/dividere/ritagliare i file Quicktime MOV
-
Come bloccare il volto in un video
-
Come distorcere il volto in un video
-
Il miglior programma per modificare i video Flip
-
Editor video iPhone: Modificare facilmente i video iPhone su PC
-
Il miglior programma di editing video per principianti 【2024】
-
10 modi per integrare i video in classe
-
Come trasmettere video 4K alla TV tramite Google Chromecast?
-
Come realizzare un video hyperlapse
-
Accessori per smartphone per la realizzazione di video
-
I 10 migliori convertitori di sottotitoli online per convertire GRATIS i file SRT
-
I meme di foto stock più popolari e le loro storie
-
Le migliori videocamere del 2022
-
I migliori effetti di testo di PSD
-
HDR quantistico: tutto ciò che si vuole sapere sull'HDR quantistico
-
Dove trovare musica di sottofondo per i video
-
Recensione di Pinnacle Studio 25
-
Recensione dell'estrattore audio gratuito Pazera 2022
-
Recensione di Movavi Video Editor Plus 2022
-
I migliori generatori di testi di meme da utilizzare
-
Miglior editor di foto di meme
-
Scarica la migliore applicazione per generare i meme
-
10 migliori LUT gratuite con link da scaricare
-
Come utilizzare le LUT per scintillare e scaricare LUT gratuite
-
Come registrare audio professionale con Audacity
-
Come ottenere foto stock senza filigrana
-
Guida definitiva su come creare un file SRT (più suggerimenti)
-
Come essere un buon intervistatore
-
Quanto costa una promozione su YouTube
-
[Risolto!] Come posso convertire un file zip in un file srt?
-
I migliori modelli di meme gratuiti
-
I migliori modelli di titolo gratuiti per After Effects
-
Trovare il giusto rapporto di aspetto per il video
-
Recensione di FFmpeg Audio: FFmpeg può estrarre l'audio nel formato originale?
-
Guida SRT: Tutto quello che c'è da sapere sulla SRT [Aggiornato]
-
Riconoscimento vocale e utilizzo gratuito
-
Recensione dettagliata per Easy HDR
-
11 migliori esercitazioni sulla correzione del colore e sulla gradazione del colore
-
Come utilizzare Luts dalla color grading central alla classificazione del colore per i film
-
La migliore app per la correzione del colore
-
Tutto sul Color Grading
-
I modi migliori per ottenere immagini stock di sfondo per foto e video
-
I migliori siti web di grafica e arte vettoriale gratis
-
Cos'è la sceneggiatura
-
Che cos'è la dissolvenza incrociata
-
I migliori plugin di testo per After Effects
-
I migliori preset per l'animazione del testo
-
Guida all'uso dei video nell'insegnamento
-
Recensione di SNS HDR Pro: Vale la pena usarlo e quali altri software HDR usare?
-
Esempio di sceneggiatura per cortometraggio
-
Il miglior sito web per la scrittura di sceneggiature
-
Migliori sceneggiature di radiodrammi
-
Come creare un buon trailer per un podcast
-
Come realizzare un buon trailer di film
-
Suggerimenti per le campagne pubblicitarie su Facebook in ambito medico e sanitario
-
Recensione di Magix Video Pro X
-
Come dissolvere l'audio in Lumafusion
-
Come sfumare l'audio in Logic Pro
-
Passi per eseguire una dissolvenza incrociata dell'audio in Logic Pro X
-
Il Vlog sulle recensioni dei prodotti è retribuito ?
-
Recensioni su Aurora HDR: Aurora HDR è una Buona Scelta nel 2022?
-
HDR Photoshop: Come creare immagini HDR in Photoshop come un professionista
-
Come aggiungere filtri video in Zoom
-
La teoria del colore e il suo utilizzo
-
5 esempi di buoni trailer di libri
-
I modi migliori per ottenere gratuitamente versioni di alta qualità delle immagini
-
Le migliori sceneggiature di 8 generi
-
I migliori trailer cinematografici
-
I migliori computer desktop
-
Il miglior generatore di titoli clickbait
-
Cinque suggerimenti per la scrittura di dialoghi e sceneggiature narrative
-
Come scrivere un Vlog Script attraente
-
Come scrivere una buona sceneggiatura per un documentario
-
Cos'è lo Slug Line e come si usa
-
I 10 migliori siti web per le immagini HDR del cielo
-
Modi per scaricare video Twitter in MP3
-
Come usare la transizione audio di Premiere
-
Come scegliere il sottofondo musicale per il trailer
-
I 10 migliori modelli di meme
-
SDR vs HDR Perché l'HDR è una parte migliore del vostro flusso di lavoro video
-
Da SDR a HDR Guida definitiva alla conversione video da SDR a HDR
-
Recensione di Luminance HDR È una buona scelta per creare HDR ?
-
Passi per sfumare l'audio con FL Studio
-
Come sfumare in Audacity
-
Come sfumare la musica su Windows/Mac
-
Come sfumare l'audio senza sforzo con Garageband
-
Come scaricare e utilizzare l'applicazione iFunny Meme
-
Come fare un dissolvenza incrociata dell'audio con Audacity
-
Tutorial Lightroom HDR Come creare e unire immagini HDR straordinarie in Lightroom
-
Le migliori sceneggiature cinematografiche finora
-
Passi per Adobe Audition Fade In
-
2 modi per sfumare l'audio in Ableton
-
Cos'è un video haul e come modificarlo
-
6 tipi di video che cattureranno i vostri spettatori
-
Come utilizzare Zoom per Win10 PC
-
Utilizzare l'applicazione Mematic
-
Utilizzare Kapwing Meme Maker
-
Come usare 9GAG per creare Meme
-
strategia di marketing unboxing
-
Windows 11 Auto HDR Come attivare Windows 11 Auto HDR
-
Creare MEME online
-
Memes per iPhone
-
MEME Generator Zombodroid
-
Crea il tuo meme personale
-
Tattiche chiave per i video di testimonianza
-
[Le 4 soluzioni più efficaci per i video HDR dell'iPhone sbiaditi in Premiere Pro
-
Generatore di meme Imgur
-
come avere una sponsorizzazione di prodotti in youtube
-
come far crescere gli abbonati a youtube
-
3 modi migliori per far scaricare i video Pinterest in MP3
-
Creatori di meme gratis
-
Attrezzatura per realizzare un video di viaggio
-
Come creare Meme con KineMaster
-
Creare Meme con Imgflip
-
Creare Meme con Adobe
-
Creare un meme su Giphy
-
Generatore di meme di Canva
-
Collaborazione con il marchio per YouTube
-
Migliori idee per i Meme
-
6 Convertitori YouTube 4k più utilizzati per
-
20 parole e frasi che funzionano magicamente nel tuo marketing
-
Come fare lo zoom online
-
Come creare un video con effetto testo con Filmora
-
Il miglior visualizzatore di foto veloce per Windows 10?
-
Toolwiz Photos App - Recensione completa 2022
-
5 Migliori creatori di titoli online
-
Questo video vi farà ottenere 100.000 visualizzazioni su YouTube
-
I migliori tipi di effetti per titoli di testo in After Effects
-
I 10 migliori effetti di testo per i video
-
I 5 migliori siti per scarica effetti di testo
-
I migliori 14 esempi di animazione del testo
-
App Slo Mo Video - Recensione completa 2022
-
Semplici passaggi per curvare un'immagine in Photoshop
-
Samsung Photo Editor: recensione 2022 - Pro, contro, caratteristiche e guida
-
Guida per principianti agli effetti di testo di Premiere Pro
-
PickU è il miglior editor di foto per Android? La nostra recensione approfondita
-
Come creare effetti di testo in movimento per i vostri video?
-
Una recensione completa dell'app Lightroom su Android
-
App KineMaster per Android - Recensione completa 2022
-
È possibile effettuare una revisione rapida su Windows ? Ecco come !
-
I migliori editor di introduzioni per dispositivi app
-
InShot è la migliore app di editing video ? Il nostro approfondimento
-
Come usare le LUT in Premiere Pro
-
Come disattivare l'anteprima dei video di YouTube? [Soluzione per tutte le piattaforme]
-
Come visualizzare l'anteprima delle attività fuori da Facebook e dovrei lasciarla attiva? Guarda qui!
-
Come avviare un canale di recensioni di prodotti
-
Come realizzare un filmato con Windows Movie Maker?
-
Come creare una GIF Meme
-
Come ottenere Clip Art senza diritti d'autore?
-
Come trovare il miglior videografo
-
Come esportare video da iMovie
-
Come creare un video di trucco
-
[Come aggiungere i sottotitoli a un video su iPhone
-
Guida completa all'anteprima a schermo intero di Premiere Pro
-
8 Migliori Title Maker gratis da provare e utilizzare
-
10 Final Cut Pro-Plug-Ins
-
Facetune Photos App Recensione completa e guida 2022
-
Come modificare gli annunci video di Facebook per le attività di e-commerce
-
Come creare un video introduttivo accattivante con InVideo
-
La guida completa per la conversione di SRT in XML, SSA, TTML e altri formati.
-
Come fare il Color Grading in Final Cut Pro
-
I 10 migliori obiettivi per fotocamere del 2022
-
I migliori microfoni ASMR con prestazioni sorprendenti e prezzi accessibili
-
Come utilizzare i filmati della bobina B
-
AndroVid Video Editor - Recensione completa 2022
-
Revisione completa di Alight Motion 2022
-
Tutorial sulla gradazione del colore in Adobe Lightroom
-
I 10 migliori preset di testo per After Effects
-
3 modi praticabili per creare animazioni con conto alla rovescia per i video
-
Tutorial completo per realizzare un impressionante video con conto alla rovescia
-
10 Migliori applicazioni per il conto alla rovescia del matrimonio per Android e iOS
-
Recensione dell'app YouCut: È l'app di editing video che fa per voi?
-
Recensione di XVideoStudio: A Comprehensive Guide
-
Scaricare e installare Windows XP Movie maker
-
Come Windows Movie Maker salva i file MP4
-
Cos'è l'arte di pubblico dominio
-
Rallentatore VSCO
-
Recensione di VLLO App
-
Recensione dell'app VivaVideo
-
VivaCut video editor - Recensione completa e guida 2022
-
Vita Video Editor App Recensione completa e guida 2022
-
VideoShow App recensione completa e guida 2022
-
Le 6 principali piattaforme di social media per le aziende
-
ToonApp: recensione e guida completa 2022
-
Recensione e guida completa dell'app PowerDirector 2022
-
App PicsArt Recensione completa e guida 2022
-
Scaricare e utilizzare Movie Maker su Windows 11
-
Come utilizzare Movie Maker su Windows 8
-
Come cercare foto belle su Pexels.com?
-
File SRT: Come aprire un file SRT su Windows o Mac [2022]
-
Come realizzare l'effetto Hand Shake con Final Cut Pro.
-
Come scaricare i sottotitoli SRT di YouTube in 3 modi ?
-
Come aggiungere animazioni di testo libero ai video
-
Guida completa al download di Windows Movie Maker 6.0
-
Soluzioni praticabili per la conversione di XML, SSA, TTML, ecc. in SRT
-
Guida definitiva per convertire SRT in TXT in pochi minuti 2022
-
Guida per principianti al codec AV1
-
Come aggiungere Testo Animato alle Storie di Instagram
-
Come realizzare animazioni con Windows Movie Maker
-
Versioni di Windows Movie Maker
-
Come caricare i file SRT sui social media (metodi funzionanti al 100%)
-
8 modi aggiornati per unire SRT con MP4 per il 2022
-
Tutorial di fotografia: Come scattare e creare ritratti HDR impressionanti
-
Come scattare foto HDR con l'iPhone
-
10 funzioni interessanti che vi faranno amare Filmora Video Editor
-
3 modi pratici per creare un'animazione conto alla rovescia per i video
-
Motivatevi con le 20 migliori musiche di sottofondo per l'esercizio fisico
-
10 alternative gratis a Windows Movie Maker
-
Scaricare Windows Movie Maker [Guida completa]
-
Conoscenze di base e uso della Motion Graphics
-
La guida completa al hand tracking e alle sue tipologie
-
La vera soluzione per l'esportazione di SRT da Premiere non funzionante
-
I 8 migliori SRT Translators gratis Online (Suggerimenti per la scelta)
-
sRGB VS RGB
-
Mostrare la forma d'onda audio e aggiungere l'animazione della forma d'onda in Premiere Pro | Tutorial
-
Mostrare la forma d'onda audio e aggiungere l'animazione della forma d'onda in Final Cut Pro | Tutorial
-
Cose da sapere su Pexels.com.
-
Le migliori applicazioni di sintesi vocale su Mac che potrebbero sfuggirvi [gratis e senza download].
-
Come ottenere immagini per uso commerciale [Modi gratuiti].
-
Il miglior generatore di titoli di YouTube
-
Come aggiungere un timestamp ai video di YouTube
-
Windows HD Color : scoprite come guardare e modificare i video HDR sul PC
-
Tutto sui messaggi vocali whatsapp
-
Quali sono i migliori siti per promuovere i video di YouTube ?
-
Fotografia al computer : cosa sono le modalità di ripresa Auto HDR, Smart HDR 3 e 4 ?
-
Registratore di messaggi vocali su iPhone 2022
-
Guida definitiva ai memo vocali
-
Recensione di VEGAS Pro 19
-
Guida definitiva per aggiungere SRT a MP4 2022
-
I 8 più efficaci convertitori SUB in SRT per Online, Windows & Mac
-
OBS Vs Twitch Studio : Quale è meglio ?
-
Come risolvere il non funzionamento della telecamera OBS
-
Le migliori alternative a OBS per la registrazione
-
Come scaricare OBS Studio per Mac
-
Il modo migliore per eseguire lo streaming OBS
-
Guida dettagliata a Streamlabs OBS
-
Come registrare una presentazione PowerPoint
-
Come registrare sullo schermo le chiamate FaceTime
-
Come registrare gli spettacoli TV online
-
Come registrare un webinar gratis
-
Recensione Bandicam Screen Recorder 2022
-
Come registrare lo schermo su Mac con le scorciatoie
-
Modi semplici per registrare il gameplay della console
-
Modi semplici per registrare il gameplay di Steam 2022
-
4 metodi per registrare video sulla webcam del Mac
-
Come registrare il gioco della PS3
-
Registrare i video della webcam con VLC
-
Come registrare video con Logitech webcam
-
4 metodi per registrare il gioco su Xbox One
-
5 modi per registrare il gameplay in VR
-
4 modi per registrare il gameplay di Sims 4
-
Come registrare una presentazione di PowerPoint con la webcam
-
Come registrare il Gameplay e la webcam
-
Come registrare una chat via webcam
-
Come registrare il gameplay con OBS
-
Come registrare League of Legends
-
Software di registrazione webcam HD
-
Registratore di schermo gratuito per Mac
-
Registratore di schermo gratuito per Android
-
Miglior registratore di schermo per chromebook
-
Recensione di Apowersoft Registratore Gratuito dello Schermo
-
I modi migliori per registrare i webinar
-
Le migliori alternative a Bandicam per Mac [Top 5 degli strumenti].
-
Come registrare una chiamata WhatsApp
-
Come registrare video su Google Hangouts
-
Come registrare il gioco su PS4
-
LoiLo Game Recorder [Recensione completa]
-
Come registrare il gioco di Minecraft [Guida completa]
-
Come utilizzare il registratore dello schermo di Xbox
-
I 10+ migliori registratori di schermo online
-
Come registrare lo schermo su Mac
-
Le migliori applicazioni di registrazione dello schermo 4K
-
I migliori registratori di schermo open source
-
Il miglior software di registrazione dei flussi
-
I 5 migliori strumenti di taglio per Mac
-
15 migliori modelli gratuiti di intro in After Effects da provare nel 2022
-
Come cambiare lo sfondo di video: I 7 migliori programmi (2023)
-
Ritagliare video su Mac : 2 soluzioni senza problemi
-
Come Montare Video con Mac Mini [recensione 2023].
-
Il miglior iMac per il montaggio video nel 2022
-
Il miglior MacBook per il montaggio video [2022]
-
I 7 migliori creatori di didascalie GIF e una guida per aggiungere didascalie alle GIF
-
Come invertire la ricerca di immagini su Android in 3 modi nel 2022
-
Come effettuare la ricerca inversa di immagini sul vostro iPhone
-
Come scaricare video da qualsiasi URL [Piattaforma calda inclusa]
-
Come creare facilmente una fastidiosa faccia arancione con Filmora
-
Come creare un effetto di zoom attraverso il testo in modo facile e veloce in Filmora
-
Come inserire un testo dietro un oggetto
-
I 3 migliori siti web o app per rendere il vostro viso di un fastidioso colore arancione gratuitamente
-
Come scaricare le serie web di Netflix su Android, iOS e desktop
-
Le 10 migliori serie web di Amazon Prime da amare assolutamente
-
Come creare un trailer di un libro partendo da zero
-
Come aggiungere un video al testo
-
Come creare testo animato rimbalzante
-
Come realizzare un montaggio video su Windows e Mac
-
Come modificare video su Mac [Modi facili e veloci]
-
Tutto quello che c'è da sapere sul tono Shepard (Download gratuito)
-
Il logo è la base del vostro branding: Come crearlo?
-
Come aggiungere transizioni dissolvibili ai video?
-
Come aggiungere l'effetto fantasma ai vostri video? [4 modi]
-
Avengers Effetti di disintegrazione: Come far scomparire le persone
-
Cos'è la vignettatura e come usarla per scattare foto migliori ?
-
Come modificare una ripresa video verticale per IGTV
-
Come caricare un video su Instagram da un desktop
-
Migliori alternative a Magix Movie Edit Pro
-
Come aggiungere una filigrana ai video in AVS Video Editor
-
PowerDirector per Mac: Una recensione dettagliata e le sue migliori alternative
-
Le 12 migliori app di editing fotografico per iPhone X/8/7 Plus/6
-
Come creare DVD domestici con il miglior software per la creazione di filmati
-
Come trasmettere AC3 alla TV con Chromecast?
-
Semplici passi per creare un meme [Memes foto e video].
-
Easy Movie Maker : Come creare facilmente un filmato
-
Come modificare i video GoPro 4K
-
Come modificare i video 4K di Sony
-
Come tagliare facilmente i file video
-
Editor DVR-MS : come modificare i file DVR-MS in modo rapido e semplice
-
Xvid Splitter : Come tagliare i file Xvid
-
Taglierina Divx : Come tagliare i file Divx in modo efficiente
-
Editor Divx : come modificare i file Divx su Windows e Mac
-
Taglierina TS: Come tagliare i file TS
-
Come ruotare i file video 3GP/3GP2
-
Come unire diversi file video 3GP in un unico file
-
Unire/combinare/fondere facilmente i file video M4V
-
Dividere/ritagliare/tagliare facilmente i file M4V
-
Editor VOB: come modificare i file video VOB in Windows e Mac
-
Unificatore VOB : Come unire i file VOB
-
Come ritagliare i file WMV
-
Editor WMV: come modificare i file WMV su Mac/Windows
-
MOD Editor - Come modificare i file MOD con MOD Video Editor
-
Come mescolare file video HD e SD
-
Come dividere file AVI con più flussi video
-
3 modi per modificare i video su iPhone
-
Come ridimensionare i file MKV
-
MKV Merge: come unire file video MKV senza gap
-
Dividi/taglia/taglia facilmente file MKV in Windows/Mac
-
Come ritagliare file MKV
-
Splitter MOV: come dividere il file Mov (Quicktime)
-
Come posso condividere schermate PS4 online
-
3 semplici opzioni per la registrazione di videogiochi
-
Come modificare il volume nei file multimediali con Filmora
-
5 migliori scelte per il software di registrazione video per il tuo computer
-
I 6 migliori video cropper online: come ritagliare un video online
-
I 5 migliori rotatori di video online
-
Ridimensionamento video per Mavericks: Come ridimensionare i video su OS X Mavericks
-
Video Rotator per Mac: Come ruotare/ribaltare i video su Mac
-
I 4 migliori video splitter per Mac: Semplicemente dividere/tagliare video su Mac
-
Video Joiner per Mac: Come unire i video in Mac
-
Editor video per Mavericks: Come modificare i video in OS X Mavericks
-
Migliori cuffie VR (realtà virtuale) Cuffie
-
Le 6 migliori videocamere a 360 gradi recensite
-
Come scaricare video 4K da Netflix
-
La migliore recensione online del scaricatore di video 4k
-
5 attrezzature e software di base indispensabili per iniziare a fare vlogging
-
Le 5 migliori applicazioni di riproduzione video per Android
-
Come modificare i video su iPhone
-
Le migliori 6 app di acquisizione video Android per la registrazione dello schermo
-
Come catturare, modificare e caricare video su Android
-
Qual è il Aspect Ratio
-
Film horror classici di Halloween da guardare
-
Le 10 migliori canzoni di Halloween
-
Come riavvolgere i video in Wins e Mac
-
Come riprodurre e guardare i video M4V su Android?
-
Come dividere i file MP4
-
Come miscelare i file MP4 con Filmora
-
Come tagliare i file MP4
-
MP4 Joiner Mac: Come unire file MPEG 4 su Mac OS X
-
Come stabilizzare i video dell'iPhone?
-
Guida allo streaming in diretta su Dailymotion
-
5 Best Photo Video Maker With Music You Should Know
-
Come modificare i video di TikTok e Instagram su Inshot?
-
4 consigli utili per un migliore utilizzo di Inshot
-
Come sapere se qualcuno vi ha bloccato su Snapchat
-
10 filtri CapCut popolari per lucidare i video in un Snap
-
Come utilizzare di Cartoon Face Lens in Snapchat ?
-
Airdrop non funziona, come risolverlo su iPhone, iPad e Mac
-
Che cos'è il filtro Anime su Snapchat ?
-
Come utilizzare lo schermo verde per lo streaming
-
Come usare OBS Streamlabs su Mac?
-
8 Migliori creatori di pannelli Twitch per personalizzare il tuo canale
-
20+ popolari Twitch Sub Badge [Twitch Loyalty Badges]
-
Trucchi Whatsapp e funzioni nascoste che dovreste conoscere
-
Come creare una storia privata su Snapchat: A Complete Guide
-
Come appuntare qualcuno su Snapchat: tutto ciò che devi sapere
-
Le migliori app per video e foto live
-
Che cos'è Triller: tutto quello che sai su questa alternativa a TikTok
-
Snapchat Ad 101: creare annunci Snapchat straordinari ed efficaci
-
Streamlabs vs. OBS: quale dei due è insostituibile?
-
Come fare pubblicità su Twitch: A Complete Marketer's Guide
-
Vuoi acquistare follower e visualizzazioni su Twitch ? Non fatevi truffare
-
Snapchat Cameos : Scopri il trucco più trendy
-
La Top Ten dei giochi più visti su Twitch
-
Come fare soldi su Twitch ?
-
Una semplice guida per diventare un affiliato Twitch
-
Banner Twitch : I migliori modelli e creatori di banner Twitch gratuiti
-
Come eliminare rapidamente l'account Twitch
-
Come fare lo streaming in diretta su Twitter
-
Come guadagnare con Periscope se si è nuovi in questo settore
-
Come ottenere uno streaming live più veloce su Periscope
-
Come fare live streaming con Periscope
-
La guida definitiva ai filtri Snapchat
-
Come salvare i video di Snapchat con le app su Android e Mac
-
7 Consigli per scrivere il sommario di LinkedIn che dovete conoscere
-
Come creare un post di LinkedIn su Homepage e Android Telefono
-
Come rendere professionale il vostro profilo LinkedIn
-
Come scrivere e pubblicare articoli su LinkedIn in modo efficace
-
Come creare facilmente un account LinkedIn
-
Video di LinkedIn: la guida definitiva all'introduzione, alla creazione e ai suggerimenti
-
How to Add, Upload and Embed Video to LinkedIn Company PageCome aggiungere, caricare e incorporare video nella pagina aziendale di LinkedIn
-
Suggerimenti e app utili per scattare incredibili fotografie Android
-
Come ruotare e unire video gratuitamente su Android
-
La guida definitiva su come usare le Animoji su iPhone X
-
10 Suggerimenti e trucchi per l' iPhone X mancante da raccogliere
-
Videografia con iPhone: 8 consigli per registrare video professionali
-
Suggerimenti per la registrazione di video in time lapse su iPhone
-
10 regole di composizione fotografica per iPhone
-
Come scattare foto di paesaggi con l' iPhone [Suggerimenti utili].
-
Suggerimenti per la fotografia di silhouette con l' iPhone
-
Guida completa alle foto in diretta: Come usarla su iPhone
-
iPhone Photo Burst: How to Take Burst Images
-
Come usare le linee guida nella fotografia per le foto con l'iPhone
-
Come organizzare l'album di foto su iPhone e iCloud
-
Come risolvere il problema della fotocamera dell'iPhone non a fuoco
-
Suggerimenti per la fotografia di riflessi per iPhone
-
Suggerimenti per la fotografia con iPhone
-
Come scattare foto di ritratto con il vecchio iPhone X/8 Plus/7 Plus
-
Come trovare le buone angolazioni per la fotografia con l'iPhone
-
Come scattare foto a lunga esposizione con l'iPhone in iOS 11 o precedente
-
Suggerimenti per la fotografia notturna con iPhone: Scattare foto notturne con l'iPhone
-
Suggerimenti fotografici per iPhone
-
10 funzioni della fotocamera dell'iPhone da conoscere in iOS 11
-
Come scattare foto mentre si registrano video su iPhone
-
La guida definitiva alle foto HDR con la fotocamera dell'iPhone
-
Come trasferire foto e video da iPhone a iPhone
-
Come trasferire video e foto da un PC a un iPhone
-
Come salvare e riprodurre GIF su un iPhone
-
10 Migliori app per fotocamera per iPhone X / 8 / 8 Plus / 7 / 7 Plus - Gratis e a pagamento
-
Come trasferire foto e video da un telefono Android sull' iPhone
-
Modi facili e gratuiti per trasferire foto e video da un iPhone a un PC
-
Applicazioni per ritagliare le foto: come ritagliare le foto su iPhone
-
Come ridimensionare le foto su iPhone
-
Creare GIF su iPhone: Le 10 migliori app GIF per iPhone X/8/7/6
-
Younow recensione e alternativa
-
vMix VS Wirecast: qual è il miglior software di live streaming professionale?
-
Recensione e alternativa di Wowza
-
Ustream Recensione e alternative
-
Suggerimenti per Twitch: Impostazione del pulsante di donazione e dell'avviso ai seguaci
-
Software per lo streaming in diretta e hardware: Qual è il migliore?
-
Recensione e alternative di DaCast
-
Come usare Periscope: La guida completa
-
Come salvare o registrare i video di Periscope: Guida completa
-
Hitbox contro Twitch: Qual è il migliore?
-
Migliori alternative a Xsplit per lo streaming
-
12 App di trasmissione video in diretta per la visione e la trasmissione di video
-
Recensione di Periscope
-
Recensione XSplit
-
Come ospitare su Twitch ?
-
Cos'è twitch tv e come si crea un account twitch ?
-
I migliori encoder e hardware per il streaming in diretta da conoscere
-
I 6 migliori microfoni per lo streaming in diretta Panoramica
-
Guida allo streaming su Twitch : Hardware e attrezzature
-
Come scegliere una piattaforma di diretta streaming con 10 consigli?
-
Come ottenere spettatori o seguaci su Twitch 7 suggerimenti
-
I 3 migliori smartphone per registrare video
-
I 6 migliori siti web per ottenere effetti sonori di Halloween raccapriccianti e senza diritti d'autore
-
Come unire i video Avi su Mac gratuitamente
-
Come ridimensionare i video FLV in modo efficiente
-
Editor FLV per Mavericks : Modifica FLV in OS X Mavericks
-
Unisci FLV : Come unire più video FLV in uno solo
-
Come tagliare video FLV
-
Come unire file FLV
-
Come ritagliare i file FLV
-
Come utilizzare FLV Extract
-
Come modificare i file video FLV con FLV Editor in Mac/Win (Windows 8 incluso)
-
Come ridimensionare i file AVI (Xvid, Divx) per ridurne le dimensioni
-
Come unire o combinare più file AVI in uno solo
-
Come ritagliare i file AVI
-
Come modificare i file AVI con AVI Editor in Mac / Win (Windows 8 incluso)
-
I 5 migliori rotatori video MP4 gratuiti Rotatori
-
Come ruotare i video MP4 (MPEG, MPG) in Mac/Windows
-
Come ritagliare video MP4 (MPEG, MPG) Files
-
Dividere M4A con il miglior software di divisione M4A
-
Migliori tagliatori M4A online in 2022
-
MP4 Trimmer Mac: I modi migliori per tagliare i video MP4 su Mac
-
Come realizzare i video con il Tilt Shift
-
Usate gli effetti di testo online per migliorare i vostri video
-
Creare effetti speciali autentici e gratuiti con Wondershare Filmora download effetti video
-
MP4 Cropper su Mac: Ritagliare rapidamente video MP4 su Mac
-
Come catturare una schermata o un video di ciò che viene visualizzato sul computer Mac
-
Il miglior software di compressione video per Mac per comprimere i file video
-
3 Migliori splitter MP4 per Mac: Dividere/tagliare video MP4 su Mac Facilmente
-
Software per effetti video: come aggiungere effetti speciali ai video
-
Come utilizzare Windows Online Movie Maker [Guida completa].
-
Recensione di Windows Movie Maker
-
Come scaricare e utilizzare Windows Movie Maker 10
-
Quanto costa il videografo di matrimonio
-
The Ultimate Wedding Videography Checklist
-
I migliori 8 siti web di video didattici per insegnanti
-
Modo semplice per aggiungere effetti ai video d'arte
-
TXT to SRT: 3 modi efficaci per convertire TXT in SRT
-
Traccia opaca: La guida definitiva per After Effects
-
Come creare sottotitoli nei video
-
Come convertire SRT in DOCX
-
I 10 più efficaci editori SRT online per il 2022
-
11 suggerimenti per realizzare video pubblicitari sui prodotti
-
Impostazioni 3D Ray Traced in After Effects: Una guida completa
-
Tracciamento degli oggetti in OpenCV: La guida completa
-
Tracciamento di più oggetti: La guida definitiva
-
2 modi efficaci per tradurre i file SRT come un professionista
-
Vantaggi dello streaming live su YouTube
-
Intervallo dei fotogrammi chiave: Tutto quello che c'è da sapere
-
Windows Movie Maker è ancora disponibile?
-
Hackeraggio dell'algoritmo di YouTube 2022
-
Come scaricare Windows Movie Maker versione 2012
-
Guida definitiva alla conversione di Word in SRT
-
2 modi efficaci per convertire facilmente VTT in SRT
-
Come convertire facilmente SRT in VTT
-
SBV a SRT: come convertire i sottotitoli SBV di YouTube in formato SRT
-
Il miglior video trimmer YouTube online 2022
-
M31 LUT (teal e orange LUT) Scaricare gratis
-
Come utilizzare le LUT in VN Editor - Guida completa e scarica delle migliori LUT
-
Come dividere i video in Final Cut Pro
-
Come dividere i video in Premier Pro
-
Come dividere un video in parti su tutte le piattaforme
-
Come usare il Face Tracking in After Effects per rendere i vostri video Pop
-
I migliori consigli per una migliore videografia
-
7 consigli per creare video didattici
-
Passi semplici per creare video introduttivi con After Effects
-
Come commentare la chat live di YouTube
-
Color Finale, transcoder Color Finale, cos'è Color Finale
-
Come fare un video con il mio telefono
-
Come utilizzare gli effetti di tracciamento 3D della telecamera in After Effects
-
I 6 migliori droni per la videografia
-
Che cos'è l'HDRI? Tutto quello che dovete sapere sull' HDRI
-
Recensione di EasyHDR: È una buona scelta per creare HDR
-
6 consigli per i vostri primi annunci su Facebook
-
Quali sono le migliori alternative a Pexels?
-
Miglior creatore youtube video meme
-
I migliori generatori di titoli video
-
Come creare un'introduzione di YouTube
-
Suggerimenti per realizzare la colorazione cinematografica
-
Guida per principianti al Keying su schermo verde
-
Passi per creare effetti di testo dorati in After Effects
-
Come aggiungere l'effetto eco ai video
-
Come creare video di testo animati su computer/iPhone/Android/Online
-
2 modi efficaci per estrarre i sottotitoli dai video MKV senza perdita di qualità
-
[I 5 modi più semplici per convertire i video HDR in SDR
-
I migliori suggerimenti per il montaggio video di Tiktok
-
Le migliori animazioni di testo in After Effects
-
Miglior creatore di titoli di film
-
Fotografia HDR: Come utilizzare la modalità HDR sui dispositivi Android
-
Come realizzare un video fai da te
-
Titoli gratuiti per Final Cut Pro
-
I 9 migliori programmi per estrarre il suono dai video 2023
-
Creare video di testimonianze per l'industria della salute e del benessere
-
Creare l'effetto testo Glitch
-
Miglior generatore di testo animato
-
I migliori Memes generati da Ai
-
Recensione di Adobe After Effects
-
Come aggiungere testo in After Effects
-
Aggiungi testo al video: Come aggiungere effetto di testo scorrevole
-
Come sfumare l'audio con Movavi Editor
-
Come cambiare il testo in Premiere Pro
-
Come cambiare il colore del testo in Premiere Pro
-
Come aggiungere la dissolvenza nell'editor video di Windows
-
Creare veri effetti di testo in 3D con After Effects
-
Come cambiare i font in Premiere Pro
-
I migliori editor video per aggiungere testo a un video
-
Come utilizzare Deep Fried Meme Maker
-
2022 Guida ai trailer per creatori e sviluppatori
-
Come usare green screen in montaggio video [2024]
-
Come inserire facilmente il testo nei video
-
Come modificare il testo in Premiere Pro
-
I migliori creatori di titoli animati
-
Come aggiungere testo in Adobe Rush
-
Modi semplici per aggiungere una sovrapposizione di testo ai video
-
Come aggiungere un'animazione di testo online
-
Come aggiungere titoli di movimento
-
Come aggiungere testo ai video
-
Come aggiungere un fermo immagine al video da qualsiasi dispositivo?
-
Come aggiungere effetti di carattere ai video
-
Come aggiungere un filtro ai video online
-
Come aggiungere un filtro al video in Premiere Pro?
-
Come aggiungere uno schermo verde allo zoom
-
Come utilizzare iMovie Text Effects
-
Come realizzare un DIY vlog o un video
-
Creare Testimonial Video
-
Creare un video promozionale
-
Cambiare il colore dello sfondo in After Effects
-
Aggiungere animazioni di testo a un video online
-
Aggiungere testo elegante ai video
-
Aggiungere video con schermo verde su TikTok
-
Aggiungere effetti di schermo verde in Final Cut Pro
-
Aggiungere la dissolvenza nell'editor video di Windows
-
Aggiungere effetti ai video online
-
I vantaggi dell'uso dei video per il social media marketing
-
Come creare una Slideshow video in iMovie
-
Come creare una presentazione con Icecream Slideshow Maker
-
DVD Slideshow Builder 2022 Recensione e tutorial
-
15 migliori rotatori video MP4 gratuiti [Windows, Mac, Android, iPhone e online].
-
La guida completa alle diapositive di Zoho con facilità
-
Come ridimensionare i video FLV in modo efficiente [Windows, Mac, Android, iPhone e online]
-
Come ho ottenuto una presentazione di modelli di After Effects gratuiti con un semplice trucco
-
Una recensione completa di Leeming LUT Pro
-
8 migliori Editor video con mascheratura utile
-
Modifica la velocità di un video su iPhone
-
Come montare un video in time lapse su iPhone?
-
Passaggi dettagliati per ruotare i video in Windows Media Player
-
Controllo della velocità di riproduzione in Premiere Pro
-
Come creare una rampa di velocità fluida in Premiere Pro?
-
Passaggi dettagliati per tagliare un video in QuickTime
-
Passo dopo passo per ruotare un video in Google Foto
-
Come sfocare i volti nei video su iPhone
-
Panoramica sui formati video iPhone supportati e sul miglior editor e convertitore video per iPhone
-
Come tagliare i video in Premiere Pro in modi diversi
-
Olimpiadi invernali 2022 Highlights
-
Punti salienti delle Olimpiadi di Snowboard Cross 2022
-
Come invertire un video su iPhone
-
Ritagliare i video in VLC [Passo dopo Passo]
-
Passo dopo passo per tagliare i video in Adobe Premiere Pro
-
6 migliori fusioni MP4 per unire facilmente i video
-
Come registrare video al rallentatore sul telefono?
-
Come unire i video in HandBrake? Aspettative e realtà
-
Imparate a unire i clip in DaVinci Resolve con semplici passaggi
-
Recensione di Virtualdub e delle sue migliori alternative
-
Come usare l'effetto schermo verde in GIMP
-
Come ruotare un video con FFmpeg
-
15 fantastici modelli di outro per gli YouTuber
-
Come realizzare un video didattico per la vostra classe?
-
I 15 migliori canali video educativi per studenti di tutte le età
-
I 6 migliori scaricatori di video di Linkedin per salvare i video da LinkedIn
-
Modi semplici per realizzare un video speciale per la giornata degli insegnanti
-
Modi semplici per realizzare un video perfetto per il vostro progetto scolastico
-
Come creare un video musicale in Split Screen su Mac ?
-
Motion tracking: Evidenziare un oggetto in movimento in un video
-
Le 10 migliori alternative a Offliberty
-
Come rimuovere il tremolio da un video in Filmora
-
Realizzare un video in stile CyberPunk con il Green Screen
-
Come scegliere la luce per il green screen
-
Passaggi per realizzare un video in stile Cyberpunk su Mac
-
I Migliori Software del Green Screen su Mac
-
Tutorial sulla gradazione del colore per FilmoraPro in modo facile e veloce
-
Come modificare il video di Facebook Look Back
-
Facebook Video Maker: Come creare video su Facebook
-
Editor ASF: come modificare i file video ASF
-
Come unire file MTS
-
MPEG Joiner: come unire file MPEG
-
Ritaglia video iPhone: come ritagliare video iPhone
-
I modi più semplici per ruotare i video di iPhone per correggere l'orientamento
-
Applicazioni per l'aggiunta di testo ai video su Android
-
Come tagliare video per Instagram su Mac
-
Taglia facilmente video di grandi dimensioni più velocemente su Mac
-
Tutto sull'aggiunta di effetti in Kinemaster
-
Come aggiungere uno sfondo al video con/senza uno schermo verde
-
Come aggiungere filtri ai video [PC e dispositivi mobili]
-
Come aggiungere la dissolvenza in entrata/uscita Premiere Pro
-
Guida dettagliata per aggiungere transizioni in Kinemaster
-
2 metodi per aggiungere effetti su TikTok
-
1 minuto per sfumare in nero in Premiere Pro
-
Suggerimenti per realizzare video su Instagram con la musica Inserisci tag (Opzione+1)
-
10 migliori effetti video AR innovativi da provare
-
Come creare le tue LUT per il tuo video
-
Come utilizzare la fusione dei fotogrammi in Adobe Premiere Pro
-
RECENSIONE: Qual è il miglior software 10 per realizzare video di upscaling AI
-
Apprendimento approfondito del riconoscimento video AI
-
10 migliori suggerimenti per interviste video AI
-
12 impressionanti idee video AI per creare contenuti video coinvolgenti
-
I 10 migliori generatori di video AI tra cui scegliere nel 2024
-
In che modo i videogiochi AI agiscono da umani?
-
I 5 migliori esempi e creatori di video musicali con l'IA per realizzarli
-
I 10 editor video di intelligenza artificiale online e su PC
-
I migliori 8 software AI Video Denoise
-
Panoramica delle 10 migliori società di analisi video AI
-
Che cos'è l'app video composito AI e tutorial video composito AI
-
15 LUT cinematografici gratuiti per il tuo film
-
3 diversi metodi per correggere la distorsione del colore nei video
-
Come aggiungere musica in Premiere Pro?
-
Le migliori app di Photo Video Maker con canzoni [PC, Mobile, online]
-
Come aggiungere lo schermo verde VHS al tuo video
-
Metti fine a questo problema! Realizza oggi un video con sfondo trasparente!
-
Metodi per rendere trasparente lo sfondo in Procreate
-
Come creare uno sfondo trasparente su Picsart
-
Eliminare lo sfondo bianco in Photoshop è difficile? No!
-
Perdi ancora tempo a creare uno sfondo trasparente in Paint?
-
Guida passo passo per rendere Gimp sfondo trasparente PNG
-
Suggerimenti per Blender - Come rendere Blender uno sfondo trasparente
-
Difficile rimuovere lo sfondo nero in After Effects? Ecco il modo migliore per affrontarlo
-
Idee che ti aiuteranno a creare immagini trasparenti
-
10 creatori di collage video strabiliante per PC
-
La guida definitiva per creare un collage di testo
-
Come creare un collage Polaroid?
-
10 app per realizzare video con immagini e musica
-
Proporzioni del telefono Definizione verticale, tipi e suggerimenti
-
Come modificare le proporzioni di un video?
-
Risposta rapida: che cos'è un file GIF?
-
Informazioni sulla tastiera GIF che dovresti conoscere
-
Semplici trucchi per creare GIF 3D per creare ispirazione
-
Come creare gif After Effects
-
Come animare i tuoi progetti con Canva GIF
-
Come scegliere una GoPro per il vlogging?
-
Come fare un vlog? Una guida definitiva per principianti
-
3 modi per combinare 2 o 3 video in 1
-
Splice Video Editor Online - Unisci i tuoi video facilmente
-
Tutorial pratici di Kapwing Collage Maker
-
Come velocizzare un video online
-
Guida utile per accelerare/abbassare i video in Camtasia
-
Come creare un collage di foto in Microsoft Word — Guida passo passo
-
Tutorial semplice passo dopo passo sulla creazione di un collage di Lightroom
-
Formato video AVI: come aprire, riprodurre, modificare file AVI?
-
Guida per principianti sul formato WMV e sul miglior editor video WMV
-
Informazioni generali che devi sapere sul formato MKV
-
Formato video 3GP: cos'è il formato 3GP e come aprirlo?
-
Come tagliare/ritagliare video in Microsoft Powerpoint
-
Come tagliare i video in QuickTime Player su Mac
-
Guida passo dopo passo per tagliare i video in Lightworks
-
Tutorial dettagliato per ridimensionare il tuo video in VLC
-
Come utilizzare Efectum per realizzare un video al rallentatore
-
Come realizzare video al rallentatore?
-
5 Interessante cambia voce per rendere divertente le tue chiamate
-
Come invertire i video su Android?
-
Come ritagliare un video in Windows Media Player
-
Tutorial dettagliato per ritagliare video utilizzando Openshot
-
Guida passo dopo passo per ritagliare video usando Lightworks
-
Guida dettagliata per ritagliare video in Sony Vegas Pro
-
Come stabilizzare video gratuitamente con l'app Google Foto
-
Come creare un'introduzione sportiva e una schermata finale di YouTube?
-
Come creare video in stile cinematografico?
-
Recensione GoPro Quik e alternative per PC GoPro Quik 【2024】
-
Come ruotare un video su un dispositivo Android
-
Come eseguire il mirroring del mio video su Zoom
-
15 migliori musica royalty free per vlog
-
Come personalizzare autonomamente i terzi inferiori?
-
I 10 migliori film d'animazione di tutti i tempi [2022].
-
10 incredibili disegni di personaggi degli Anime per ispirarvi
-
A quale personaggio degli anime assomigli?
-
Guida passo passo allo storyboard
-
Garantiti 10 creatori di storyboard per rendere l'animazione più facile per voi
-
Quanto tempo ci vuole per modificare i video
-
Come aggiungere foto ai video Tik Tok
-
Come cambiare l'anteprima di un video su Google Drive
-
I 10 bot Discord più divertenti di cui avete bisogno nel 2022
-
Come rendere semplice la dissolvenza in nero dei video in movie maker
-
Come combinare più video in uno su Instagram
-
Passi per rimuovere il rumore di fondo dai video Sony Vegas
-
Come combinare diversi file Xvid in uno solo [Windows, Mac, Android, iPhone e Online].
-
10 migliori software gratuiti di conversione da testo a voce in spagnolo [Windows, Mac, Android, iPhone e online]
-
10 migliori siti web gratuiti di conversione da testo a voce in spagnolo
-
I 20 migliori software di sintesi vocale [Windows, Mac, Android, iPhone e online].
-
10 migliori generatori di voci per trailer di film [Windows, Mac, Android, iPhone e online]
-
10 migliori software di sintesi vocale gratuiti [Win, Mac, Android, iOS e online]
-
I 10 MIGLIORI PRODUTTORI DI VIDEO DI TESTO DA PARLARE
-
Come ruotare AVI in orientamento verticale/verticale [Windows, Mac, Android, iPhone e online]
-
Volete realizzare una presentazione video? Ecco come fare
-
Come creare una presentazione Adobe in modo semplice
-
Personalizzare l'icona della presentazione di PowerPoint in 8 semplici modi
-
Ispirazione video per la presentazione di un compleanno
-
Come aggiungere una presentazione in PowerPoint
-
Come creare una presentazione Pinterest in modo semplice
-
Come creare una presentazione in loop in PowerPoint
-
Come creare una presentazione in LinkedIn
-
I migliori 10 software per presentazioni 3D
-
I 5 migliori suggerimenti per il fermo immagine in After Effects
-
I migliori consigli per Camtasia Freeze-frame
-
Il modo migliore per bloccare il fotogramma in Final Cut Pro
-
Come fare il fermo immagine in Sony Vegas
-
I migliori 5 strumenti che vi aiuteranno a conoscere meglio le abilità di montaggio video con Freeze-frame
-
I 12 migliori esempi di montaggio video con Freeze Frame
-
Guida all'uso dell'effetto distorsione in Premiere Pro
-
15 Preset per il vibrazioni della telecamera per Adobe Premiere Pro
-
Come aggiungere il Camera Shake ai video in Adobe After Effects
-
Tecniche che non hai mai sentito per l'apprendimento dell'intelligenza artificiale YouTube
-
4 modi per aggiungere un bordo bianco ai video su mobile e desktop
-
Passaggi dettagliati per aggiungere un bordo al video con Premiere Pro
-
Che renderà più comprensibile il disegno estetico dei cartoni animati
-
Cos'è la GIF animata | Esempio di GIF e vantaggi della GIF
-
15 incredibili esempi di GIF Splitter da inserire nei preferiti nel 2022
-
Come creare un GIF con il logo Discord
-
Come creare Discord GIF PFP? [Risolto]
-
Come Creare un avatar GIF Discord in profondità Guida
-
Come creare GIF Emoji Discord
-
Volete sapere subito tutto sulle GIF di Discord?
-
La guida definitiva alle GIF per il profilo di Discord
-
10 Migliori rimuovi sfondo GIF gratuiti per PC e online
-
Alcuni fatti sullo sfondo delle GIF che non conoscevate
-
Quali sono i 10 migliori creatori di GIF?
-
Come creare GIF con Photoshop in modo semplice al 100%
-
Modi semplici per creare GIF con Procreate
-
Come fare una GIF con sfondo trasparente su PC
-
6 strumenti online per la conversione istantanea da mp4 a GIF
-
Come creare un vlog divertente per TikTok?
-
Idee per un perfetto Café Vlog
-
Come utilizzare il colore Lumetri in Adobe After Effects
-
Le 10 migliori videocamere per il vlogging per i principianti
-
Passi per ruotare i video in Lightworks
-
Passi dettagliati per ruotare i video con Kdenlive
-
Passo dopo passo per ruotare i video utilizzando OBS
-
Come schiarire i video in Premiere Pro
-
Le 5 migliori soluzioni per il montaggio video di OBS Studio
-
Passo dopo passo per ruotare i video in Davinci Resolve
-
4 metodi per ridimensionare un file WebM
-
I migliori 6 ritagli di MP4 online
-
2 Metodi per tagliare i video in VLC su Windows
-
Passi dettagliati per ruotare un video con KMPlayer
-
Passo dopo passo per ridimensionare i video in Davinci Resolve
-
Tutto quello che c'è da sapere sulla gradazione del colore in fotografia
-
Come classificare le immagini in LightRoom
-
Guida utile per velocizzare/ridurre i video in VLC
-
Una guida completa su QuickTime Player
-
2022 Guida di 8 applicazioni per collage di foto per PC
-
8 Collage di foto gratuiti con la creazione di video musicali
-
Come realizzare i collage di Canva
-
Qualcosa che dovreste sapere sul formato video MP4
-
Passo dopo passo per ritagliare i video con CyberLink PowerDirector
-
Modo pratico per ridimensionare i video in freno a mano
-
Tutorial dettagliato per ruotare i video in Cyberlink PowerDirector
-
Pattinaggio di velocità su pista corta Olimpiadi 2022 Highlights
-
Guida dettagliata per unire i video in VLC Media Player
-
Come DIY VHS Overlay in After Effects ?
-
I 8 migliori siti per scaricare Glitch Transition per Premiere Pro
-
Come creare l'effetto Datamoshing alle vostre riprese in After Effects?
-
Come ottenere il filtro VHS e il filtro Glitch sulle immagini o sui video?
-
Come si crea un effetto glitch in After Effects?
-
I migliori film con schermo verde
-
Come ruotare un video in Windows 10: i 5 metodi utili [2024]
-
Come si possono creare filmati nel Google Photos Software? [Suggerimenti per desktop e dispositivi mobili].
-
Idee creative per l'illuminazione Stop Motion
-
10 siti web consigliati per scoprire fantastici modelli video Premiere Pro
-
10 modelli gratuiti di logo per After Effects per creare intro di logo
-
Come aggiungere bordi ai video online
-
4 idee per creare video spaventosi ad Halloween
-
I 5 Programmi Migliori per Rimuovere il Rumore nel 2022
-
Come Rimuovere il Rumore dai Video con Adobe Premiere Pro - Rimozione Rumore Audio e Video
-
Come Rimuovere il Rumore Digitale e Ambientale con After Effects – Rimozione Rumore Audio e Video
-
Le 5 Soluzioni Migliori per Rimuovere il Rumore dai Video
-
I 10 Software Gratuiti Migliori per Convertire la Voce in Testo
-
Come Scegliere il Corso di Montaggio Video Più Adatto alle Proprie Esigenze
-
Come Ridurre il Rumore con Final Cut Pro – Riduzione Rumore Audio e Video
-
I 10 Editor Video Online Gratuiti Migliori del 2022
-
Guida Rapida Completa alla Progettazione di Sequenze Temporali
-
Come Aumentare la Durata dei Video
-
Guida all'Utilizzo dei Bot per Giocare su Discord
-
La Guida Definitiva a Craig (Bot di Discord)
-
Guida Completa ai Server Boost di Discord (2022)
-
Guide e Consigli sulla Creazione e sull'Uso degli Account Discord
-
Come Realizzare un Video Elettorale
-
Come Unire i Video su TikTok
-
Le 8 Soluzioni Migliori per Aggiungere Emoji alle Foto Online
-
I Metodi Migliori per Aggiungere Emoji alle Immagini su iPhone e Android
-
Come Aggiungere Emoji ai Post di LinkedIn – 5 Consigli Imperdibili
-
Le 5 Soluzioni Migliori per Aggiungere Emoji su iPhone
-
Come Aggiungere le Emoji su Mac in Meno di 10 Minuti
-
6 Metodi Veloci per Creare Presentazioni su Windows 10
-
I Metodi Migliori per Creare Presentazioni su TikTok [Risolto] 2022
-
Come Velocizzare le Immagini nelle Presentazioni di TikTok
-
5 Metodi Per Creare Una Finta Videochiamata di FaceTime
-
I 10 Convertitori di Testo in Voce Robotica Migliori [Windows, Mac, Android, iPhone e Online]
-
I 10 Generatori di Voce Fuori Campo Migliori [Windows, Mac, Android, iPhone e Online]
-
I 10 Strumenti di Sintesi Vocale Migliori per Creare Meme (su Windows, Mac, Android, iOS e Web)
-
Come Tagliare Video Senza Usare FFmpeg su Mac
-
Recensione dei 20 Creatori di Presentazioni Migliori Online, per Windows e per Mac
-
La Guida Definitiva alla Creazione di Presentazioni con Musica
-
I Migliori Creatori di Presentazioni Gratuiti Senza Filigrana
-
Come Creare una Presentazione con l'iPhone
-
I Trucchi Migliori per Creare Presentazioni Fotografiche
-
Come Creare Presentazioni con OBS
-
Come Creare una Presentazione con Movavi Slideshow Maker
-
Come Creare Presentazioni Personalizzate con PowerPoint
-
Come Creare Presentazioni con Clideo
-
La Guida Definitiva all'Utilizzo di VLC Media Player
-
Elenco Completo dei Formati Video Supportati da WhatsApp
-
Il Metodo Migliore per Dividere i Video in Più Parti Online
-
Come Dividere i Video con Lightworks [Guida Dettagliata]
-
Guida Completa alla Divisione dei Video con VLC
-
Come Creare Intro e Outro per Video di Cucina di un Canale YouTube
-
Come Creare Video di Gameplay con Schermo Verde
-
Modelli di Intro per Video Gratis per Adobe After Effects
-
La Guida Definitiva alla Distorsione dell'Obiettivo
-
4 Consigli Utili per Utilizzare OpenShot
-
Guida allo Speed Ramping - Come Velocizzare e Rallentare i Video
-
Come Modificare il Video Registrato
-
Trovare i migliori siti web di GIF è facile come una torta : ecco cosa sapere
-
Come creare una GIF di presentazione?
-
5 metodi collaudati per la creazione di GIF
-
Suggerimenti utili per i video Tiktok [Rapporto d'aspetto incluso].
-
Come modificare i file video FLV con FLV Editor [Windows, Mac, Android, iPhone e Online].
-
Formato video supportato da Powerpoint e suggerimenti per l'utente
-
Pattinaggio artistico Highlights 2022
-
Come usare l'effetto Twixtor per creare video al rallentatore?
-
Dividere i video in VSDC [Passo dopo Passo]
-
Come ritagliare un video in Davinci Resolve [passo dopo passo]
-
10 migliori siti di modelli di grafica in movimento gratuiti per After Effects e Premiere Pro
-
Come aggiungere bordi ai video su Windows e Mac
-
I 12 Modelli Migliori per Creare Slideshow e Presentazioni di Marketing
-
Consigli Utili per la Realizzazione di uno Slideshow di Viaggio
-
Come Creare uno Slideshow delle Vacanze in 5 Minuti
-
Tutto Quello che Serve Sapere sugli Slideshow Matrimoniali
-
I 15 Esempi di Slideshow e Presentazioni Migliori e Più Apprezzati dal Pubblico
-
Le 20 Canzoni Migliori da Usare negli Slideshow per il Diploma
-
5 Consigli per Trarrei il Massimo da Aquasoft Slideshow
-
10 Esempi Straordinari di Applicazioni Video AR
-
Gli 8 Videogiochi in Realtà Aumentata Migliori
-
10 Esempi di Utilizzo Innovativo della Realtà Aumentata nel Mondo dell'Educazione
-
Conferenze con Realtà Aumentata: Il Futuro della Collaborazione sul Lavoro?
-
Le 8 Applicazioni AR Migliori per Android e iOS | Alla Scoperta della Realtà Aumentata
-
Le 10 Applicazioni AR Migliori
-
I 11 Software Più Efficaci per Migliorare la Qualità dei Video
-
Recensione di Topaz Video Enhance AI e Guida alla Conversione dei Video
-
Risposta Rapida: Qual è Il Segreto del Successo dei Ritratti AI di Filmora?
-
La Guida Definitiva alla Creazione di Video con Canzoni
-
La Guida Definitiva alla Musica per iMovie
-
Come Creare Un Video di Foto con Musica
-
Come Aggiungere Musica ai Video su Windows 11
-
I 4 Metodi Migliori per Aggiungere Bordi Bianchi ai Video su Dispositivi Mobili e Computer.
-
Risposta Rapida: Cosa Sono e a Cosa Servono i Loghi Trasparenti
-
Guida Completa alla Rimozione dello Sfondo e alla Conversione delle Immagini JPG in PNG
-
I 10 Strumenti Online Migliori per Creare Immagini con Sfondo Trasparente
-
I Metodi Migliori Per Creare Immagini con Sfondo Trasparente
-
Come Rimuovere Facilmente lo Sfondo delle GIF Trasparenti
-
Le Applicazioni Migliori per Creare Video da Foto
-
Le 5 Applicazioni Migliori per Aggiungere Canzoni ai Video
-
La Guida Definitiva all'Aggiunta di Musica di Apple Music ai Video
-
Trucchi e Suggerimenti per Convertire i Video AVI in GIF e Viceversa
-
Guida Completa alla Conversione delle GIF in Formato SVG
-
Convertire le GIF in JPG Non è Mai Stato Così Semplice [2022]
-
La Guida Definitiva alla Creazione di GIF Virali
-
Ecco Perché Migliaia di Persone Impazziscono per ezGIF
-
Guida alla Correzione dei Colori con After Effects (Con Video Tutorial)
-
Guida Dettagliata alla Correzione dei Colori con OBS
-
I 15 Vlogger di Viaggio Migliori da Cui Trarre Ispirazione nel 2022
-
8 Consigli Utili per Applicare Una Gradazione del Colore Cinematografica ai Video
-
Guida Dettagliata alla Rotazione dei Video con Blender
-
Come Ruotare i Video Usando Handbrake
-
Guida Dettagliata alla Rotazione dei Video con CapCut
-
Come Usare le LUT con Adobe Premiere Pro
-
Come Eseguire la Gradazione dei Colori con le LUT
-
Come Sfocare Oggetti e Soggetti Statici e in Movimento nei Video
-
Introduzione Base alla Gradazione dei Colori con LumaFusion
-
Come Ruotare i Video con iMovie [e con un Software Alternativo]
-
Guida al Download e all'Uso delle Migliori Applicazioni per Unire Video su Android
-
Come Unire Più Video con l'iPhone
-
Come Velocizzare i Video con Splice
-
Introduzione al Formato TS e Guida alla Riproduzione dei Video TS
-
Introduzione al Formato MOV e Guida alla Modifica Creativa dei Video MOV
-
Come dividere lo schermo su Tiktok
-
Come dividere una clip in After Effects
-
Come convertire una GIF in un video per Instagram
-
Modi gratuiti per dividere i video per lo stato di Whatsapp su tutte le piattaforme
-
10 modi efficaci per convertire facilmente YouTube in MOV [PC e online]
-
Personalizza e scarica i modelli di video outro gratuiti
-
Zoom su CapCut: ecco come farlo
-
Come ingrandire Discord
-
Come utilizzare Zoom su Google
-
Guida facile per ingrandire i video in VLC
-
I modi migliori per sfocare lo sfondo dello zoom gratuitamente
-
Come ingrandire la webcam su PC
-
Come abilitare e utilizzare OBS Zoom Camera
-
I 5 migliori convertitori video online per Instagram 2022
-
Come usare Kahoot! su Zoom
-
I 10 migliori convertitori da GIF a JPGPNG
-
Come utilizzare l'effetto visivo per lo zoom
-
Come ingrandire l'immagine nell'immagine [soluzione semplice]
-
Come ottenere lo zoom sulla TV [Soluzioni facili]
-
Come ingrandire lo schermo del desktop
-
Come ingrandire PowerPoint [Metodi facili]
-
Come ingrandire e rimpicciolire su Mac
-
I Convertitori Migliori per Video da Pubblicare su Twitter
-
Come Effettuare lo Zoom nei Video di TikTok
-
I 5 Downloader Migliori per Scaricare Video da Pinterest nel 2022
-
Le 10 Applicazioni Migliori per Scrivere sulle Foto con Telefoni iOS e Android (2022)
-
Le Applicazioni di Riconoscimento Vocale Gratuite Migliori per Mac
-
Tutto Quello Che C'è Da Sapere sulla Tecnologia del Riconoscimento Vocale
-
Come Creare Un Video di Foto con Pixiz
-
Come Sovrapporre le Foto sul Computer (Desktop e Online)
-
Le 10 Applicazioni Gratuite Migliori per Sovrapporre Immagini su Android e iPhone
-
Come Convertire le Immagini in Video (Guida per Kapwing)
-
Come Effettuare lo Zoom con Videoleap
-
Come Usare Zoom su Xbox One
-
Come Usare il Servizio di Riconoscimento Vocale di Microsoft Azure
-
Come Eseguire la Digitazione Vocale (Dettatura) con Microsoft Word
-
Come Aggiungere la Data alle Foto
-
Come Aggiungere Testo alle Foto su Windows e Mac (2022)
-
Guida Completa al Servizio di Riconoscimento Vocale di Documenti Google
-
È Possibile Effettuare il Riconoscimento Vocale con PowerPoint?
-
I 3 Metodi Migliori per Convertire le Riunioni di Zoom
-
Come Effettuare lo Zoom su Roblox
-
I 10 Modi Migliori per Convertire i Video di YouTube in MPEG
-
Come Convertire i Video di YouTube in MP4 con VLC Media Player
-
Come Effettuare lo Zoom in Minecraft
-
Come Effettuare lo Zoom con Kinemaster
-
Come Usare Zoom Tramite Gmail
-
Come Effettuare lo Zoom su Google Meet
-
Il Modo Migliore per Usare Zoom con Skype
-
Le Webcam Migliori da Usare con Zoom
-
I 10 Programmi Migliori per Applicare lo Zoom ai Video
-
Il Modo Più Semplice per Aggiungere Transizioni ai Video
-
Guida Pratica all'Applicazione dell'Effetto Zoom Lento ai Video
-
Panoramica Completa di VSCO Video Editor
-
Guida all'Aggiunta di Sovrapposizioni ai Video con Premiere Pro
-
Come Aggiungere l'Effetto Mosso con After Effects
-
I 10 Migliori Convertitori di Video Gratuiti per WhatsApp nel 2023
-
Come Aggiungere la Dissolvenza in Nero con Premiere Pro
-
Come Applicare la Dissolvenza in Entrata al Testo con Adobe Premiere Pro
-
Guida all'Aggiunta di Effetti di Transizione con Premiere Pro
-
Le 10 Applicazioni Migliori per Aggiungere Adesivi alle Foto su iPhone e Android (2022)
-
Guida Semplice e Completa all'Aggiunta di Foto su Instagram
-
Come Aggiungere Font in After Effects
-
I Software e Siti Migliori per Aggiungere Cornici alle Foto nel 2022
-
Come Aggiungere Filtri con iMovie
-
Come Aggiungere Espressioni con After Effects
-
Come Aggiungere Effetti su TikTok
-
Come Aggiungere Effetti con Premiere Pro
-
Come Aggiungere Transizioni Personalizzate con OBS
-
I 7 Modi Più Semplici Per Convertire i Video in GIF Online
-
I 3 Metodi Migliori per Comprimere Video per IGTV, Feed e Storie di Instagram
-
Che cos'è Mukbang e come realizzare video Mukbang
-
Crea un Video per un Brand per Far Brillare il tuo Business!
-
I Migliori Convertitori da GIF a MP4
-
I Migliori Convertitori di Immagini (JPG/PNG) in GIF
-
I Migliori Convertitori Online da GIF a Immagine (PNG/JPG)
-
I Migliori Convertitorida GIF a AVI
-
Gli 8 Migliori Convertitori Online da GIF a APNG
-
I 10 Migliori Convertitori da Video a GIF: Scelte Top
-
I Migliori Software o Siti Web per Convertire il Formato dei Video nel 2022
-
Come Convertire Video di Twitter in GIF?
-
Come Convertire Video in Slow Motion?
-
Come Convertire GIF Animate da un Video
-
Come Convertire Video di Facebook in MP4 720p/1080p/HD Online e Gratuitamente?
-
Come Ruotare i Video su Windows Media Player
-
Alcuni Fatti che Poche Persone Conoscono Su Come Rendere Gli Sfondi Trasparenti Su Canva
-
Come ottenere Filmora gratuitamente senza crack [2023]
-
Migliori 15 Idee di Progetti Video Creativi per Studenti di Tutte le Età
-
Ritaglia i Video con QuickTime Player su Mac
-
30 Fantastiche Idee di Bio per Clubhouse e Consigli per Ispirarti
-
I 15 Migliori Modelli Alla Moda di Diapositive per After Effects [Gratuiti per l'Uso]
-
Le 10 Migliori Intro Gaming Panzoid Adatte agli Influencer del Gaming
-
Gli 8 Migliori Modelli di Storyboard Video e Come Creare le Storyboard
-
I 10 Migliori Modelli di Iscrizione per Aiutarti ad Attrarre Più Follower
-
Come Aggiungere la Firma su Outlook nel 2022
-
Come fare la Ricerca Immagini Inversa su Facebook
-
Codice Coupon Ufficiale 100% Valido per Wondershare Filmora [Fino al 54% di Sconto]
-
Come si fa a sfocare lo sfondo nelle Riunioni di Teams? [Desktop e cellulare]
-
Le 10 Migliori Alternative a Popcorn Time
-
Come utilizzare Chroma Key in Cyberlink PowerDirector
-
Come ritagliare video con PowerDirector di CyberLink
-
Tutorial per principianti: come utilizzare Cyberlink PowerDirector
-
Come sfocare i volti nelle foto [Miglior software di fotografia per computer e smartphone]
-
Come ruotare un video su VLC Media Player
-
Come Montare video in Apple MacBook Air M1
-
Apple MacBook Air vs MacBook Pro: quale laptop M1 è migliore?
-
Tutorial Openshot: come aggiungere testo in Openshot
-
Come eseguire l'aggiornamento a Windows 11 nel 2022?
-
5 modelli più popolari di introduzione di Filmora perfetti per qualsiasi video
-
Come rimuovere o modificare lo sfondo di un video? [2022]
-
Come Rimuovere la Filigrana di Filmora [2024]
-
Convertire TikTok in MP4 Senza Filigrana: i Migliori Downloader di TikTok
-
Miglior 6 Creatori di GIF Glitch per Creare GIF con Effetto Glitch
-
Come Renderti Cartone - Diventare cartone
-
Come Creare un Video su Lavagna Bianca Passo per Passo
-
Come Creare l'Effetto di Tremolio Videocamera
-
Come creare uno straordinario effetto Glitch in Photoshop?
-
Iscriviti a Green Screen - Semplifica l'aggiunta di CTA video di YouTube
-
I migliori convertitori di video in testo di YouTube online (2024)
-
Guida tutorial per animare le immagini su Canva
-
Come Creare Video Didattico-Formativi Eccezionali nel 2022
-
I 9 Strumenti Online Migliori per Registrare da Microfono
-
I Migliori Strumenti Editor per Creare Sottotitoli Video
-
Come Creare Video Split Screen con Final Cut Pro
-
Come Aggiungere Più Video Nella Stessa Schermata su Mac
-
Rimuovere il Silenzio da Video: Migliori 8 Eliminatori su PC
-
Come Fare un Video di Pesce d'Aprile Facile con Filmora?
-
Le migliori 10 web series su Netflix-Web series su Netflix perfette per te!
-
Come aggiungere l'effetto ali di neon nel montaggio video di PUBG
-
Come usare il Luma Key durante l'editing di un video sul Mac
-
Domande frequenti su Chroma Keying
-
Come usare lo schermo verde Elgato con FilmoraX
-
Guida all'allestimento di uno studio con schermo verde
-
Consigli sull'utilizzo dello Schermo Verde
-
Cos'è lo Schermo Verde di Zoom?
-
Come creare un'immagine in movimento su Mac
-
Come creare una GIF da un video su Mac
-
Come Scaricare I Video Stati di WhatsApp: Una Guida Completa
-
Come creare un video in loop
-
Come Creare e Usare i File Proxy per Accelerare il Processo di Modifica dei Video
-
Come Ridurre Facilmente il Rumore in Audacity e in FilmoraPro.
-
Come Animare Facilmente il Testo nei Video con FilmoraPro
-
10 migliori lenti Fisheye ( a occhio pesce) per iPhone e Android su Amazon
-
15 Migliori Generatori Meme [Online, PC & Mac]
-
Come Risolvere i Problemi di Incompatibilità di PowerDirector MP4
-
Risoluzione video non supportata: Risolto
-
12 Step per un Miglior Editing Video
-
Come Aumentare la Luminosità di un Video
-
Video Splicer: Crea Facilmente un Filmato Continuo Con le Tue Brevi Clip
-
Ridimensionamento Video per Mac: Come Ridimensionare Video su Mac
-
Mixer video: come mixare più video su Mac/Windows
-
Editor video di Instagram: come modificare i video per Instagram
-
Fusione VOB: Come unire/combinare file VOB
-
Creatore di video HD: Come fare un video HD
-
Come ruotare i video MOV in Mac/Windows
-
Editor MOV: come modificare i file MOV su Mac/Win (incluso Windows 10)
-
Ottieni un potente editor video a 64 bit (Windows 8&10 incluso)
-
Top 5 Video Cutter gratuiti online: come tagliare i video online
-
Ritaglia video su Mac: come ritagliare un video su Mac (Mojave incluso)
-
Filigrana nei Video: Come Filigranare un Video con Video o Foto
-
Magic Movie Maker: come realizzare facilmente filmati e presentazioni dall'aspetto professionale
-
I 10 Migliori Film Educativi per Studenti
-
Le migliori 6 app gratuite di conversione video per Android
-
Le migliori applicazioni per scaricare video per telefoni e tablet Android
-
Top 8 migliori video trimmer MP4 gratuiti
-
Suggerimenti per la Riproduzione di File Audio M4A su Dispositivi Android
-
Top 3 migliori applicazioni per leggere FLAC su Android
-
Top 10 Free MP3 Joiner: Come unire file MP3 gratis!
-
Come modificare dei video con template video?
-
6 I Migliori Effetti Video Online per Creare Video Pluripremiati
-
Convertitore da MP3 a Video: Converti MP3 in Video
-
Video Trimmer Mac: 3 modi affidabili per tagliare i video clip su Apple Mac OS
-
Come girare un video con schermo verde
-
Come Aggiungere Transizioni Video e Audio tra Scene/Clip
-
Dividi il tuo video in sub clip con il rilevamento automatico della scena
-
Testi e titoli: Come aggiungere titoli, testi e crediti ai video
-
Come modificare la luminosità del video su PC, iPhone e online
-
Come Zoommare il Video Dopo Che È Stato Registrato o Salvato
-
Sai Come Schiarire un Video Scuro?
-
Come modificare i fotogrammi video su Windows
-
Come abbassare il volume dei file multimediali
-
Come realizzare un video con foto e musica
-
Come ridimensionare i file MP4 (MPEG/MPG) per dimensioni più piccole
-
Come Accorciare un Videoclip
-
Come ridurre facilmente le dimensioni dei file video su Win/Mac/Online
-
Come Cambiare la Forma di un Video?
-
6 migliori strumenti per creare e modificare i video MKV
-
Editor MPEG - Come modificare i file video MPEG
-
Top 5 Fusori di Video Online Gratuiti nel 2021
-
Come Scaricare i Video Dailymotion: 3 Semplici Modi per Te
-
Come Accorciare i Video sul Mac
-
I 15 migliori programmi TV di Amazon Prime Video [Aggiornato al 2021]
-
Cos'è Elgato Green Screen?
-
Come Fare un Video con Schermo Verde Senza Schermo Verde sul Mac
-
Come fare uno Schermo Verde Portatile/Fatto in Casa
-
Come creare GIF da foto su Mac?
-
Come tagliare un video su Mac senza usare FFmpeg?
-
"Come tagliare, ridimensionare e comprimere video MOV su Mac?
-
Come realizzare un video adatto alle dimensioni di Snapchat su Mac?
-
I migliori formati di file video per l'editing e la condivisione
-
Come tagliare video AVI su Mac? (facile e veloce)
-
Come tagliare/rifilare video in VLC su MacOS?
-
Easy Blender 2.8 Tutorial: animazione dei keyframe per utenti Mac
-
Come utilizzare le animazioni dei fotogrammi chiave in Final Cut Pro X
-
5 suggerimenti per accorciare la durata di video su Mac
-
Tutorial sul monitoraggio della fotocamera di Blender per principianti Mac
-
Come eseguire il rilevamento del movimento con After Effects su Mac
-
Come utilizzare 3D Camera Tracker in After Effects su Mac
-
Tracciamento del movimento in Final Cut Pro su Mac: guida completa
-
Tutorial Blender 2.8: Motion Tracking su Mac
-
Come Scaricare Amazon Prime Video su Computer, Android e iPhone
-
Video Editor per Samsung: Come Modificare i Video Samsung [Su PC e Mobile]
-
I 5 Software Gratuiti Migliori per Modificare i File M4A
-
Come Accorciare, Tagliare o Dividere i Video MP4 (MPEG/MPG)
-
I 7 Software e Strumenti Migliori per Stabilizzare Video
-
Il modo più semplice per sfocare le immagini nei video
-
Come convertire le GIF in video: La guida definitiva
-
Qual è il miglior formato video per YouTube/Editing/FB/Ins?
-
10 migliori programmi per video musicali per realizzare fantastici MV
-
8 migliori modelli di After Effects per il compleanno
-
Come Tagliare o Ritagliare Video Clip su iPhone/iPad
-
Come Invertire i Colori nei Video: I migliori programmi su PC
-
Software per Aggiungere Loghi o Filigrana di Brand in video
-
Cos'è Il Keyframing - Guida per Principianti (Semplicissima)
-
I 9 Migliori Siti Web di Serie Web per Scaricare Serie Web
-
Come Aggiungere Sottotitoli a un Video [2022]
-
Come mettere in loop un video su iPhone?
-
Splice Video Editor per PC: Giuntare facilmente i video su PC
-
10 Siti per Guardare Web Serie GRATIS!
-
I Migliori Downloader per Video di Reddit (Aggiornato al 2021)
-
Come Montare Video: La Guida Definitiva per Principianti
-
Come tagliare video online gratuitamente?
-
Come fare video con un iPad Pro?
-
Come Aggiungere Foto ai Video [3 Passaggi]
-
Come Capovolgere Facilmente i Video
-
Come Trasferire i Video da Videocamera a Computer con USB/FireWire
-
Come Aggiungere Immagini ai Video (Effetto PIP)
-
Come Riprodurre i Video al Contrario
-
Come Modificare Video MP4 su Computer Mac e Windows (anche Windows 8)
-
Come Migliorare Rapidamente la Qualità dei Video [2024]
-
Come Aggiungere Immagini ai Brani Musicali (MP3): Una Guida Definitiva
-
Come Cambiare Facilmente la Risoluzione Video su Windows e Mac
-
Come Rimuovere i Sottotitoli da un Video MKV, MP4, AVI
-
Come Rimuovere i Loghi dai Video
-
Stabilizzazione Video: Come Stabilizzare un Filmato Video Mosso
-
Come Ritagliare le Video Clip (YouTube incluso)
-
Come Tagliare/Dividere/Ritagliare Video Senza Perdita di Qualità
-
Come Aggiungere un'Immagine a MP3 [Soli 3 Passi]
-
Come Aggiungere Rapidamente del Testo al Video
-
Come Sistemare i Video a Testa in Giù?
-
I migliori strumenti per estrarre l'audio da video online (2023)
-
Come ridurre le dimensioni di video e inviarli tramite email
-
15 Tipi di inquadrature che i principianti devono conoscere
-
Trimmer MP3 Gratuito per Mac: Guida Completa per Tagliare MP3 su Mac Gratuitamente
-
I 5 Migliori Compressori Video Gratuiti per Windows [2024]
-
Aggiungi una Barra Nera per Creare il tuo Video Cinematografico nel 2020
-
Come Ritagliare Video su Foto di Windows 10 Facilmente
-
Consigli per Fare il Tuo Primo Vlog
-
Come creare e modificare video su Windows 10
-
Come sfumare i video clip in entrata e in uscita
-
Come modificare le proporzioni tra 16: 9, 9:16, 4: 3, 1: 1 (Windows 10/11 inclusi)
-
I migliori app di video joiner per partecipare ai video
-
Come ridimensionare un video in proporzioni e dimensioni corrette
-
Come fare un video con multischermo
-
Come ruotare o capovolgere il video su Windows/Mac [3 metodi].
-
Come Velocizzare/Rallentare i Video [3 Modi Unici]
-
Come Fare una Ricerca Video Inversa su Google? [Solo 5 Passaggi]
-
Come Modificare i File MKV con MKV Editor per Mac / Win (Incluso Windows 10)
-
Video Cropper: Come Ritagliare i Video a Schermo Intero
-
8 Migliori Distorsioni Video da Usare Facilmente
-
Come Ridurre le dimensioni di Video: 10 Migliori Programmi Online Gratuiti
-
I 10 Migliori Generatori di Testo Animato [2023] (Efficaci 100%)
-
Gli 8 Migliori Tipi di Videografia Per La Produzione Video
-
I 6 i migliori software video per fare spiegazioni che dovresti provare
-
I 7 migliori software per fare Lyric video per PC e telefono (download gratuito)
-
Come Cambiare la Velocità di Riproduzione di un Video su Windows 10?
-
Guida di Montaggio Video Completa per Neofiti 2023
-
Come impostare il bilanciamento del bianco nei video registrati
-
I 10 migliori suggerimenti e trucchetti per iOS
-
Devo fare l'aggiornamento a iOS 10 o no
-
Come realizzare un video picture in picture su Mac OS sierra
-
Come modificare i video su macOS Sierra
-
I 4 migliori potenziatori di qualità video del 2016
-
I 5 migliori Video Frame Captures per Mac
-
Come girare un video lateralmente con un solo click
-
Come posizionare due video fianco a fianco
-
Come scegliere la migliore musica per il tuo progetto video
-
Come modificare il video di un viaggio
-
Suggerimenti per la creazione di ottimi video di viaggio
-
Come invertire i video
-
Come creare e modificare i video con Windows 10
-
Come Ridurre Dimensione AVI
-
Modifica Filmati QuickTime su Windows
-
Video Joiner: Come Combinare più Video
-
Rotazione MP4 su Mac/Win (Windows 8)
-
I 10 Top siti Torrent più popolari
-
MPEG Splitter: Come Split MPEG/MPG to Small Files
-
Video Watermark - Come Aggiungere Watermark Video
-
Come Ridurre Peso file video
-
Come Comprimere un Video con Wondershare Video Editor
-
Come Fare il Crop dei File MKV
-
Come Ridimensionare Video per Risoluzione e Dimensione (incluso Windows 8)
-
Come Fare un Video più Piccolo
-
Splice Video Editor per PC: Modificare Video su PC
-
Come Resize MKV Files
-
Come Tagliare Video MP4 (MPEG-4)
-
Come Mixare VOB
-
Come Tagliare File TS
-
Come ridurre le dimensioni di Video [2022]
-
Come diminuire Velocità di una Canzone senza Modificare la Tonalità
-
Come Aggiungere Musica di Sottofondo a Video su Windows/Mac
-
Come Ridurre Peso MOV Files
-
Crop Video: Come Modificare Dimensioni Video
-
Come Tagliare MOV Files
-
Come Ruotare MOV su Mac/Win
-
Illuminare Video Scuro su Mac/Win (incluso Windows 8)
-
Come Ruotare Video di 90 Gradi o di altra angolazione
-
Come Ridimensionare MP4
-
Cambiare Risoluzione da 4:3 a 16:9 e Viceversa [2024]
Transcript
So open Filmora and import your file. I already imported my file. Then drag your video into the timeline. Then drag the same video into the upper track. Then double click on the upper video and go "Transform," set the "Scale” value to 120, then click “OK."
Then go to "Effects" and search “Water.” Add the water effect to the upper video. Then double-click on this and go "Effect" section. Set “Emboss” to 0.10, and set “Steps” to 2. Let’s see a preview.
Okay, now double click on this and go “Mask." Then select the "Double Line” mask from here. Then go down and set this parameter. First, set the width to 25 and also set “Rotate” to 25. Then set the position out of the frame. Just drag like this. I set the position to -154. Then add a keyframe here. Then go 5 second later. Then just reverse the position value. I set it to 154. Let's check now.
So, as you can see, our first part animation is done. Okay, now, copy this and paste it on the upper track. Now you just need to reverse the animation. Go to the first keyframe, change rotate value to -25, and change position to 154. Then go to the second keyframe. Also, change the rotate value to -25 and set the position to -154. Let’s check now. So as you can see, our animation is done. In this way, you can add up-down animation or left-right animation.
Okay, now let's add text. Select the upper two videos and drag to 1 track higher. Then add text here, enter your text, and change font and size. Let's check now. So as you can see, our animation is done.
Tutorial: come ingrandire un'animazione su Filmora
Lo que necesitas preparar:
- Una computadora (Windows o macOS)
- Tus materiales de video.
- Editor de video Filmora
Importar Video en Filmora Edior
Primero, debes importar tu video a Filmora. Para hacer esto, debes hacer clic en la barra "Media" en la parte superior izquierda de la pantalla y luego presionar el botón "Importar Medios".
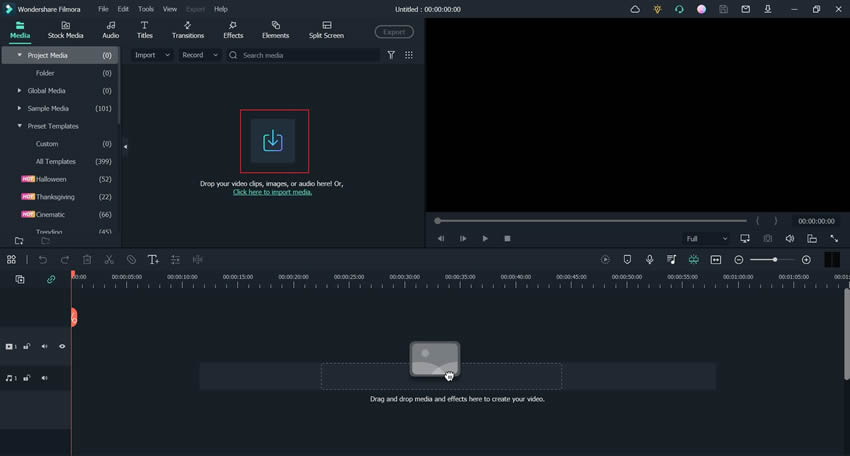
Trascina il video sulla sequenza temporale del progetto
Dopo aver importato il video, trascinalo nella sequenza temporale del progetto sottostante. Ripeti questo processo trascinando di nuovo lo stesso video nella sequenza temporale del progetto.

Applica una trasformazione al secondo video
Fare doppio clic sul video dello stesso secondo nella sequenza temporale e apparirà una finestra sullo schermo. Seleziona "Video", quindi fai clic su" Basic "e seleziona" Trasforma", dove puoi regolare i diversi margini e parametri dell'effetto di trasformazione. Dopo aver completato le modifiche, fare clic su OK.
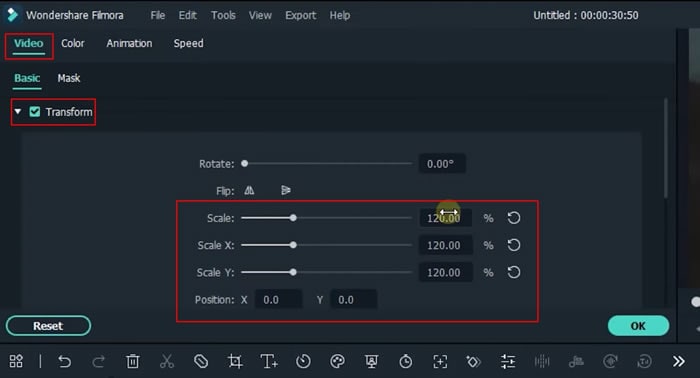
Aggiungi effetti per migliorare gli effetti visivi
Seleziona la barra Effetti dalla parte superiore dello schermo, cerca l'acqua e aggiungi l'effetto Acqua al video sopra la sequenza temporale del progetto. Quindi fai doppio clic sull'effetto sulla sequenza temporale e vedrai una finestra. Premi "Video" e seleziona "Effetti" nel menu fornito.
Usa l'opzione Zoom per regolare l'effetto, incluso impostare "rilievo" a 0.10, "passo" a 2 e "opacità" a 100. Puoi impostare i margini in base alle tue esigenze. Dopo aver cambiato, fare clic su OK.
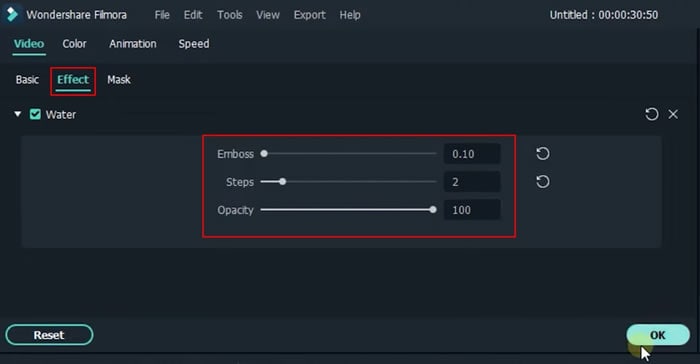
Integrate Masking Effect for Cinematic View
Again, double-click on your upper video and a window will open. Select "Video," then choose "Mask," and select "Double line" mask from the given options. To edit the mask, scroll down in the window and adjust the width, rotation, X and Y position, and other parameters as per requirements. After changes are done, click "Add" and add a keyframe by adjusting the playhead in the timeline.
If you need to apply reverse animation, it's possible. Simply right-click on the upper video with the keyframe, and select the "Copy" option. Click on "Manage tracks" and select "Add Video Track," and then again right-click and choose "Paste." A new track will be added with a second keyframe.
Now, on the first keyframe, change rotate value to, e.g., -25 and set position X at 154. Now, click on the ">|" icon and go to the second keyframe where you keep rotate value to 25 and position X to -154.
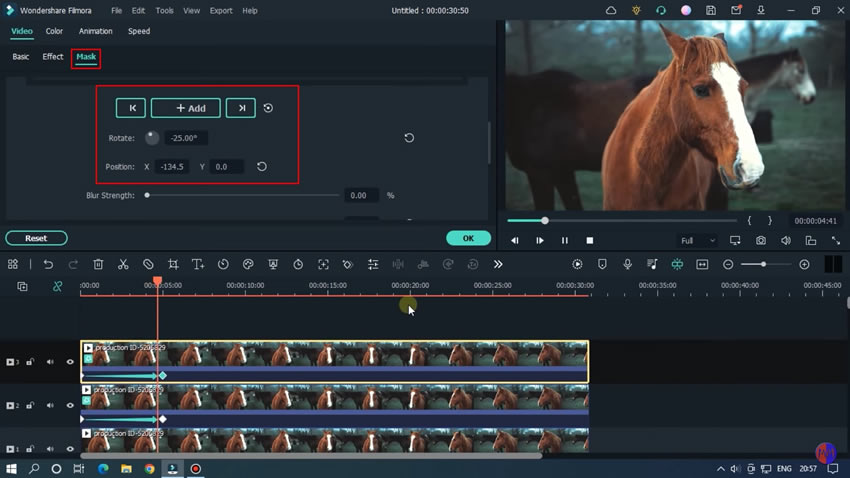
Add Titles, Play Your Video, and Export to Device
Your video with magnified animation is ready. You can also add the titles to your video from the “Titles” tab. Click on "Render Preview" for smooth video playback. Navigate to the "Export" button, set your desired file location, and your video will be successfully downloaded.
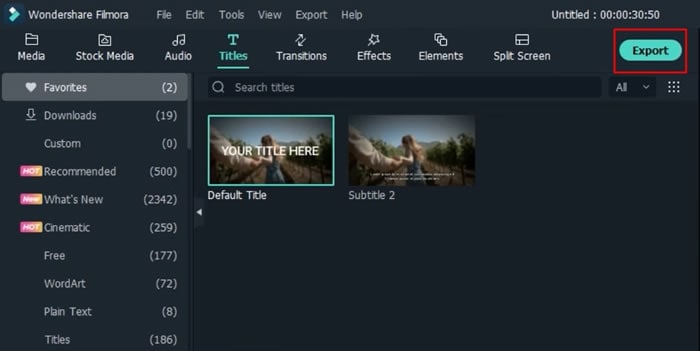
Videos are very close to us, and animations can make them more special and interesting. Thus, magnified animations are a great addition to all videos that inspire us because of the special objects in them. This tutorial on Filmora will help everyone design their videos with magnifying animation, as it provides easy-to-understand steps.
